


About the GemPages Sales Funnel
An eCommerce sales funnel describes the journey potential customers take from discovering your product to making a purchase.
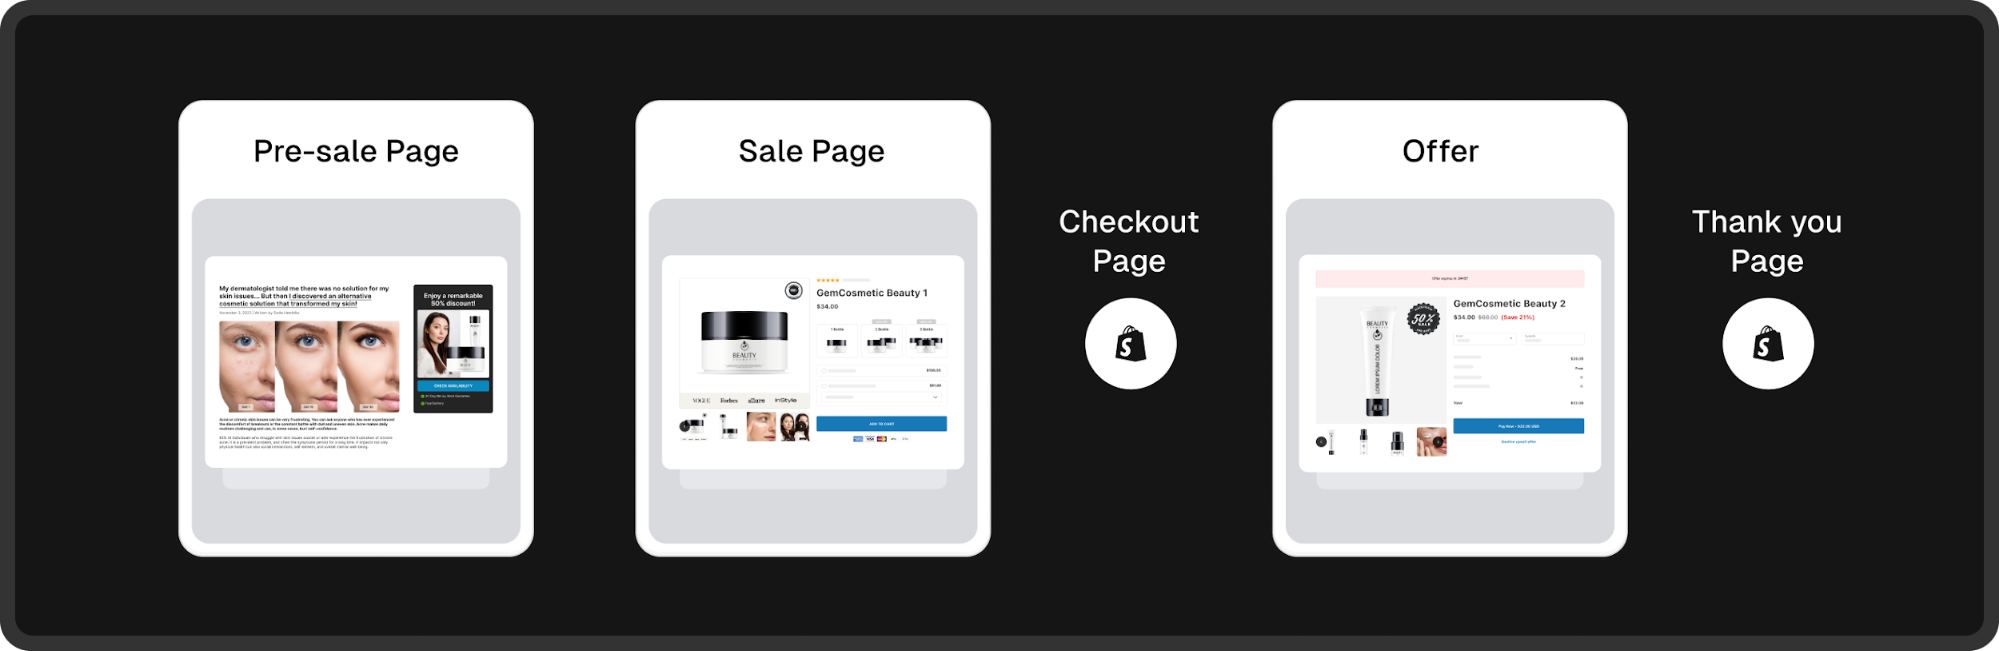
The funnel is divided into these key stages:
1. Pre-Sale Stage: After encountering an advertisement, customers are directed to a pre-sale page like an advertorial or listicle that promotes your product.
2. Sales Stage: Customers arrive at a product page containing all the necessary information for making a purchase decision.
3. Checkout Stage: Customers enter their details on this default Shopify page to complete their purchase.
4. Post-Purchase Stage: After completing a purchase, customers are shown upsell offers for related products.
5. Thank-You Stage: This final stage involves sending a thank-you message to customers.
While the checkout and thank-you pages are the default Shopify pages, the other stages can be customized using GemPages.
GemPages Sales Funnel is a feature designed to help eCommerce businesses create and optimize effective sales funnels within their Shopify stores.
Benefits of using Sales Funnel in GemPages
Here’s what GemPages Sales Funnel can help with:
- Add and design post-purchase upsells/downsells.
- GemPages’ Sales Funnel allows you to customize up to two offers after payment is completed.
- Implement A/B testing with comprehensive metric reports, enabling sellers to fine-tune their pricing strategies.
- Optimize for desktop, tablet, and mobile devices.
Sales Funnel Pricing
All GemPages plans can use the Sales Funnel feature, but with different upsell revenue limits:
#1. Free and Build Plans: Limited to $100 in upsell revenue per month.
The GemPages Sales Funnels feature is available on all plans, including Free and Build plans, and can be used for free with an upsell revenue limit of $100 per billing cycle.
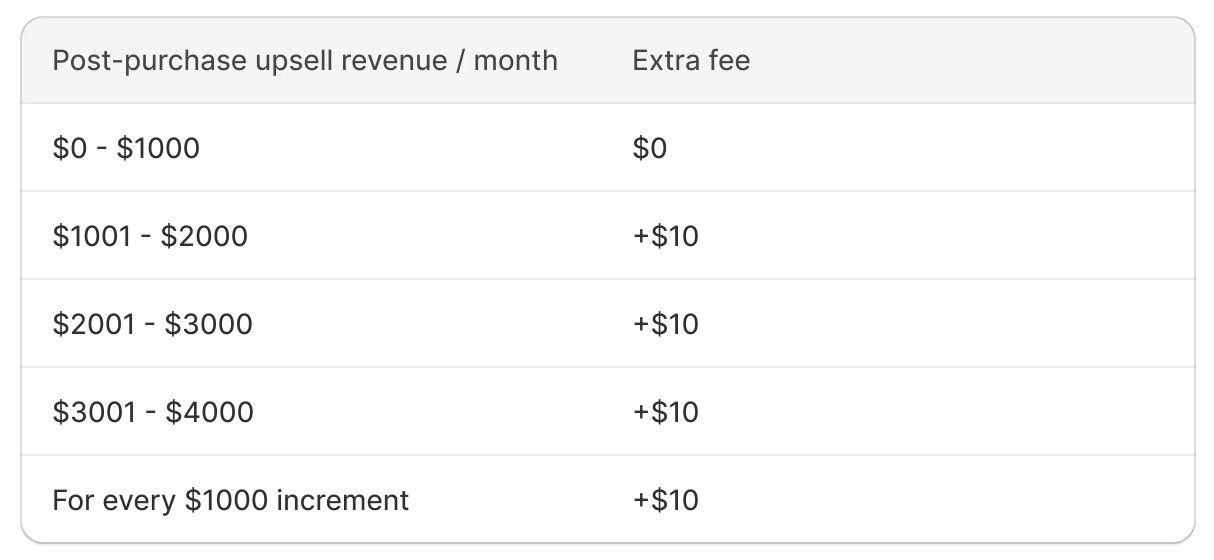
#2. Optimize Plan: No revenue limit! You won’t pay any commission on your first $1,000 in revenue. Once you exceed that amount, a fee of $10 will be charged for every incremental $1,000 in revenue. Refer to this for more details:
#3. Enterprise Plan: No commission fee, forever.
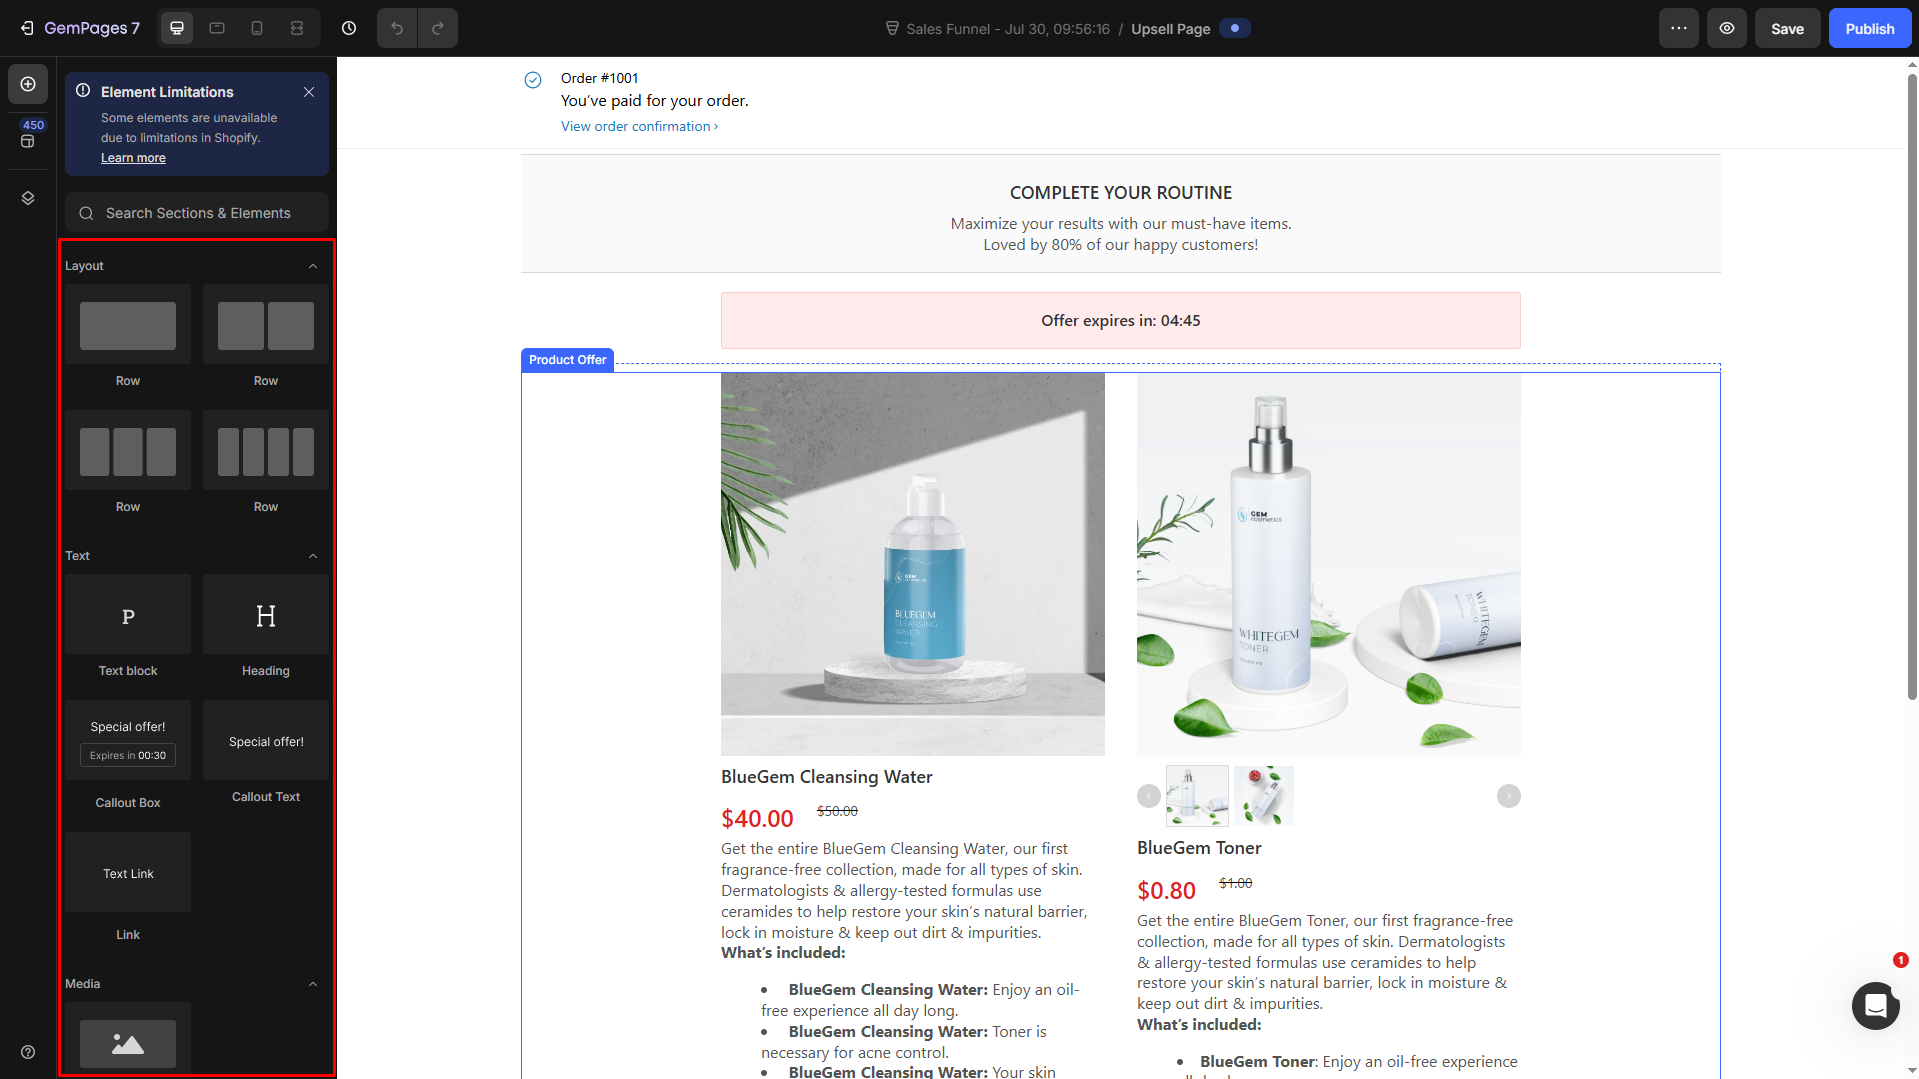
How to Create a Sales Funnel in GemPages?
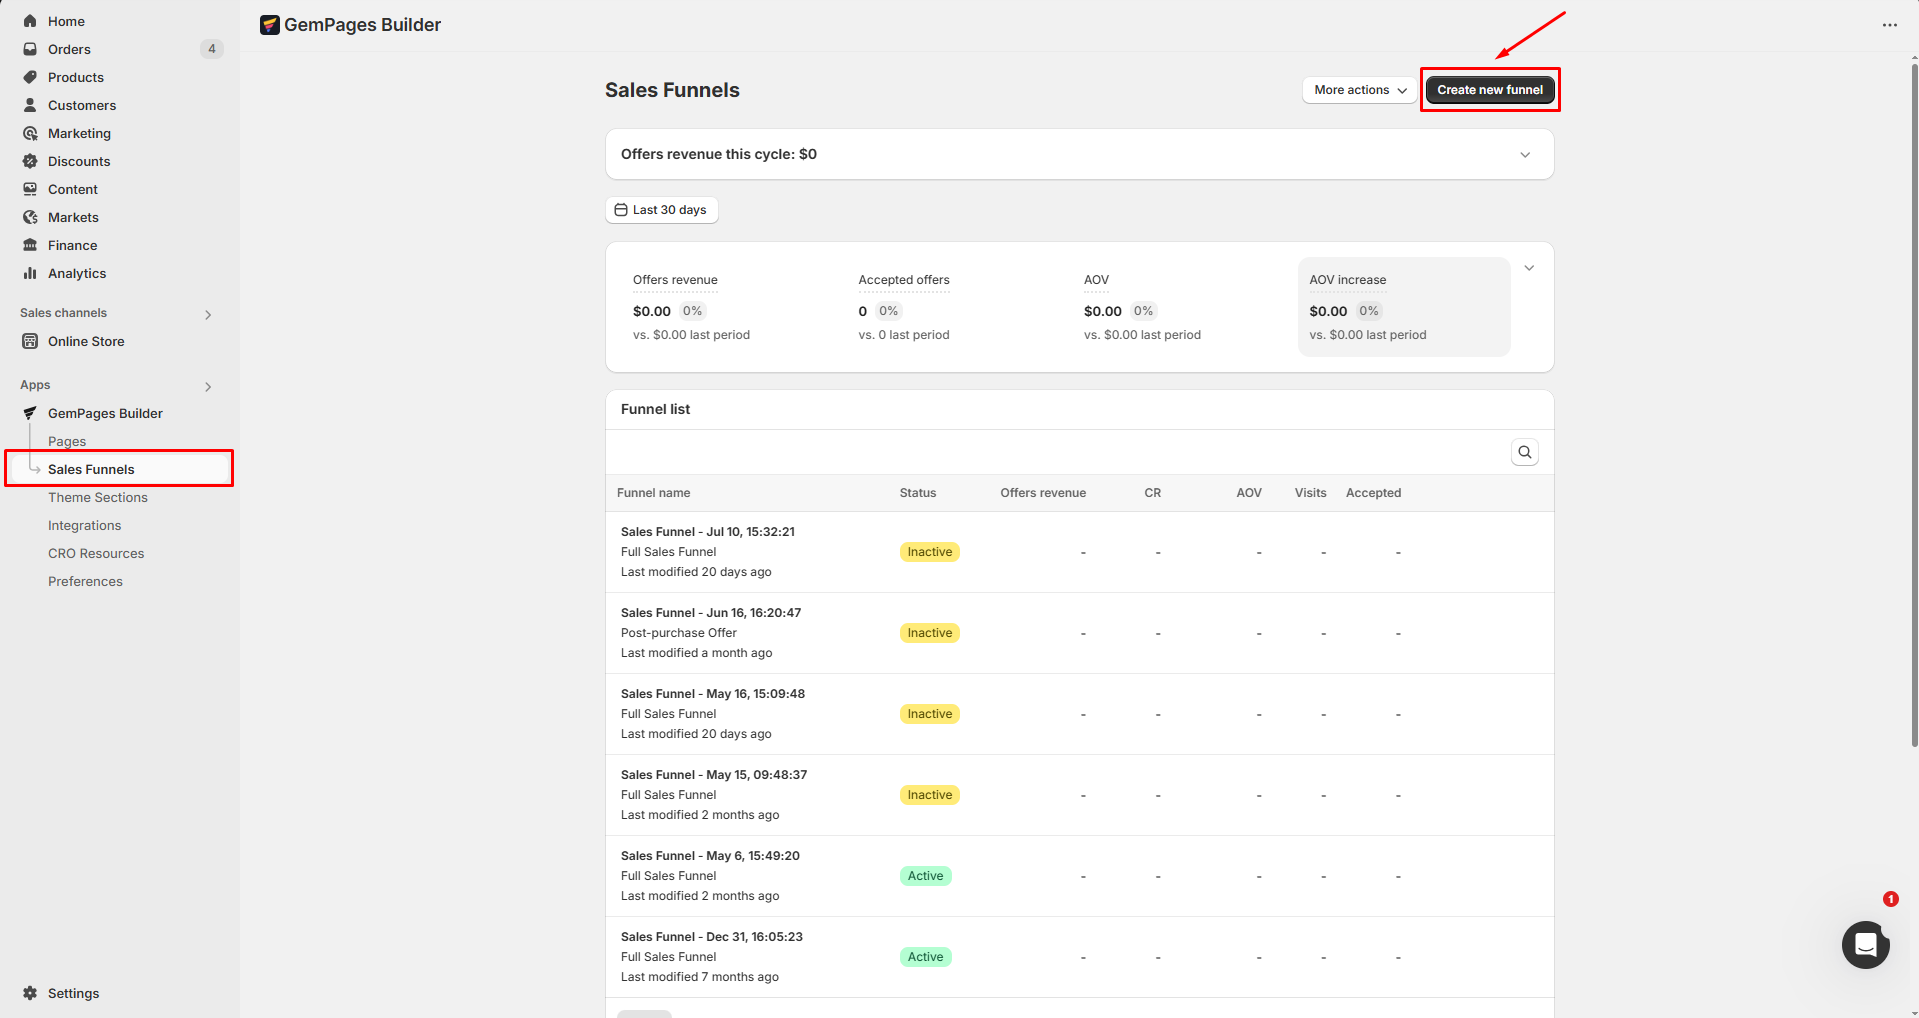
Step 1: Access the Sales Funnel in the GemPages Dashboard
From your Shopify admin, navigate to the GemPages Builder app > Sales Funnels > Create new funnel.
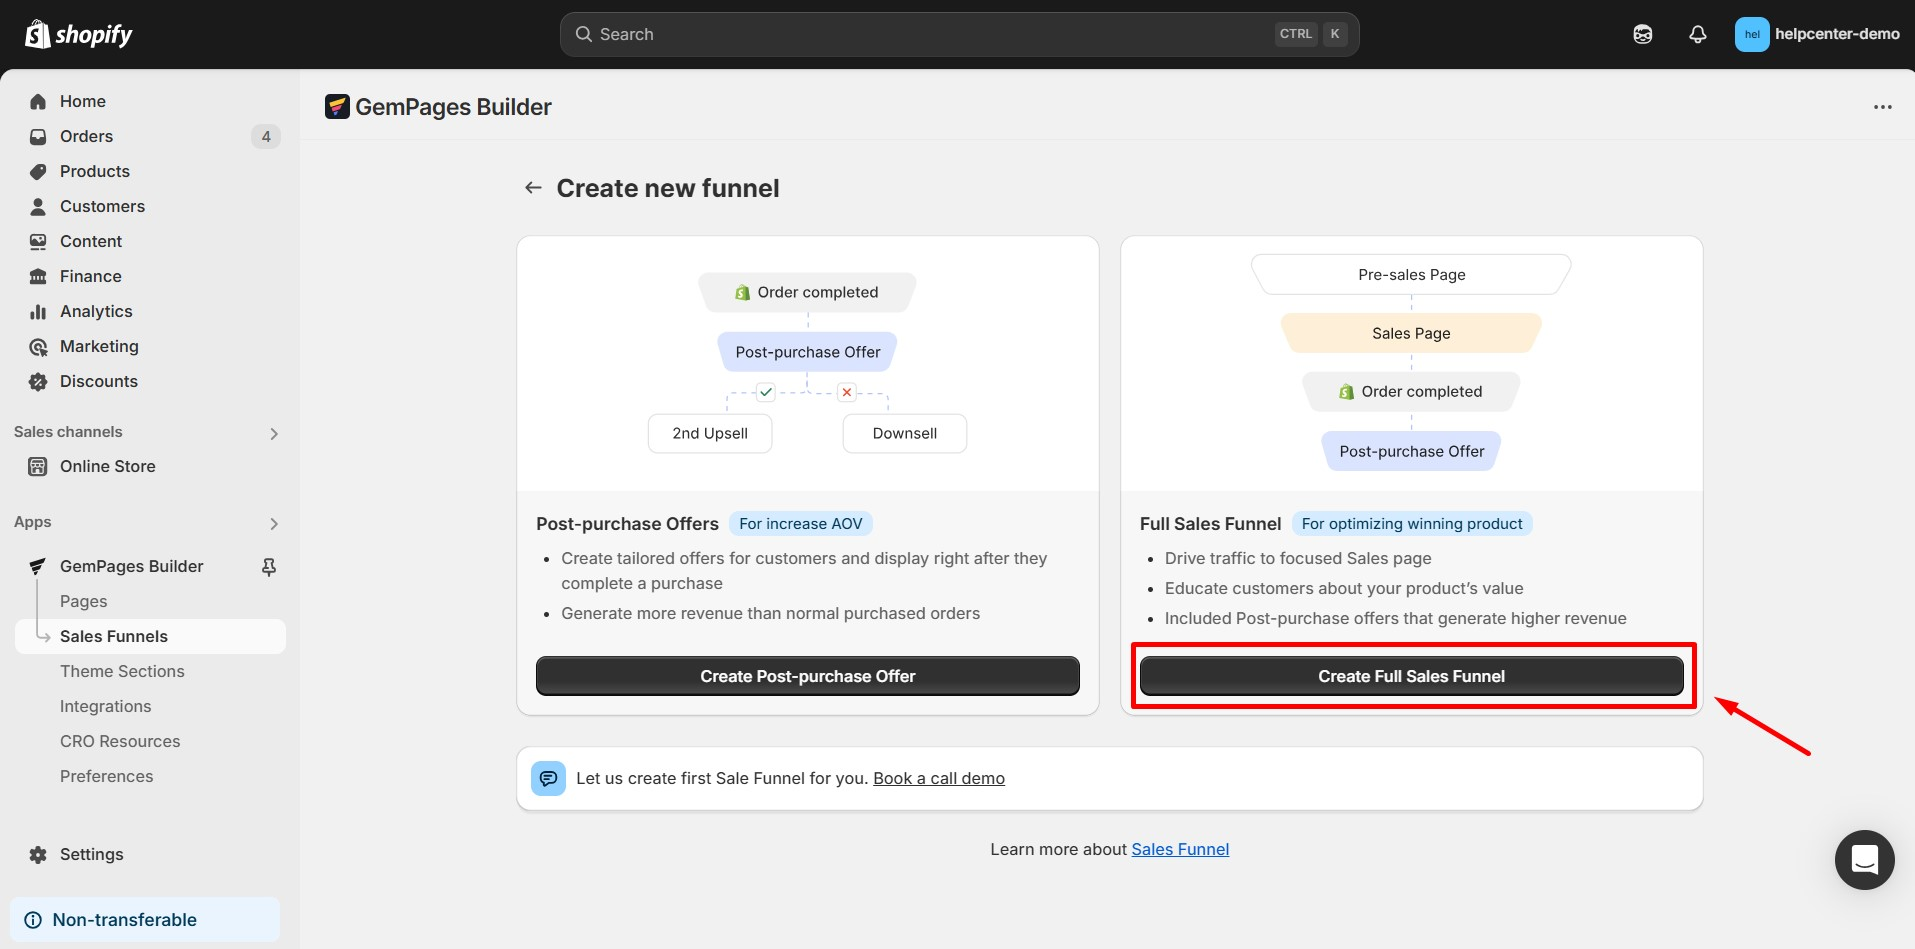
Step 2: Select funnel type
For post-purchase optimization, select Create Post-Purchase Offers.

To build a full funnel that covers every stage, click Create Full Sales Funnel.
For this example, we’ll use the Create Full Sales Funnel option.
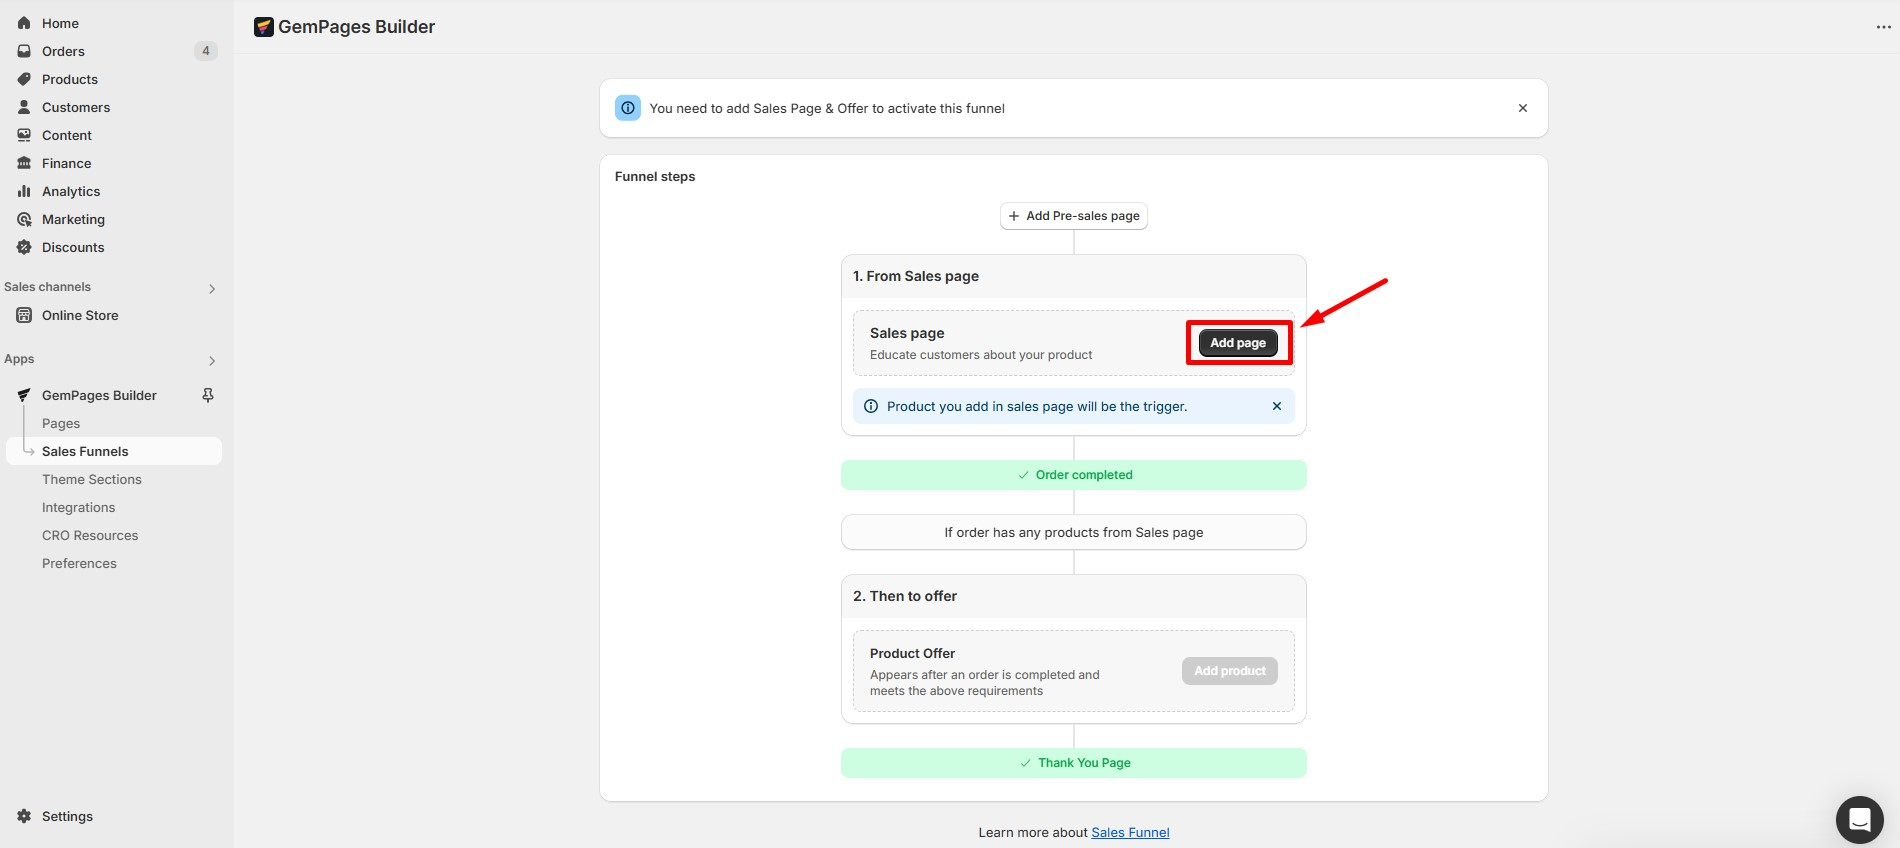
Step 3: Create your sales page
Click on “Add Page” to start building your sales page.
You’ll be taken to the GemPages editor, where you can personalize your page. From here, you have some options:
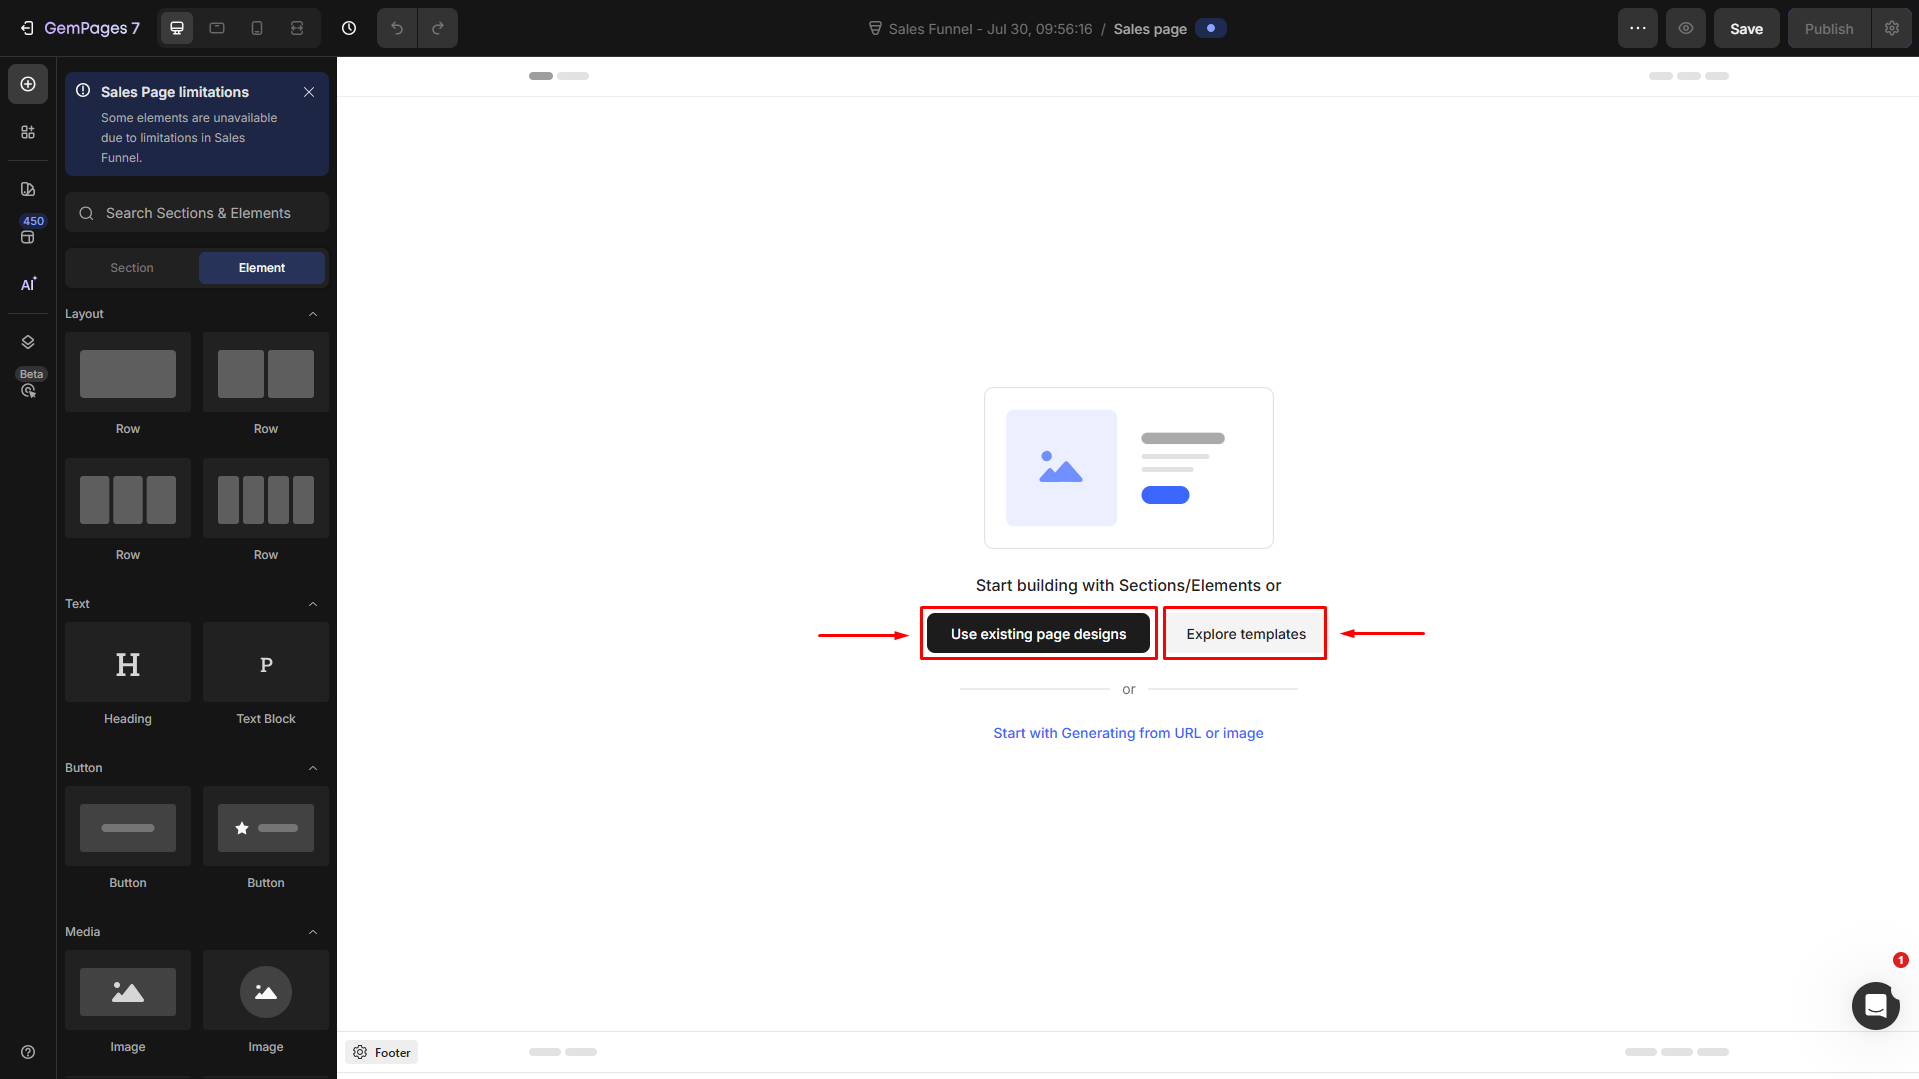
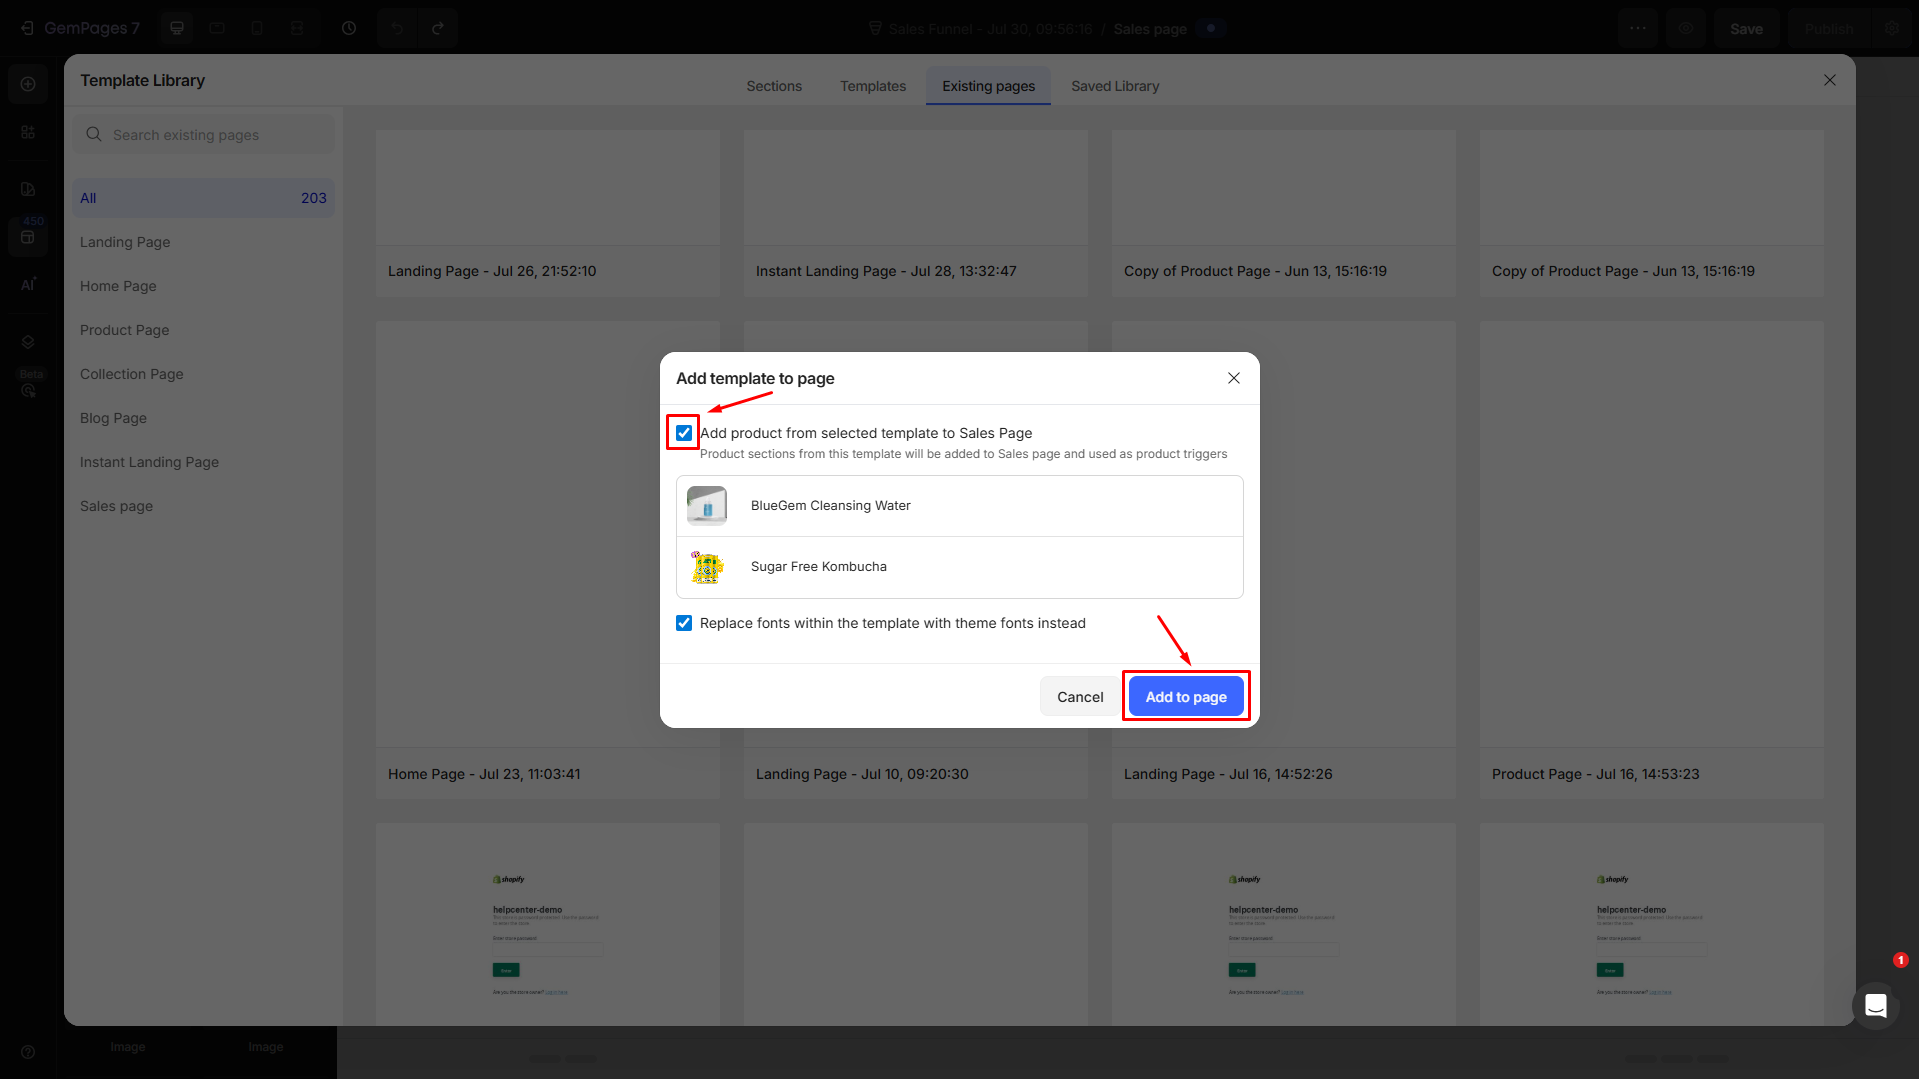
1. Use existing page designs
If you already have a sales page that works well for your funnel, you can use it.
When you select a template that includes product sections, those sections will be added to your sales page and serve as product triggers.
In case you don’t want to include them, simply uncheck the “Add product from selected template to sales page” option.
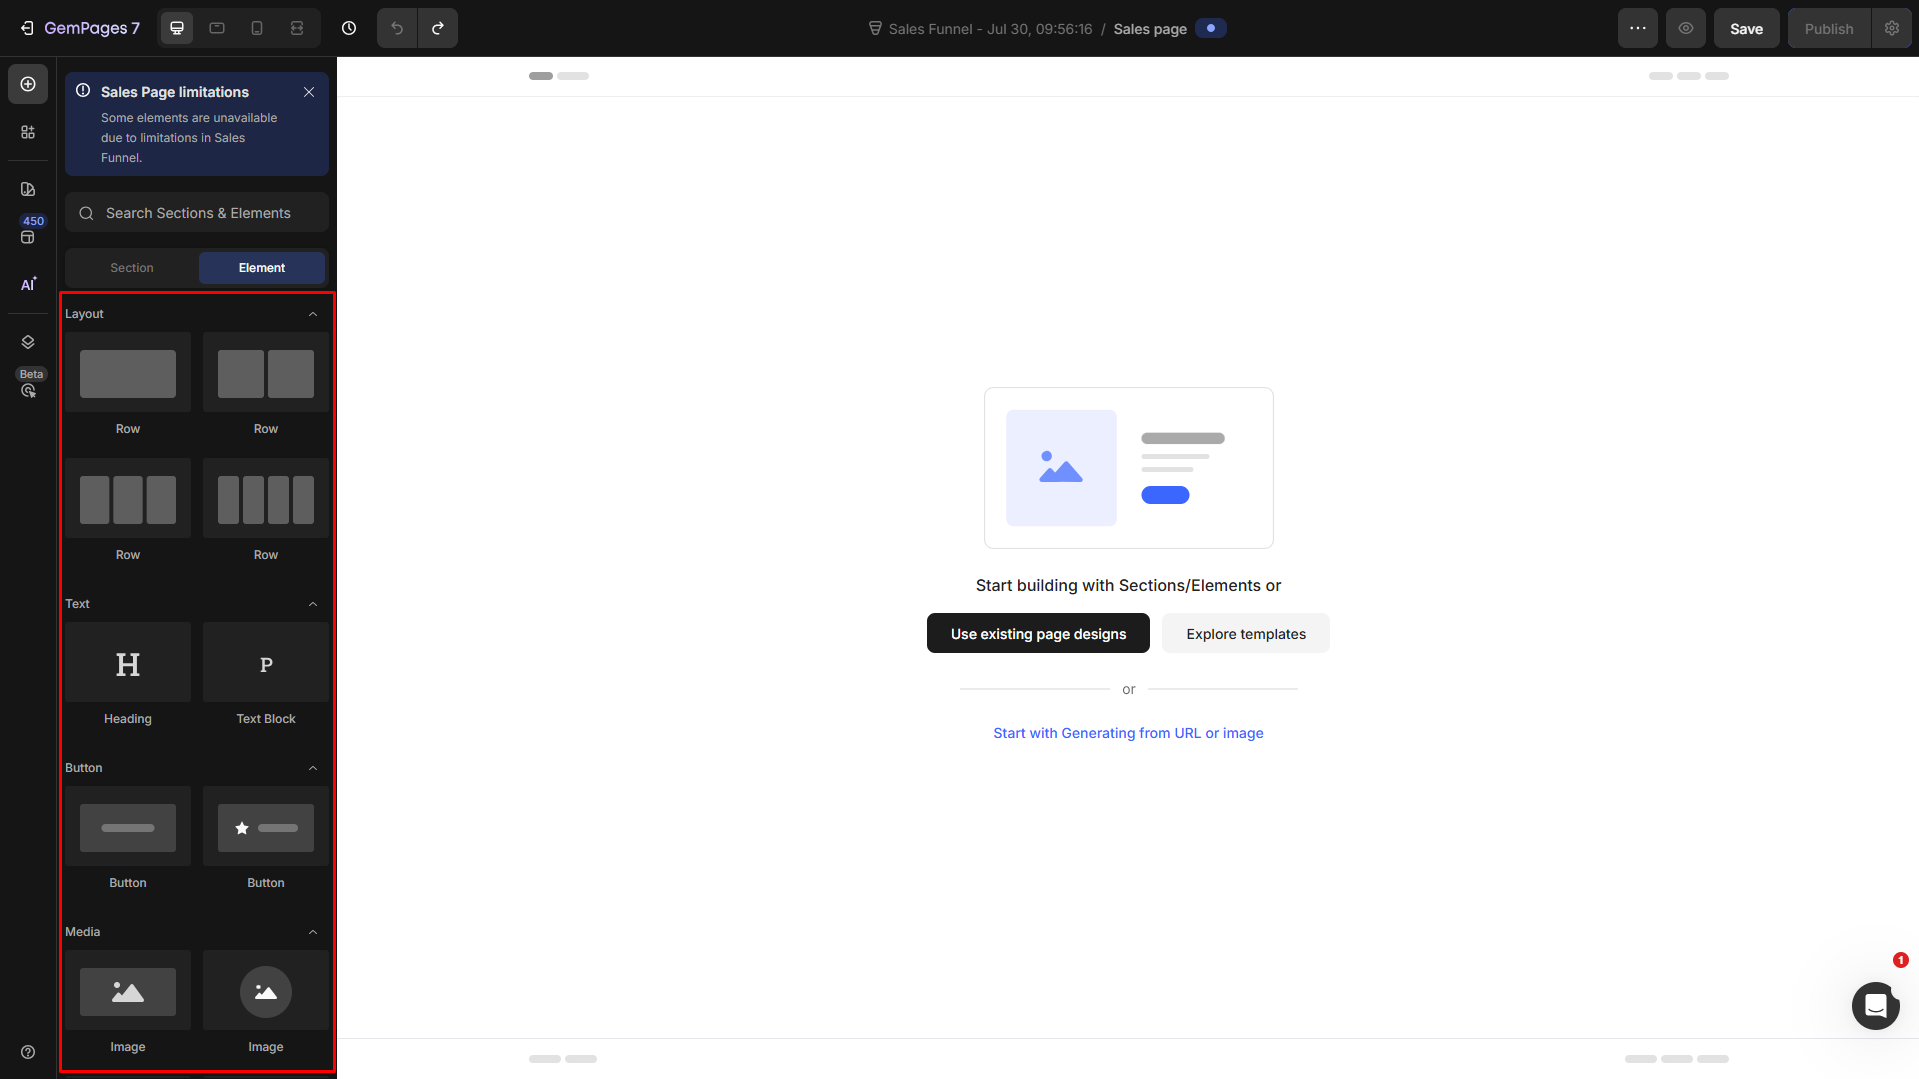
2. Create Blank Page
If you want to start fresh and build a new page from the ground up, choose this option.
You’ll begin with a blank canvas and can use GemPages’ drag-and-drop tools or templates to design a sales page suited to your product or promotion.
Be sure to assign your products to this page. These products will be the triggers of your sales funnel.
3. Explore existing templates
If you don’t want to start from scratch, you can choose from our pre-built templates to save time and effort.
Choose the preferred templates from our template library, assign a product, and hit Publish to make it live as your sales funnel page.
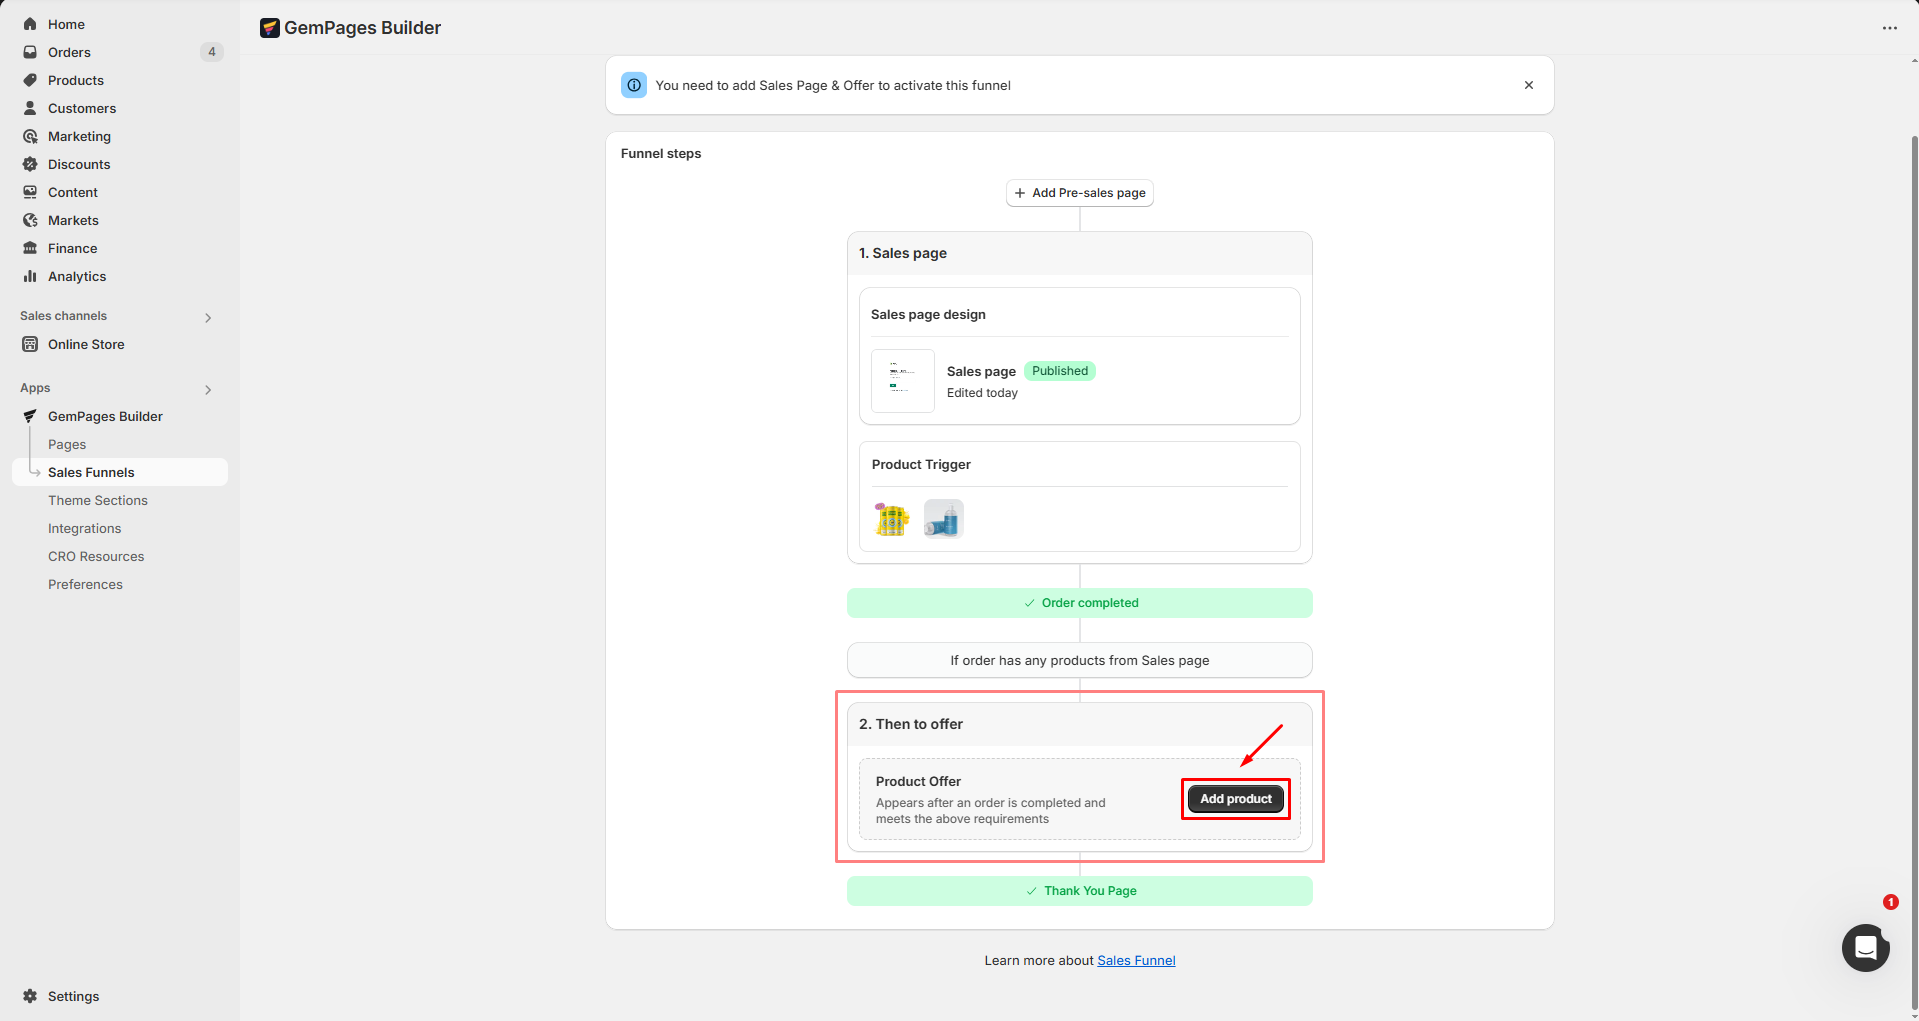
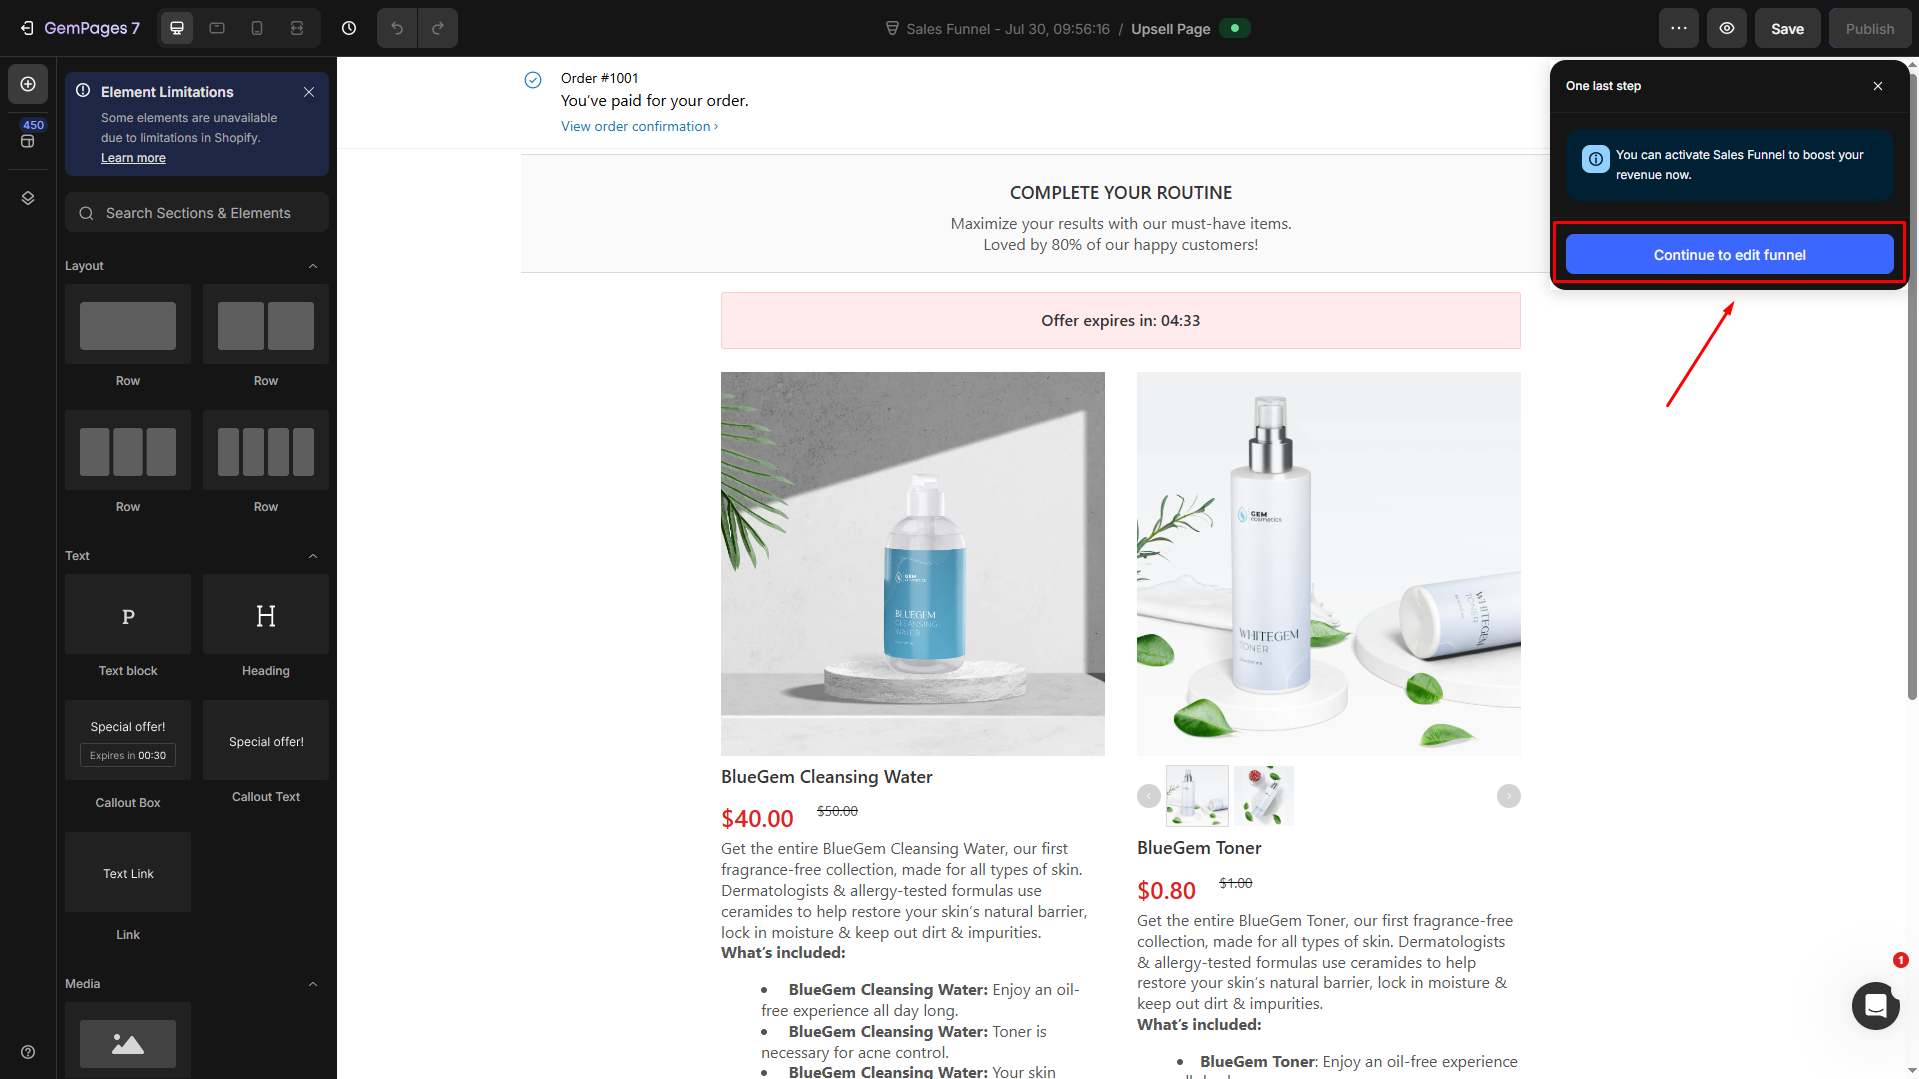
Step 4: Add the offer to your funnel
Once you publish your sales page, you’ll see this notification. Hit Continue to edit funnel to add offers to your sales funnel.

Under the “2. Then to offer“ section, click on “Add product“ to choose a product offer for your sales funnel.
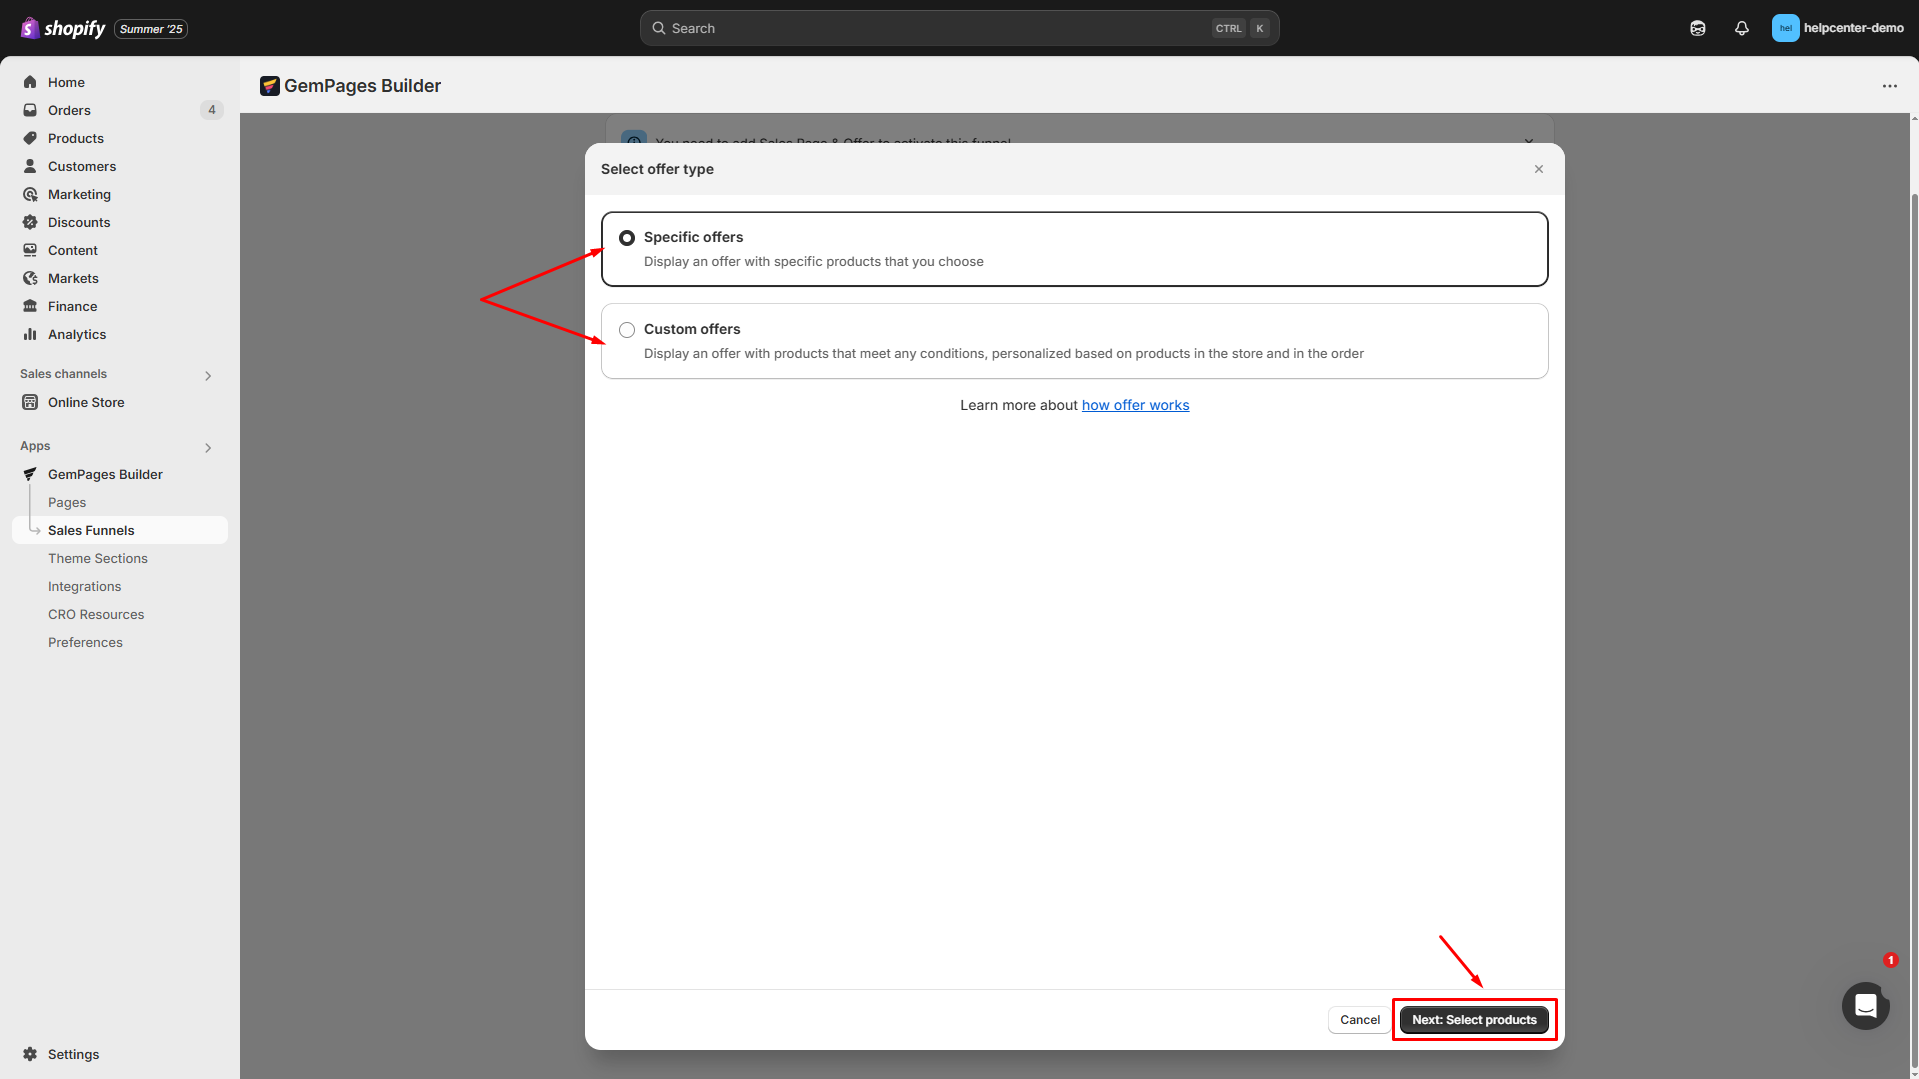
At this stage, you’ll have two options:
- Specific offers: Display an offer featuring products you manually select.
- Custom offers: Display an offer with products that meet certain conditions, personalized based on what’s in your store and the customer’s cart.
For more details about dynamic offers, refer to this article: Sales Funnel – Dynamic Offer.
Hit Next: Select products to choose the product offer from your product list. You can select up to 4 products for the offer.
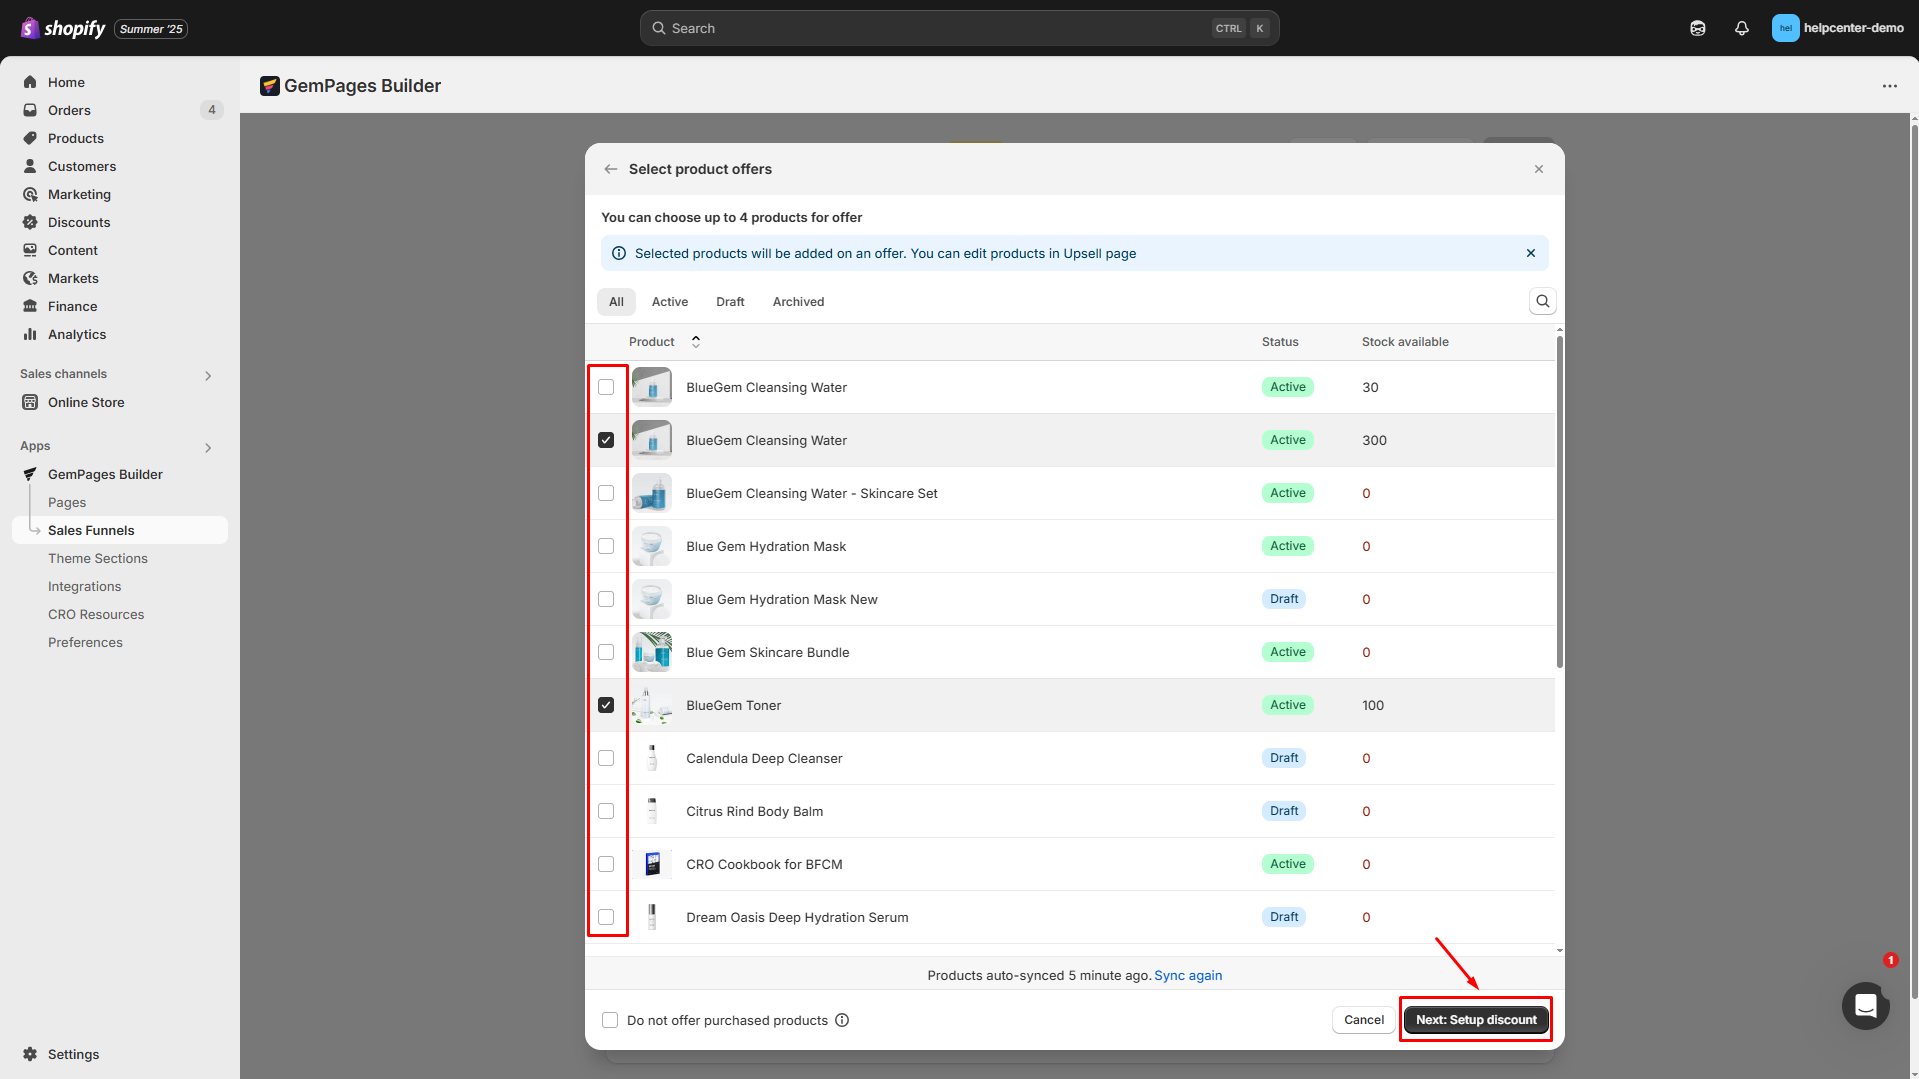
Then, click Next: Setup discount to configure the discount for each product offer. Once done, hit Save offer.

You’ll be redirected to the Sales Funnel setup.
Step 5: Customize the upsell page as desired
Under the Product offer block, click Edit page to customize your upsell page.
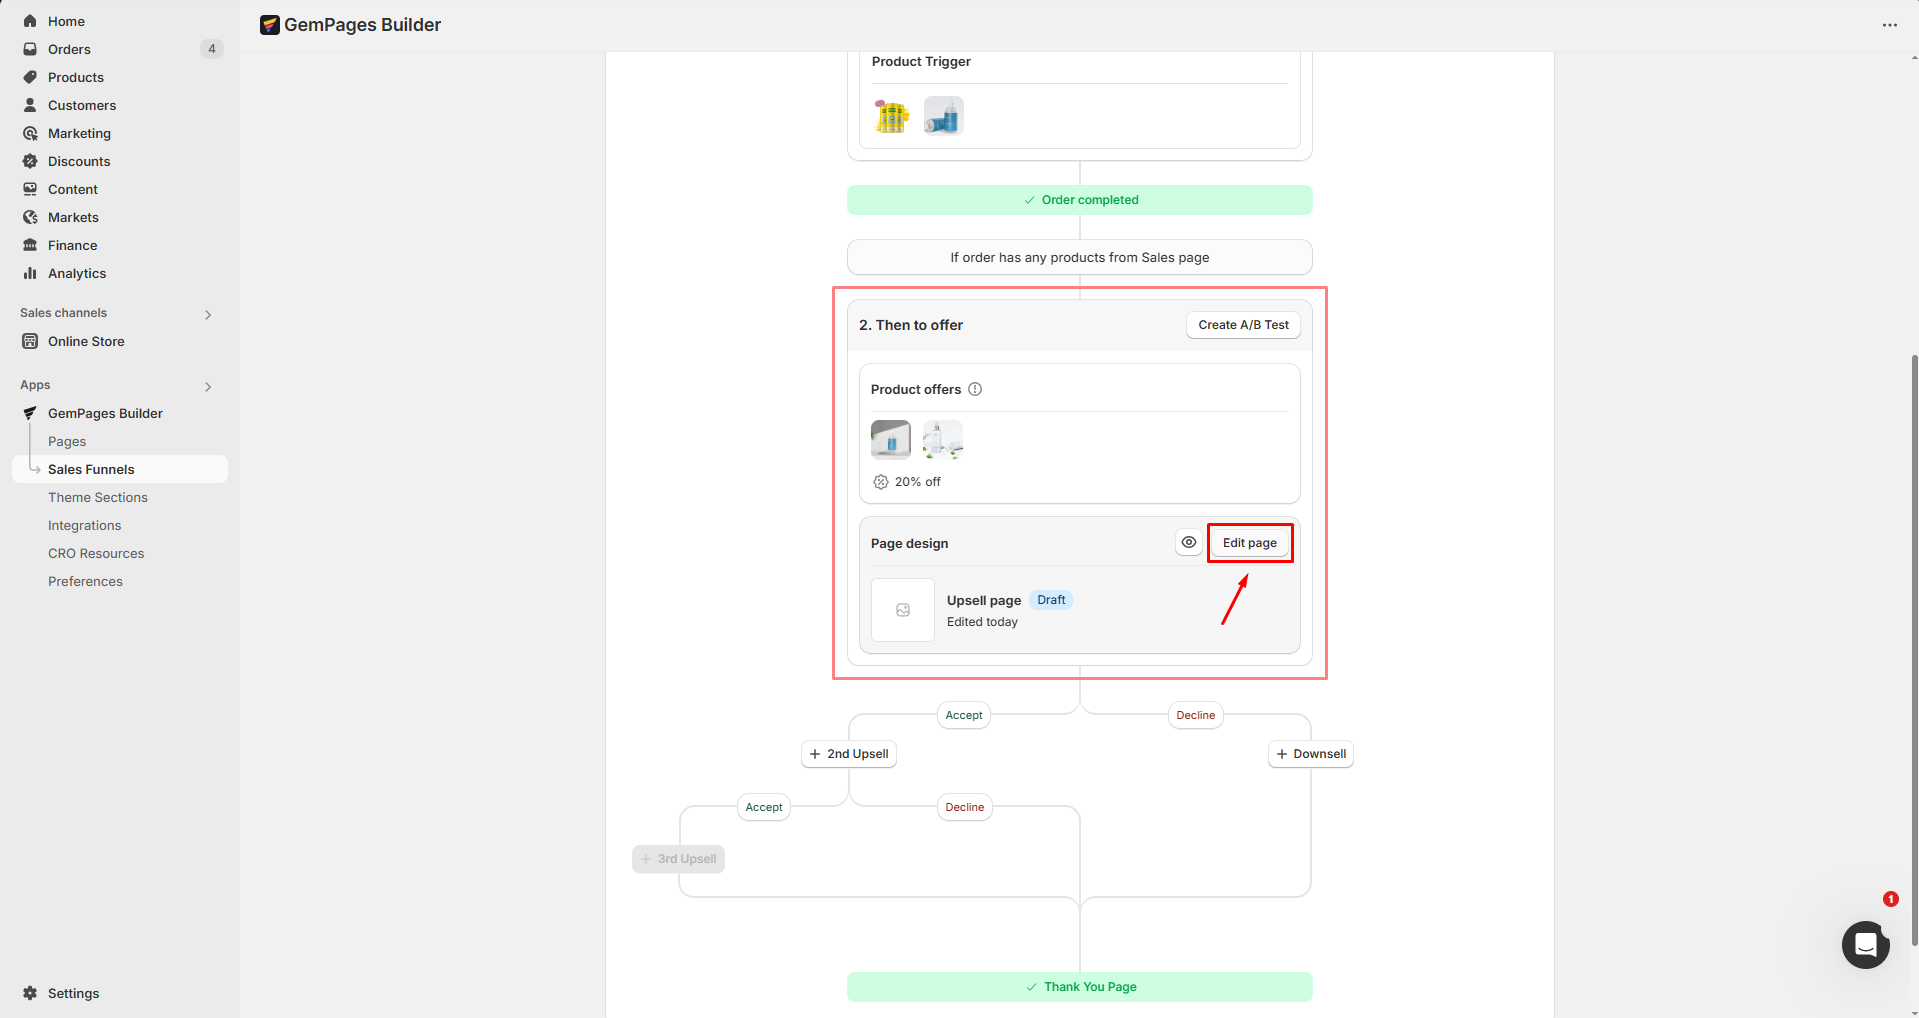
You’ll enter the editor, where you can add other elements to design the upsell page in your own way.
Once done, hit Publish to make your upsell page live, then go back to the Sales Funnel setup page to activate your sales funnel.
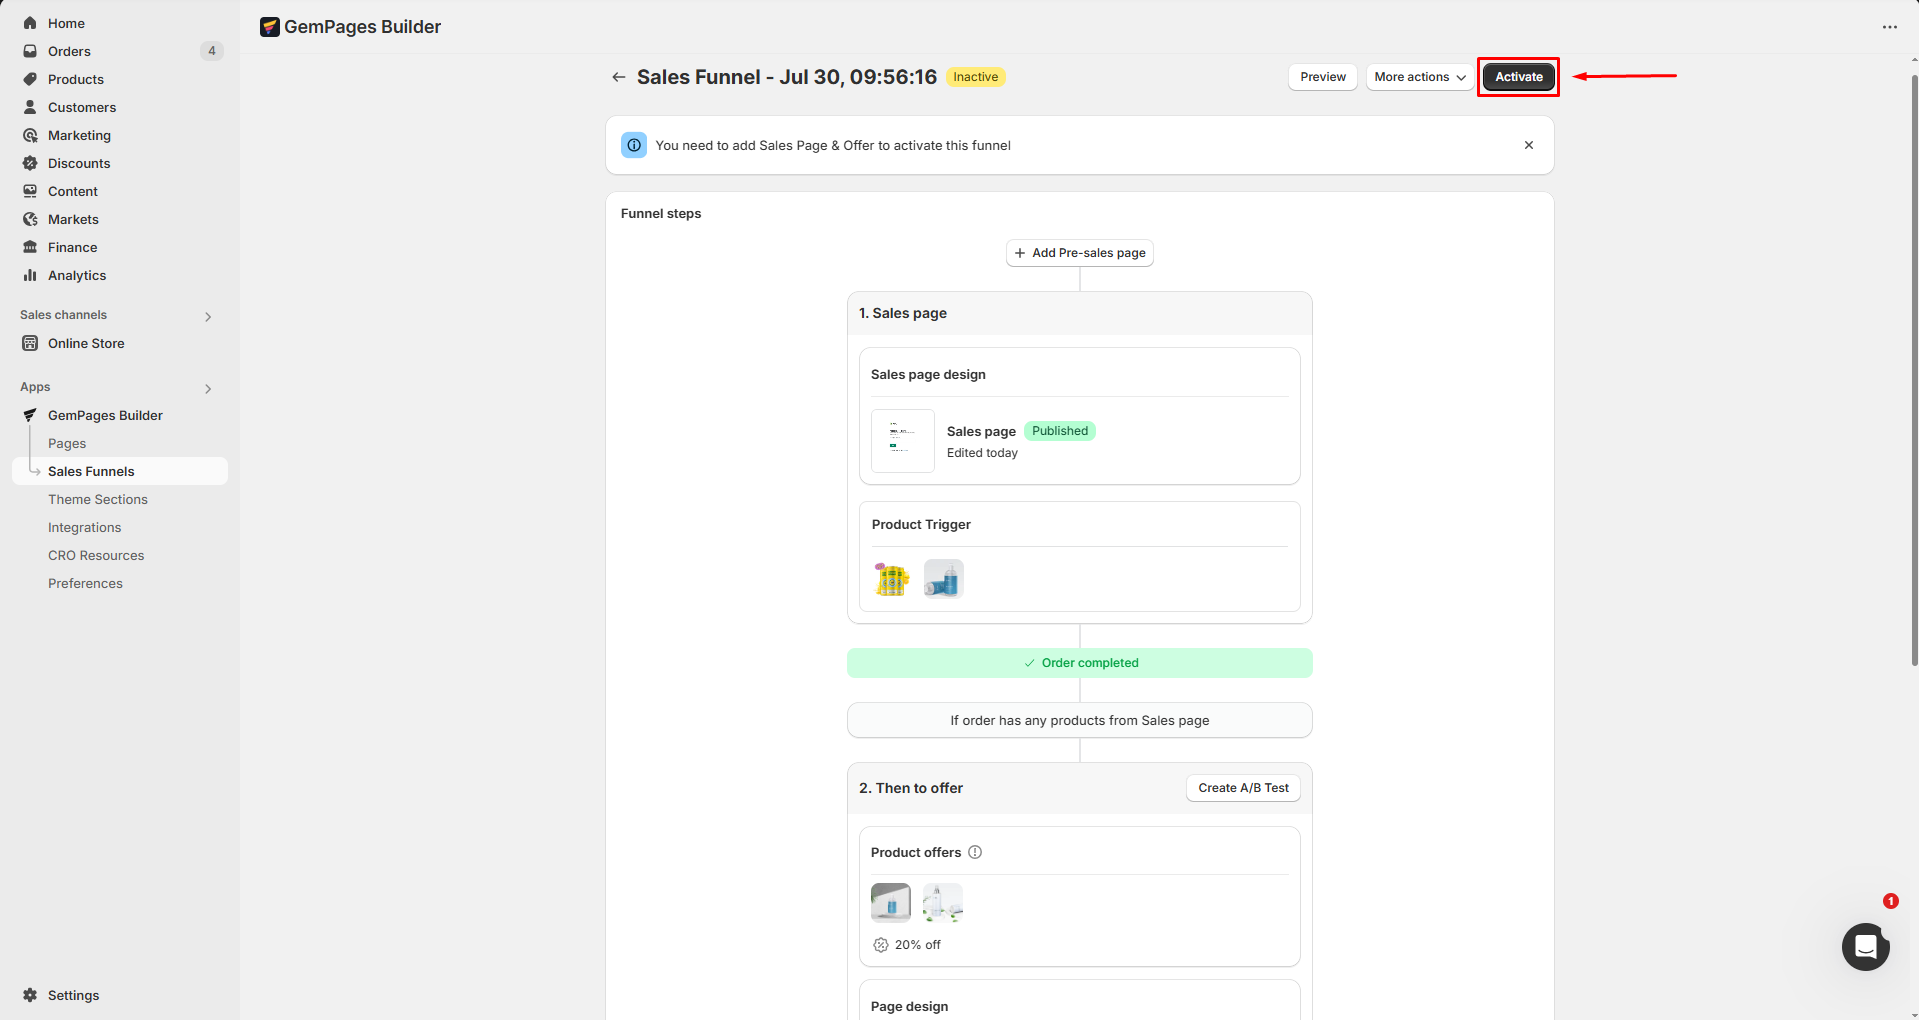
How to Activate a Sales Funnel?
Step 1: From the Sales Funnel setup, hit Activate to activate your funnel.
Step 2: Your sales funnel is now live. You can view the live funnel and copy or edit the funnel URL.
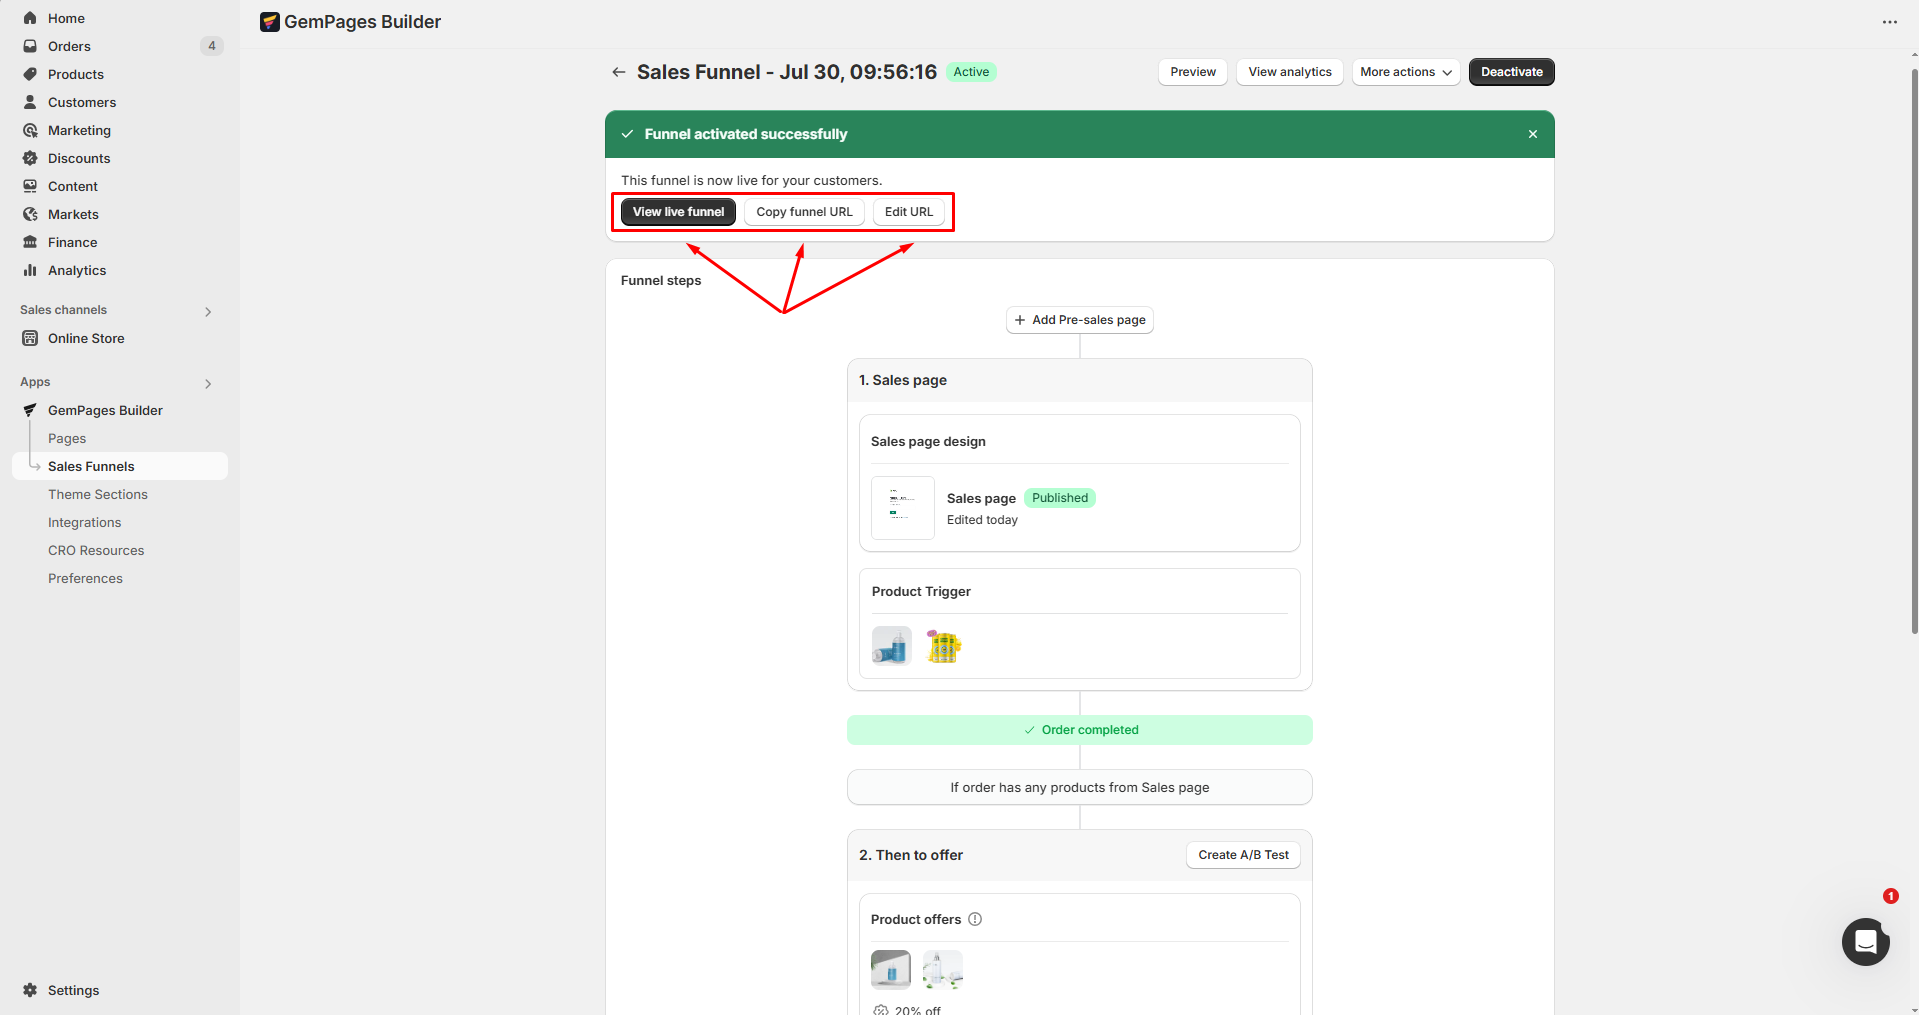
Step 3: Check your sales funnel in the live store to ensure everything works well.
How to Conduct A/B Testing?
A/B testing is crucial for optimizing your sales funnel because it allows you to compare different versions of your post-purchase offers to see which performs better.
By testing variations, you can identify the most effective elements and make data-driven decisions to enhance your sales performance.
Here is how to conduct A/B Testing:
Step 1: Click “Create A/B Test” in a post-purchase offer.
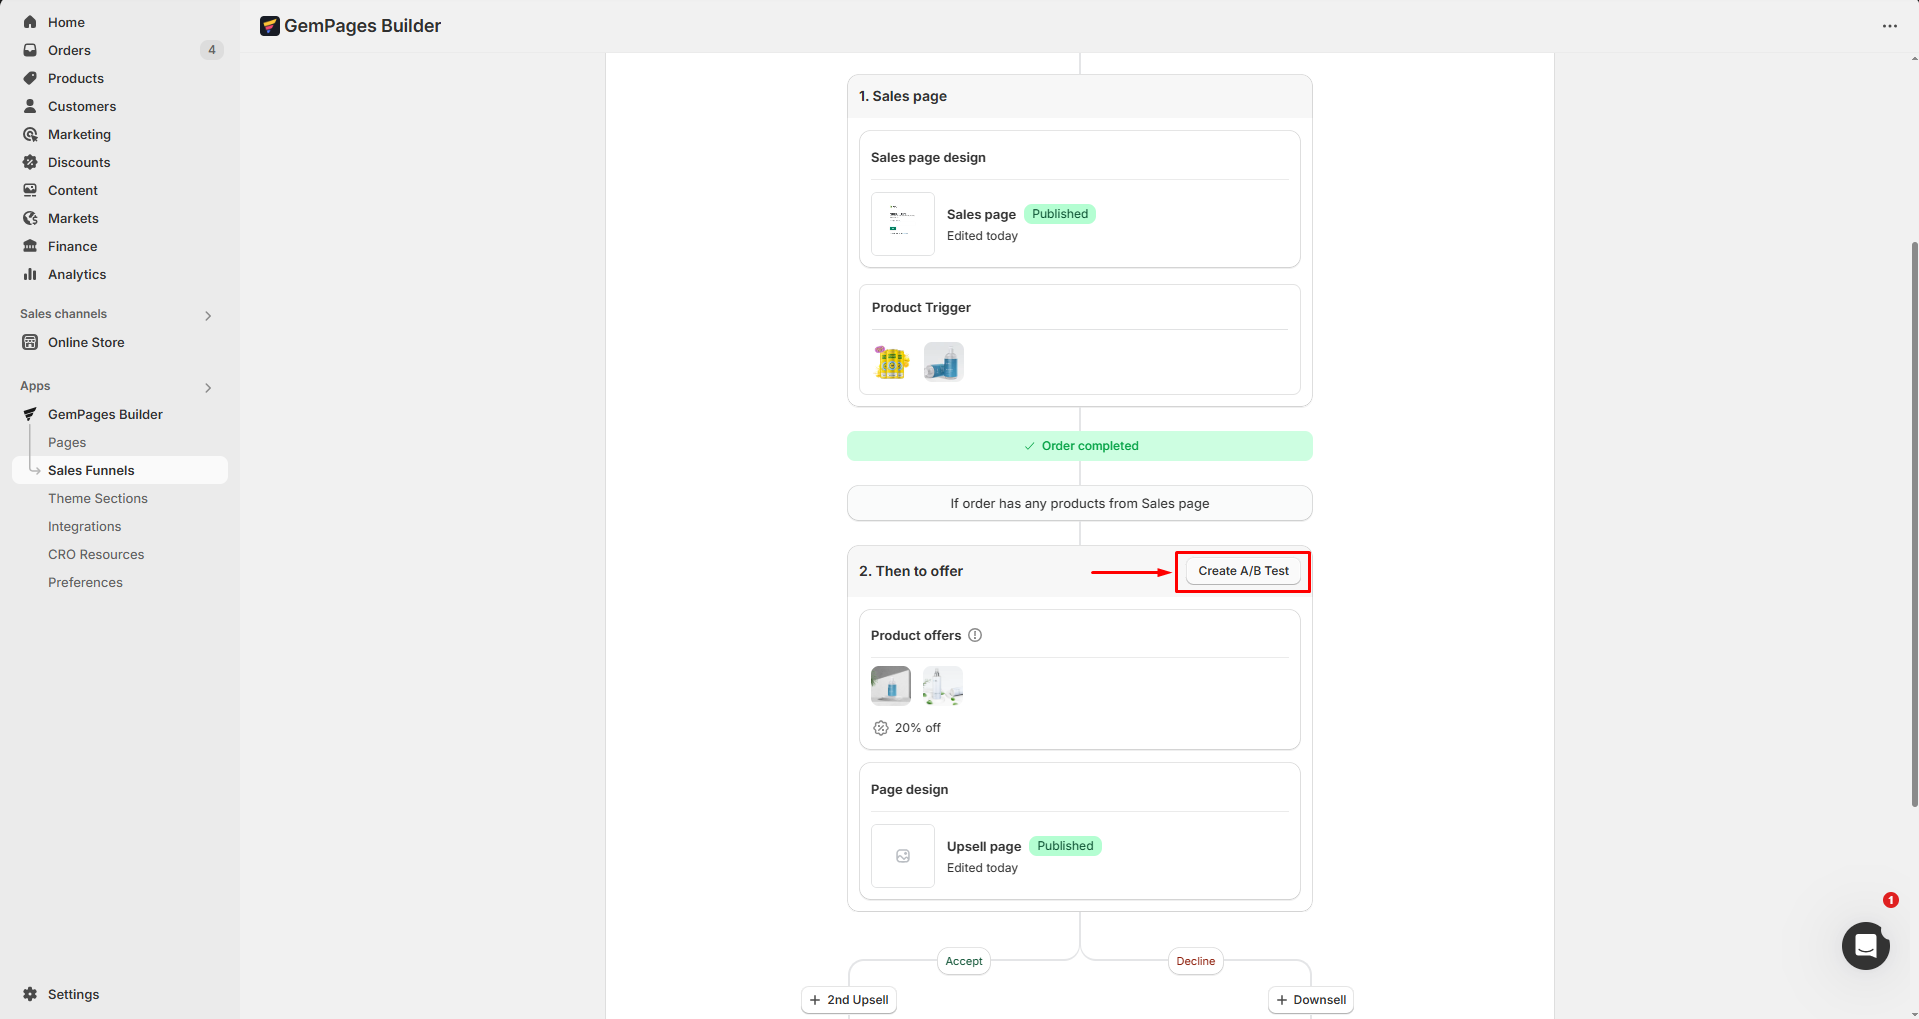
Step 2: A duplicate of the post-purchase offer will appear. You can modify each version, such as changing the product offer or editing the page design for A/B testing.
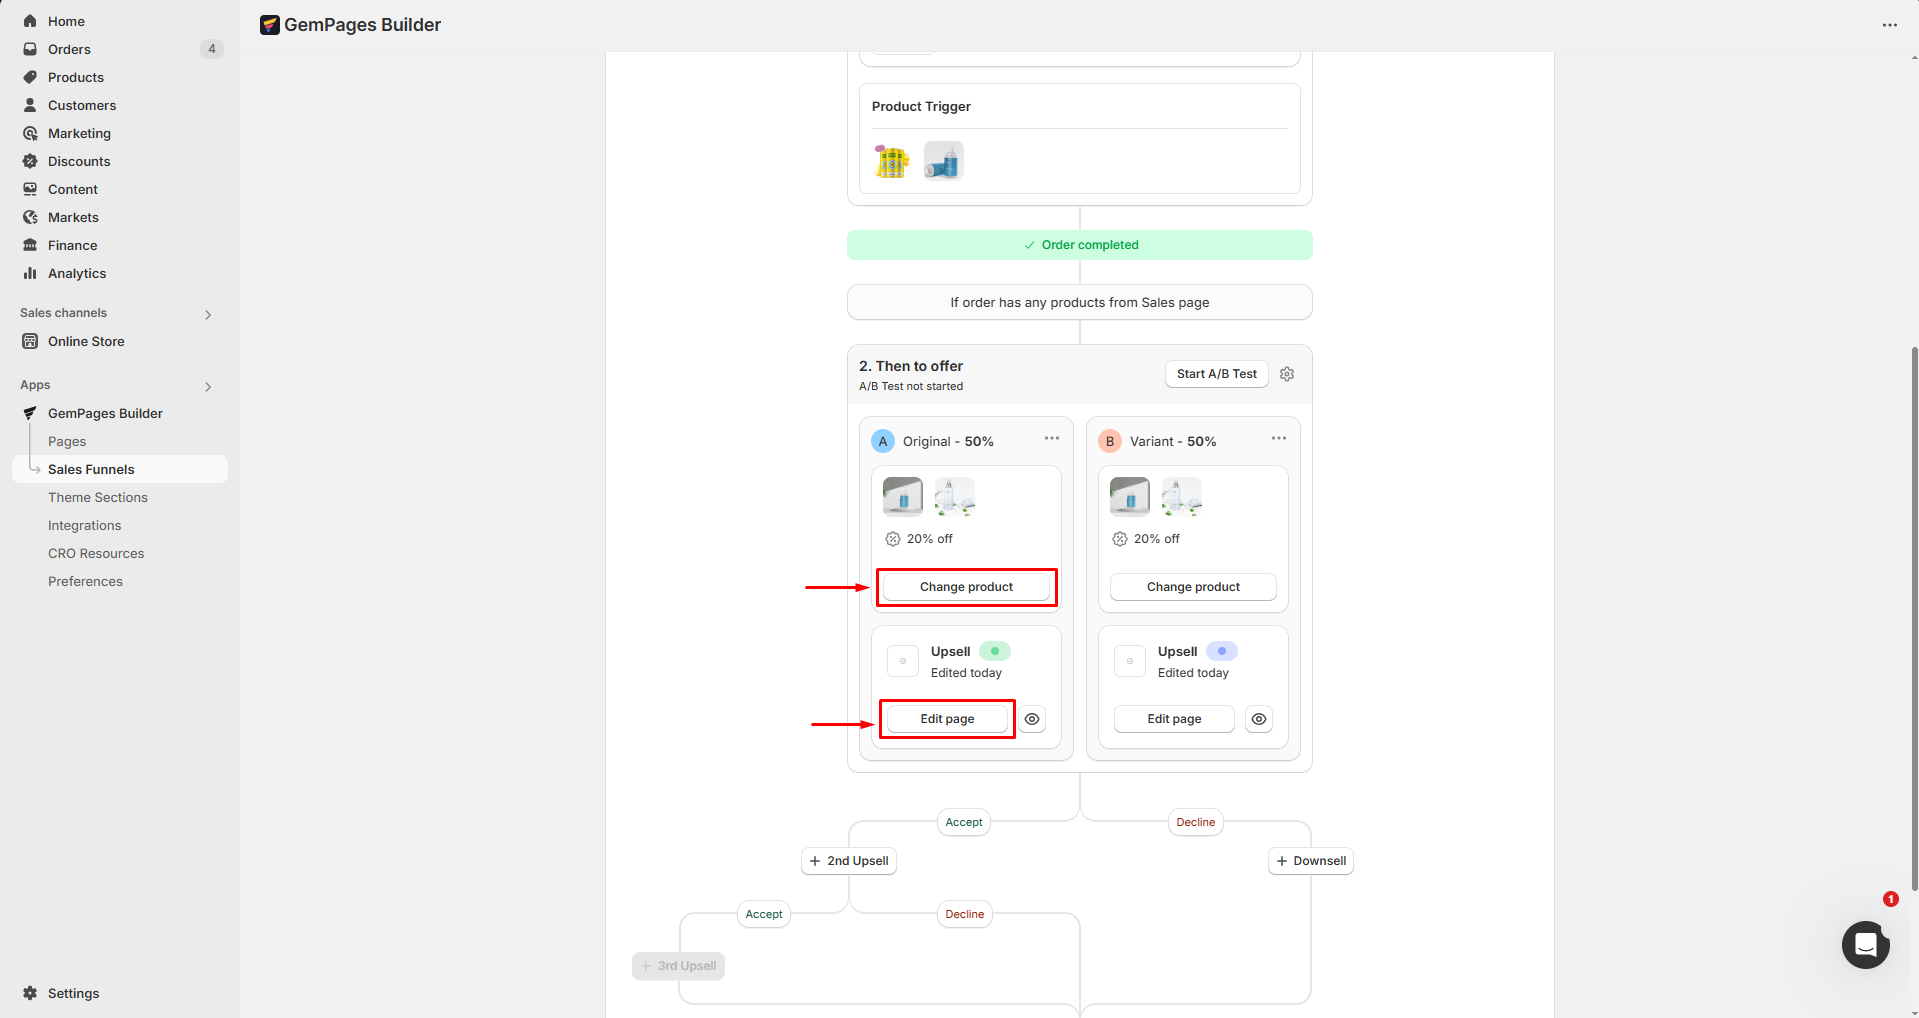
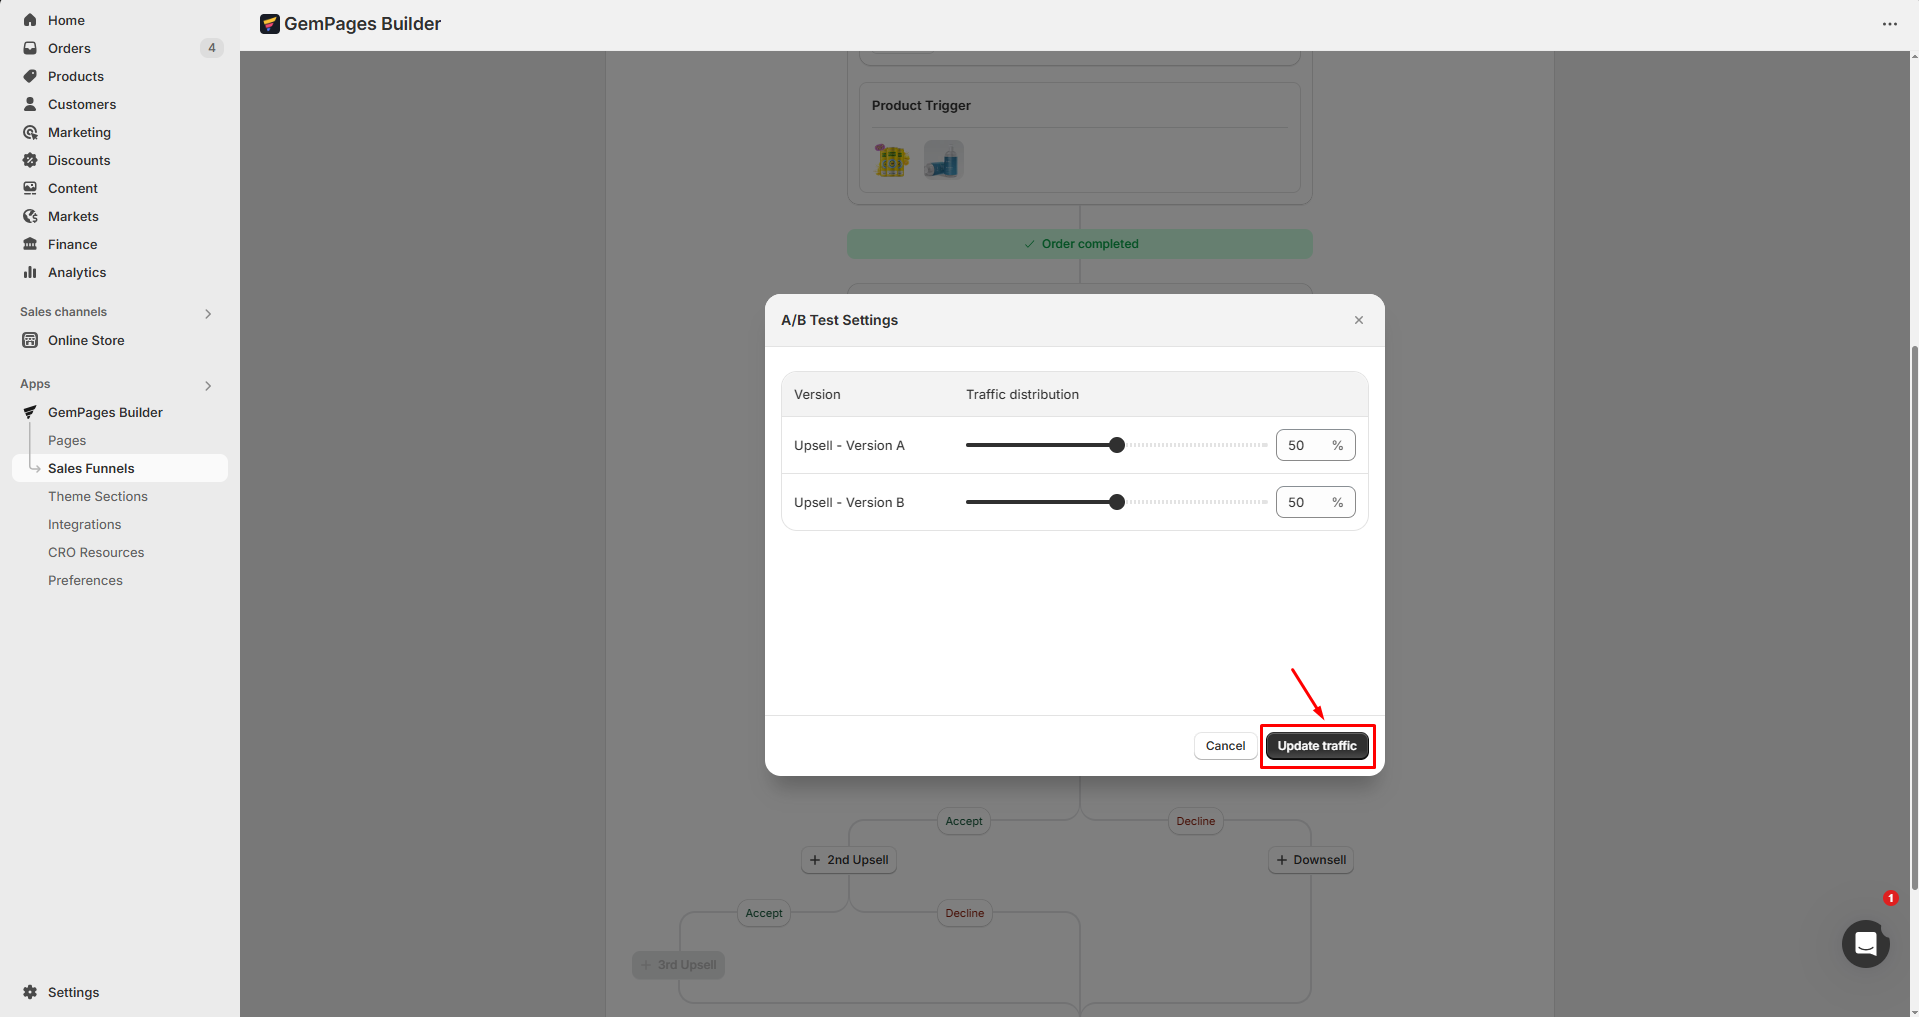
Step 3: Click on the settings icon to adjust the traffic distribution. Drag the slider or enter an exact number to distribute the traffic for each version. Once done, hit Update traffic.
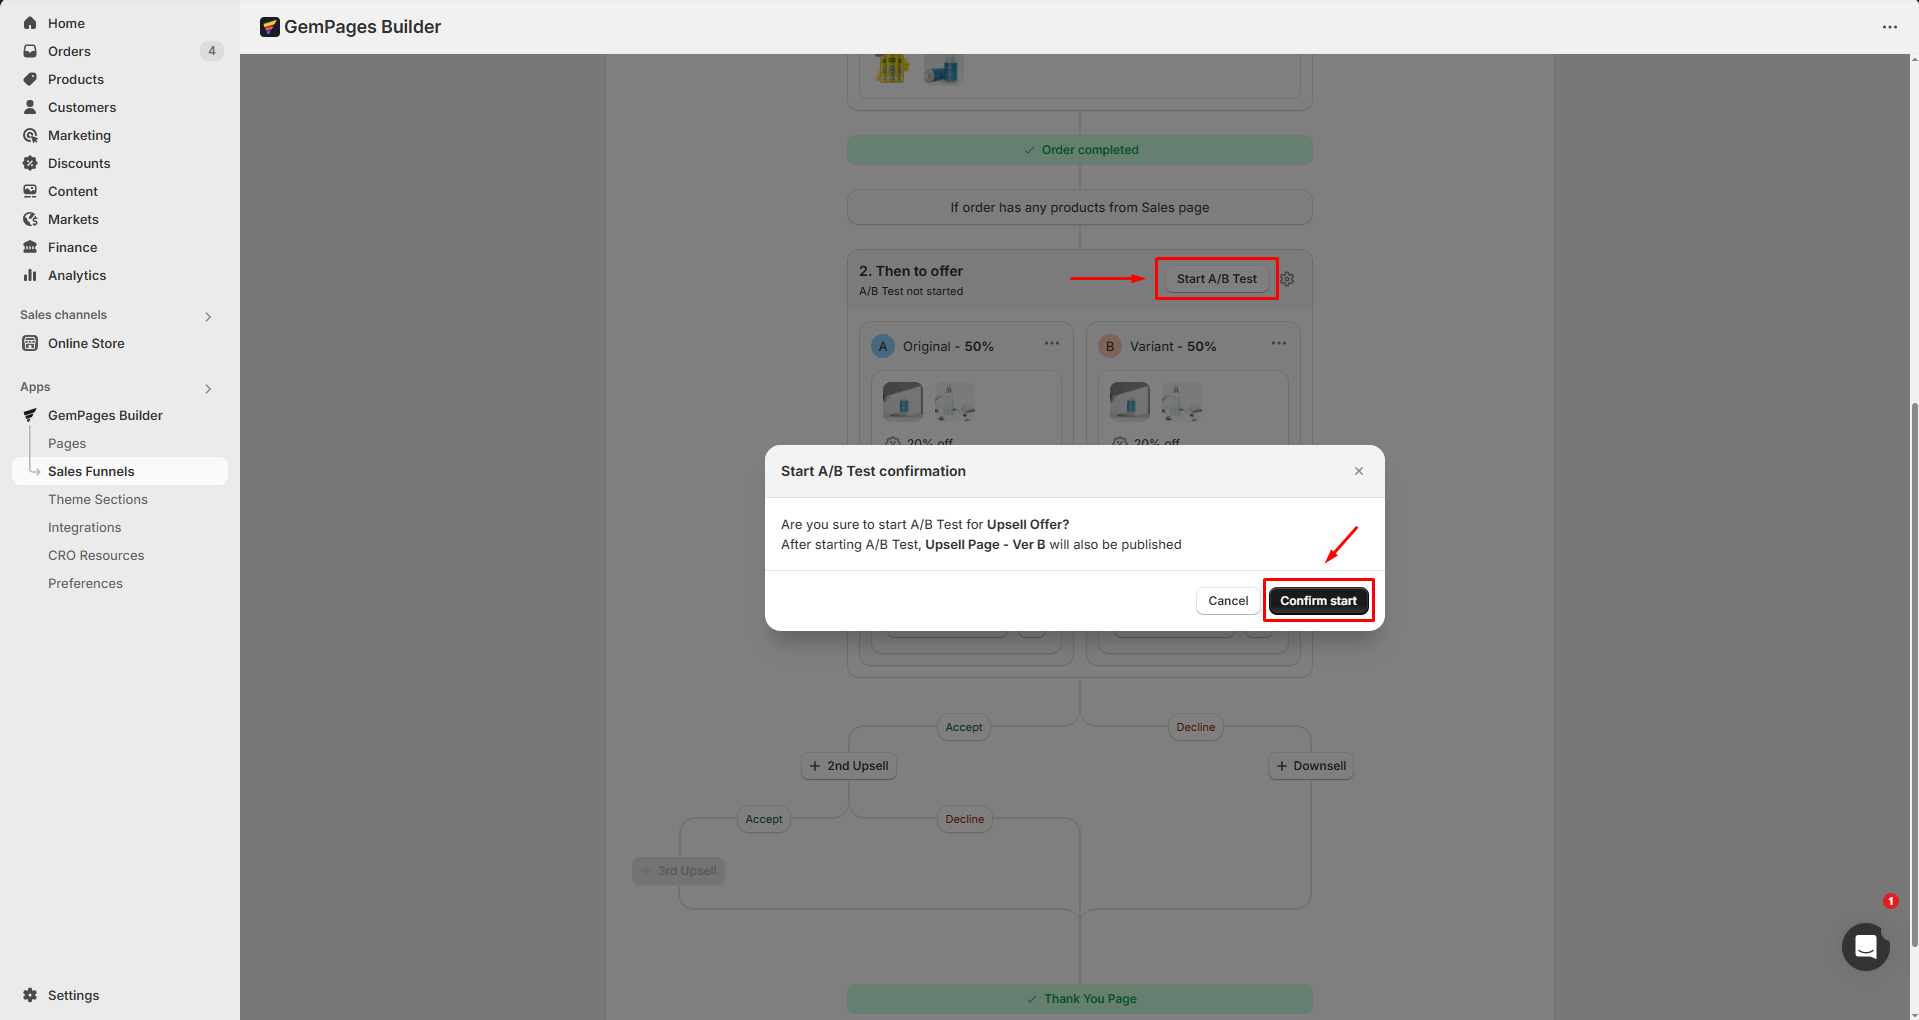
Step 4: Hit Start A/B Test, then click Confirm start to run the A/B testing for your sales funnel.
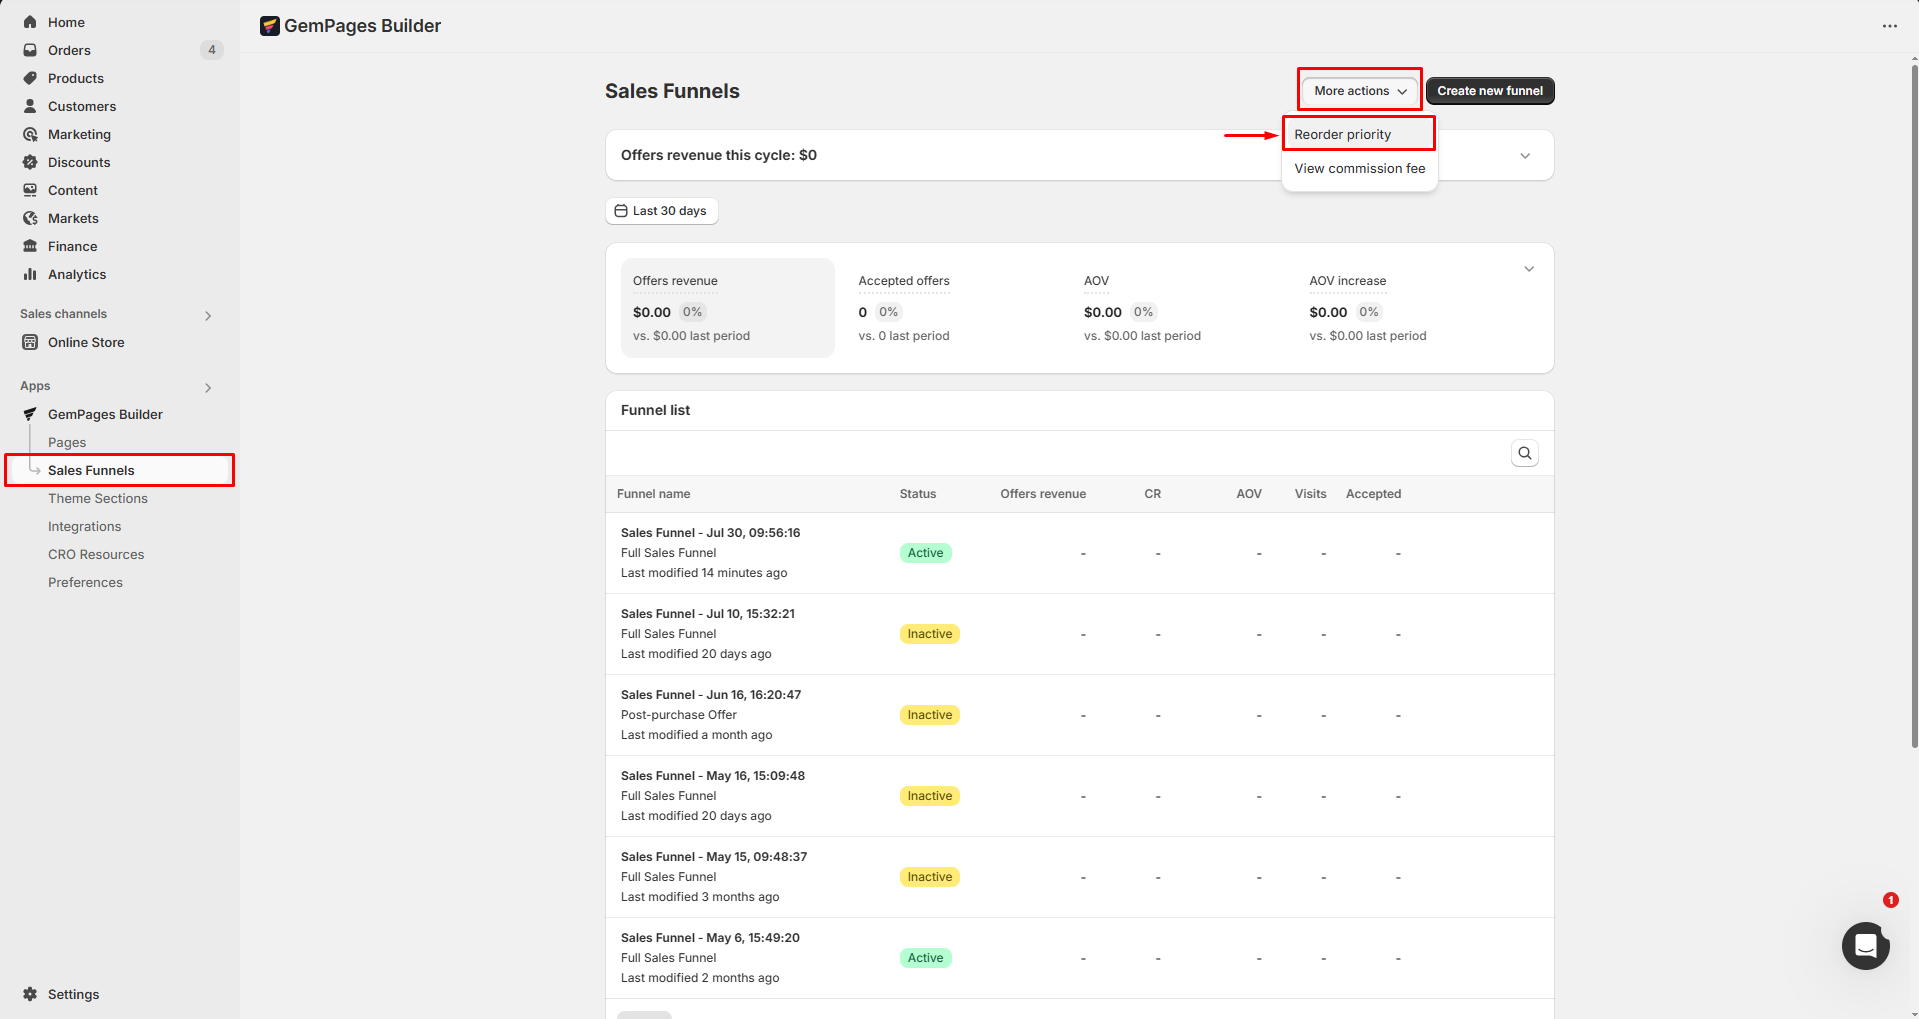
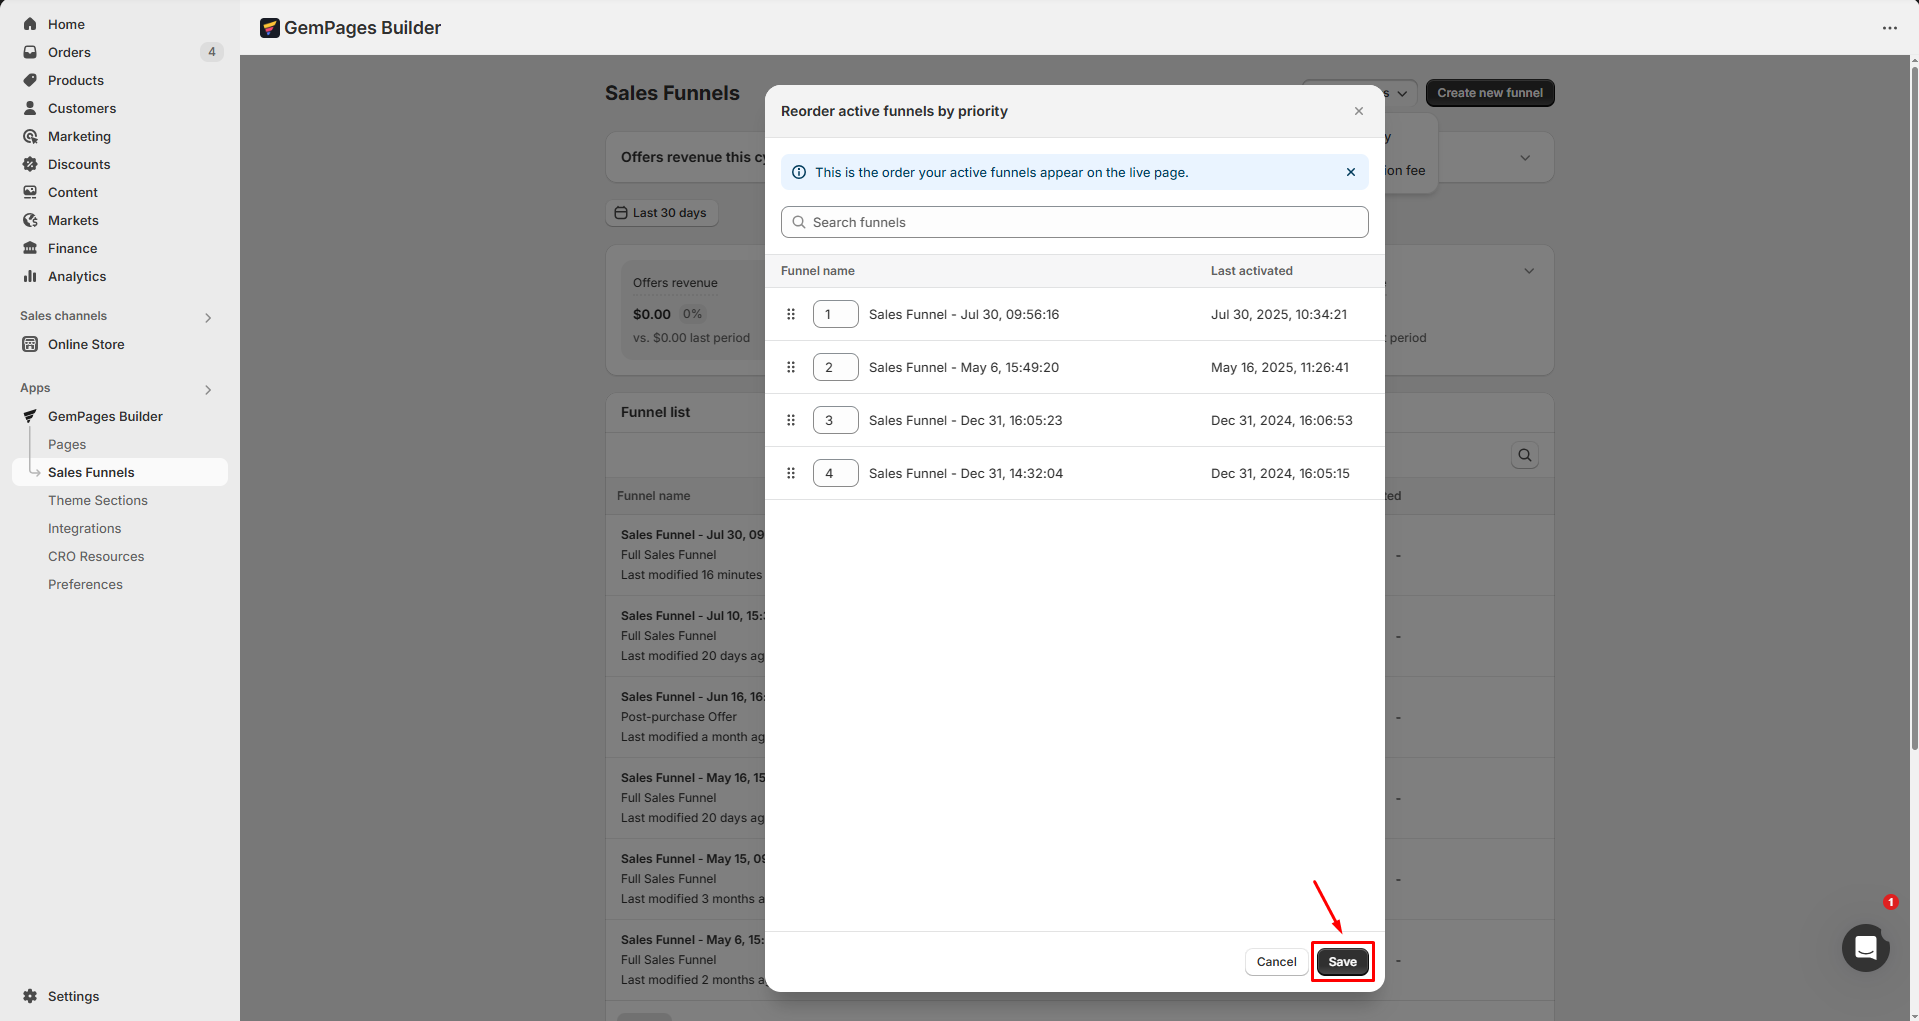
How to Prioritize Your Sales Funnel?
Previously, the most recently activated funnel was automatically set as the highest priority. However, you now have full control to reorder and prioritize your funnels based on your preferences.
To adjust the priority of your sales funnel, go back to the Sales Funnels section > More options > Reorder Priority.
From here, you can reorder your active funnels using two methods:
1. Manually Enter a Number: Input the desired priority number in the provided field to adjust the funnel’s position.
2. Drag and Drop: Click and hold the funnel, then drag it to the preferred position in the list.
FAQs about GemPages Sales Funnel
1. What are the differences between upselling and downselling?
Upselling is offering an additional product related to the customer’s recent purchase. Downselling, on the other hand, suggests a more affordable alternative when the customer declines the initial offer.
With GemPages, eCommerce sellers can set up two layers of upselling or downselling before directing customers to the thank-you page.
2. Can I show an upsell offer on the Shopify Checkout page?
No. Due to Shopify’s limitations, an upsell offer cannot be displayed directly on the checkout page. However, you can use a third-party app to customize the Checkout experience.
3. How can I test my eCommerce sales funnel on a live page?
To test your eCommerce sales funnel, follow these steps:
- In Shopify Admin, create a product named “Test 1” priced at $1.
- Create another product named “Test 2” priced at $1 to use as an upsell offer.
- Create a sales funnel using GemPages. Assign “Test 1” to the sales page and “Test 2” to the upsell page.
- Publish the funnels. Publish your funnels and proceed with a test purchase to ensure everything works as expected.
For more details, read our article on testing eCommerce sales funnels on live pages.
4. Can you build a sales funnel for me?
Yes. You can schedule a meeting with us, and we will build a sales funnel tailored to your needs.
5. Could a post-purchase order fail to appear in the Shopify system?
Yes. During peak periods such as flash sales, Shopify’s system focuses on swiftly capturing orders, occasionally postponing the creation of orders for a seamless purchasing experience.
As a result, post-purchase pages may not appear even if the request was made correctly.
If a post-purchase offer is not displayed, please note that the original order will proceed as usual.
6. If a customer accepts the post-purchase offer, will it generate a new order or be included in the original order?
Post-purchase offers are automatically included in the original Shopify order using Shopify’s edit order API.
This ensures a straightforward process for eCommerce sellers and their customers, without the complexity of managing multiple orders or shipments.
7. What payment methods are supported for the Sales Funnel feature?
Post-purchase upsell offers are supported when customers use standard credit or debit card payments through the regular Shopify checkout flow, not through accelerated checkouts like Shop Pay, Apple Pay, or Google Pay.
For more details, please refer to this article: GemPages One-Click Post-Purchase: Supported Payment Methods.
8. Can I have 2 different funnels active at the same time?
Yes. GemPages does not limit the number of active funnels at the same time. You can run 2 or more funnels simultaneously without restriction.
9. Is GemPages able to replicate a page or funnel only with the link of a store?
No. GemPages cannot automatically replicate a page or funnel just by using a store link. However, you can easily rebuild it inside our drag-and-drop Editor using pre-built templates, sections, and elements.
For further assistance with Sales Funnel in GemPages, please reach out to our support team.
10. Can I use GemPages Sales Funnel with subscription products?
- When accelerated payment methods (e.g., Shop Pay, Apple Pay, Google Pay) are used.
- When additional/local payment methods or installment-based gateways are used.
- When the order includes subscription products.
- When the order includes duties and multi-currency.
11. Can an Advertorial be used as a Sales page in Sale Funnel?
Yes, an advertorial is typically used as a pre-sale page within a sales funnel, followed by the sale page. However, you can use an advertorial as a sale page as well. Just make sure that the purchase button in the advertorial is an “add to cart” or “checkout” button.


Thank you for your comments