


TL;DR
GemPages MCP lets you turn finished HTML into an editable page inside GemPages.
You can use HTML from a developer, agency, AI coding tool, Figma-to-HTML workflow, or another source that produces complete HTML.
Once you provide the HTML, the AI:
- Reads the supplied HTML.
- Identifies the page structure and sections.
- Uses GemPages’ generation rules to build the page.
- Builds and validates the page section by section.
- Creates the editable page in GemPages.
- Returns the preview and editor URLs when the page is complete.
A basic prompt looks like this:
Use GemCommerce MCP. Turn landing-page.html into an editable GemPages page on my store.
The AI creates the page but does not publish it. Review the result in GemPages and publish it when ready.
How HTML Page Generation Works With GemPages MCP
GemPages MCP supports AI page generation from HTML, images, and URLs. This guide focuses specifically on using HTML as the source.
HTML landing pages can come from many sources:
- An internal developer
- A creative or ecommerce agency
- Claude Code or another AI coding tool
- A Figma-to-HTML process
- An existing campaign workflow
- A page your team already owns
- Another system capable of producing complete HTML
The file may already look finished in a browser, but it is still separate from the store’s page workflow.
Without a direct connection, the team may need to transfer the code manually or ask a developer to rebuild the page in GemPages. This creates another handoff and another chance for copy, layout, or links to change.
GemPages MCP allows the AI to complete this transfer through a defined process. Instead of leaving the finished work in a local folder, the workflow creates a real GemPages page that your team can preview and edit.
How GemPages MCP Creates a Page From HTML
GemPages MCP does not treat the entire HTML file as one undifferentiated block.
It divides the source into semantic sections, builds each section separately, and validates the result before moving forward.

1. The AI Reads the Finished HTML
The workflow begins when you paste the HTML into the conversation or point the AI to a local .html file.
You can provide:
- One HTML landing page
- Several HTML files
- A folder containing a batch of pages
The source HTML should already contain the intended copy, layout, images, and styling.
Major content or design changes are better completed before the workflow starts. Beginning with a stable HTML version reduces confusion during a long conversion.
2. The Page Is Divided Into Semantic Sections
The AI reads the HTML and identifies the functional sections of the page.
Depending on the source design, these may include:
- Hero
- Product introduction
- Benefits
- Features
- How it works
- Product comparison
- Social proof
- Testimonials
- Offer
- Frequently asked questions
- Final CTA
The exact section list depends on the HTML supplied.
Dividing the page into semantic sections gives the AI a clear structure to follow. It also allows the workflow to isolate problems within a particular section rather than processing the complete page in one bulk action.
3. GemPages’ Generation Rules Are Retrieved
Before building the page, the AI retrieves GemPages’ generation rules.
These rules provide the instructions needed to translate the HTML into a GemPages page. The AI retrieves them once and uses them as a reference throughout the run.
This keeps the same building requirements in place as the workflow moves from the first section to the last.
4. Each Section Is Built and Validated
The AI processes one section at a time.
For each section, it will:
- Read the relevant HTML.
- Build the section according to GemPages’ generation rules.
- Validate the generated result.
- Address problems found during validation.
- Push the completed section onto the page.
- Continue with the next section.
This section-by-section process may detect problems such as:
- Missing copy
- Incomplete page elements
- Layout differences
- Content placed in the wrong section
- Buttons that do not match the source
- Sections omitted during the build
- Other differences between the HTML and generated result
Once one section has been built and validated, the AI proceeds to the next.
5. The Complete Page Is Created in GemPages
After every section has been processed, the workflow completes the page in the GemPages app.
The HTML is no longer only a local code file. Your team receives a page it can open and continue working on.
6. The AI Returns the Page Links
Once the page is complete, the AI returns:
- A preview URL
- An editor URL
The preview URL allows you to inspect the complete page before publication.
The editor URL opens the page in GemPages so your team can continue making changes.
The workflow stops after creating the page and returning these links. The AI does not publish the page automatically.
How to Create a GemPages Page From HTML Step by Step
Run the workflow in Claude Code, Claude Cowork in Claude Desktop, or another compatible AI environment with GemCommerce MCP and local file access.
The interface may differ between clients, but the main process remains the same.
Before starting, follow the GemPages MCP setup guide to connect GemCommerce MCP to your AI tool and Shopify store.
Step 1: Prepare the HTML
Start with a finished HTML landing page.
The source should already contain the intended:
- Page copy
- Section structure
- Images
- Typography
- Colors
- Buttons
- Links
- Responsive styling
Review the file before conversion and confirm that you are using the correct version.
Clear filenames can help prevent mistakes, especially when several files or versions are stored in the same folder.
For example:
- summer-sale-approved.html
- product-launch-final.html
- comparison-page-v3.html
Avoid filenames such as:
- new.html
- test2.html
- final-final.html
For a batch conversion, place the related HTML files in a clearly named folder.
Step 2: Open a Compatible AI Environment
Open Claude Code, Claude Cowork in the Claude Desktop app, or another AI environment with:
- GemCommerce MCP
- Local file access
- Permission to read and write the workflow files
The workflow creates a run folder containing section files, logs, and build artifacts. It depends on these files to track progress and resume correctly when interrupted.
A chat-only AI environment without local file access cannot reliably complete the full conversion.
To learn how to connect GemCommerce MCP to Claude or Codex, follow our GemPages MCP setup guide.
Step 3: Explicitly Ask the AI to Use GemCommerce MCP
Begin the prompt with:
Use GemCommerce MCP.
This instruction tells the AI to connect to the correct tools rather than guessing how the HTML should be processed.
For example:
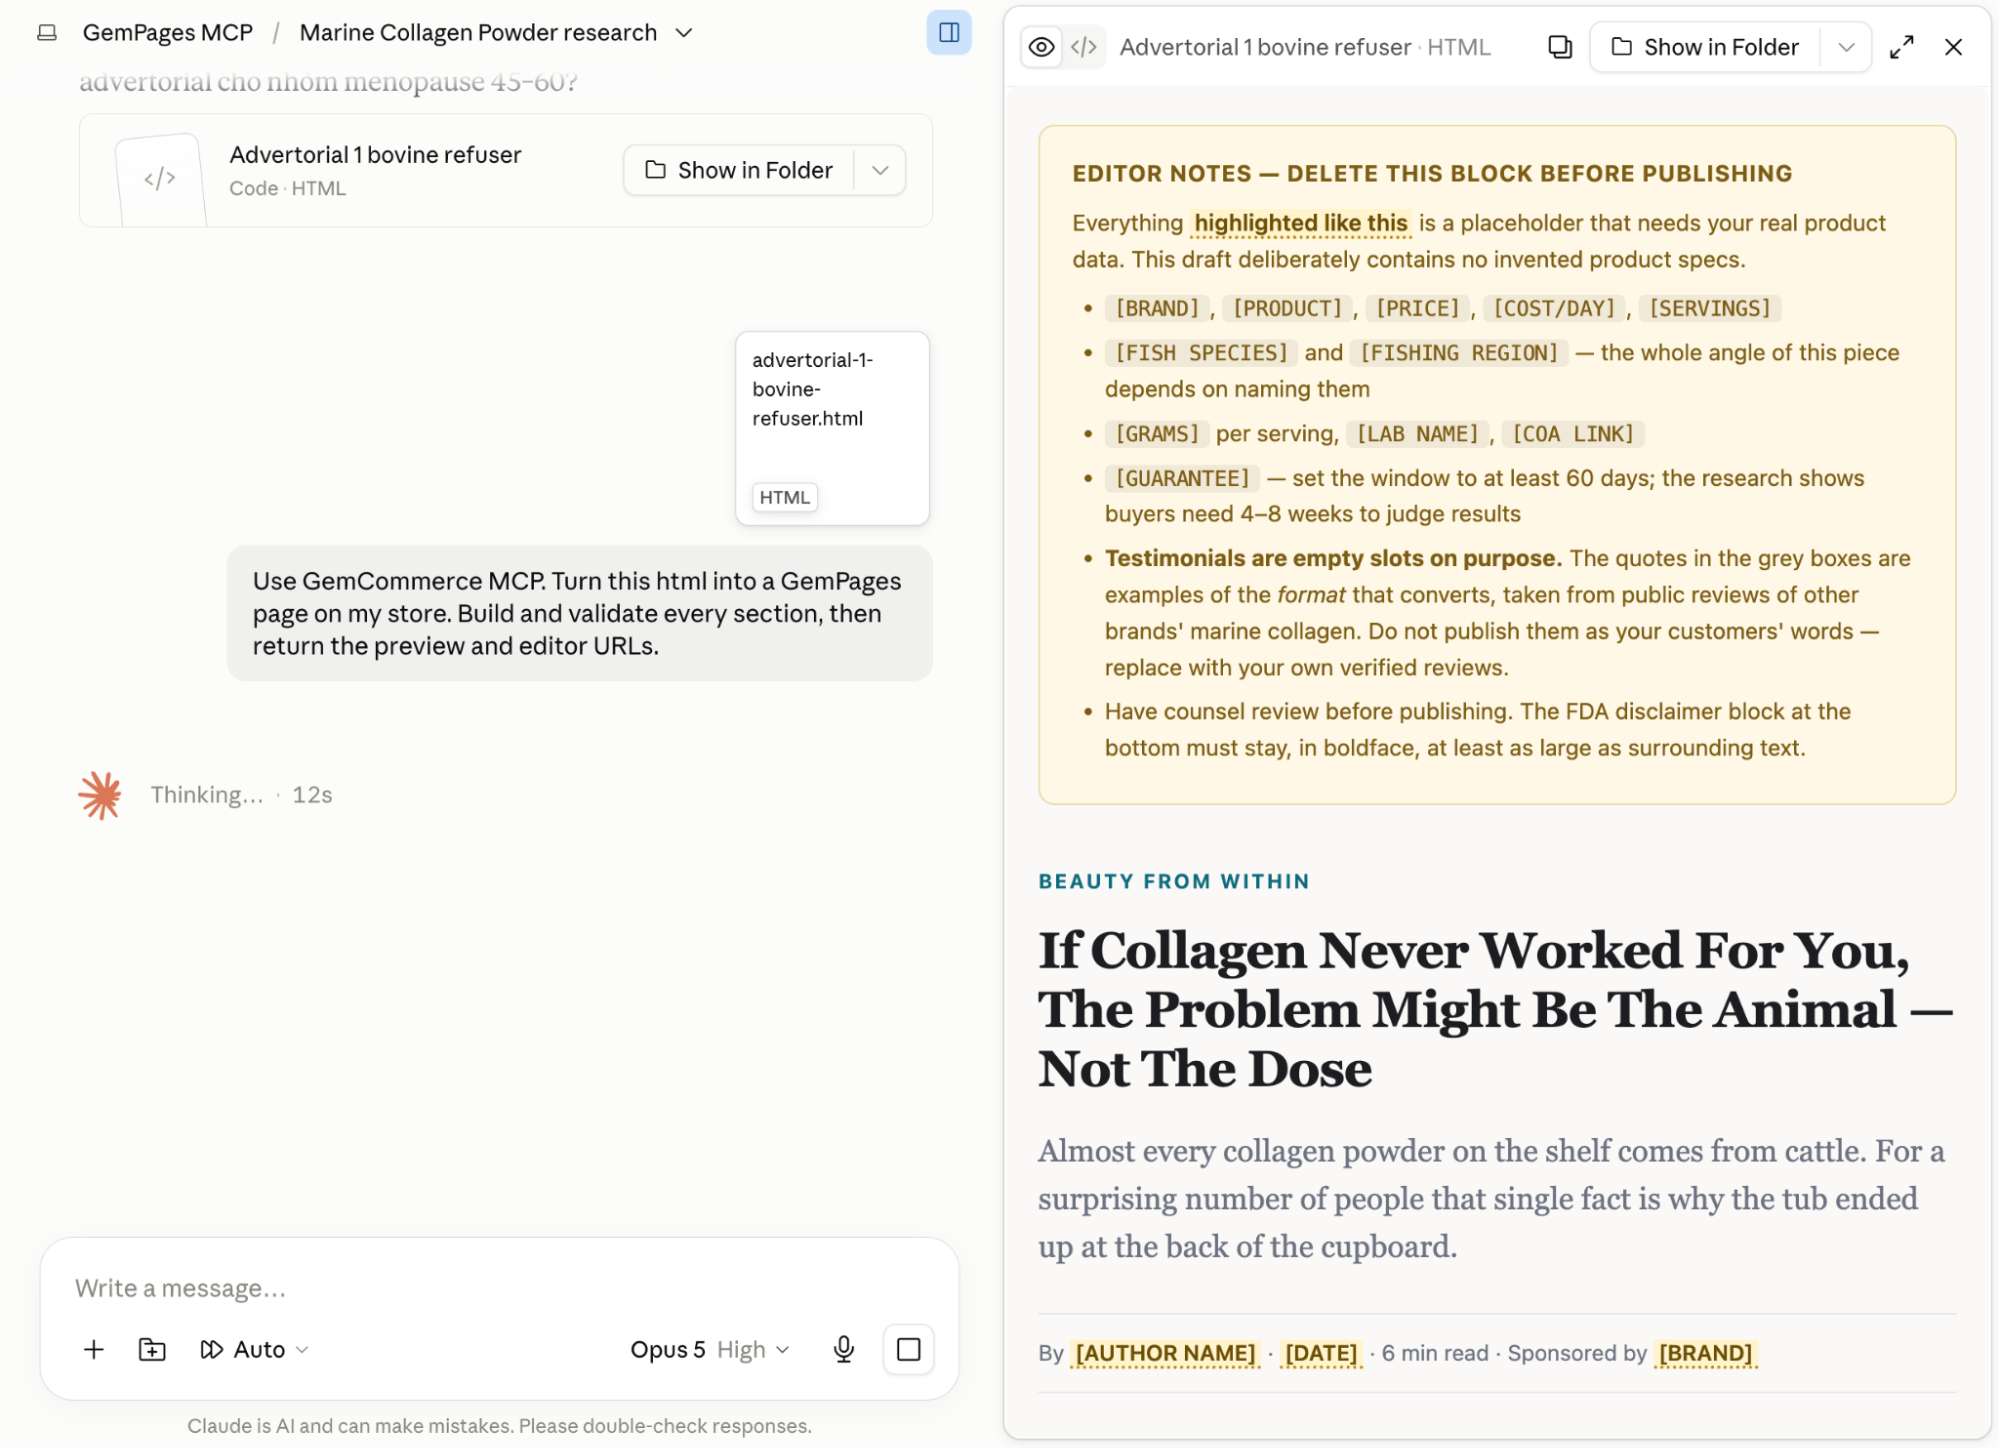
Use GemCommerce MCP. Turn landing-page.html into a GemPages page on my store.
Step 4: Provide One HTML File or a Batch
You can paste the HTML into the conversation or point the AI to a local file.
For one page:
“Use GemCommerce MCP. Turn landing-page.html into a GemPages page on my store”.
For an attached file:
“Use GemCommerce MCP. Turn the attached HTML into a GemPages page on my store”.
For several files:
“Use GemCommerce MCP. Build GemPages pages for every landing-page.html under pages/batch-2026-07/. There are six files in the folder”.
State the exact filename or folder whenever possible. Avoid instructions such as “use the latest file” when several versions are available.
Step 5: Let the AI Build the Page
After receiving the HTML, the AI will:
- Read the page.
- Divide it into semantic sections.
- Retrieve GemPages’ generation rules.
- Build the first section.
- Validate the result.
- Push the section onto the page.
- Repeat the process for each remaining section.
You normally do not need to provide more input during this stage.
However, stay near the conversation during the beginning of the run. The AI may need permission to use an MCP tool, access a file, or run a local command.
Step 6: Receive the Preview and Editor URLs
Once every section has been built and validated, the AI returns the links to the completed page.
Open the preview URL to inspect the result.
Open the editor URL when the page requires further changes.
For a batch, confirm that each HTML file has a corresponding page and set of links.
Step 7: Review the Page in GemPages
Compare the converted page with the original HTML.
Review the page from the Hero through the final CTA rather than checking only the first few sections.
Confirm that:
- All sections are included
- The copy has been transferred correctly
- Images appear in the right locations
- Typography and colors match the source
- Section spacing remains consistent
- Buttons and links work
- The page behaves correctly across screen sizes
- Interactive elements perform as intended
Step 8: Make Final Changes in the Editor
Use the editor URL to address any issues found during review.
Preview the page again after making changes.
The page should pass your team’s content, design, technical, and commercial checks before publication.
Step 9: Publish the Page Yourself
GemPages MCP does not publish the page for you.
When the page is ready, publish it manually through GemPages.
This keeps the final customer-facing version and launch timing under your team’s control.
Prompt Examples
A clear prompt should identify GemCommerce MCP, the source file, the requested action, and the expected output.
| Convert an Attached HTML File | “Use GemCommerce MCP. Turn the attached HTML file into a GemPages page on my store. Return the preview and editor URLs when every section is complete”. |
| Convert HTML From an AI Coding Tool | “Use GemCommerce MCP. Turn summer-campaign.html into a GemPages page on my store. Build and validate each section separately, then return the preview and editor URLs”. |
| Convert a Batch of HTML Pages | Use GemCommerce MCP. Build GemPages pages for every landing-page.html under pages/batch-2026-07/. There are six files in the folder. Process each page separately and return its preview and editor URLs”. |
Using Other Input Types
This guide focuses on creating a GemPages page from HTML.
GemPages MCP also supports other inputs for AI page generation:
- Image: Use an image or screenshot as a visual reference.
- URL: Use an existing webpage URL as the source.
For step-by-step instructions, refer to: How to Generate an Editable Page From an Image With GemPages MCP
Tips for Running the Workflow Without Interruptions
Tip 1: Allow GemCommerce MCP Tool Calls
Claude asks for permission before using an MCP tool by default. Since the HTML to GemPages workflow uses many tool calls, these prompts can repeatedly interrupt the process.
To allow the required GemCommerce MCP tool calls:
- Open Claude Code in the Claude Desktop app.
- Click Customize in the left sidebar.
- Go to Connectors → GemCommerce MCP.
- Open Tool permissions.
- Set the required GemCommerce MCP tools to Always allow.
Only grant ongoing permission to a connector you recognize and trust.
Tip 2: Use Auto Mode for Safe Bash Commands
The workflow uses Bash commands to create and manage section files, logs, and build artifacts.
When Claude requests approval for every command, the run may stop frequently.
In Claude Code inside the Claude Desktop app, set the conversation to Auto mode. Claude can then run commands it considers safe without requesting approval each time.
Review the permission settings before enabling Auto mode, especially when the conversation has access to store information or local files.
Things to Know Before Running the Workflow
Review the following points before starting a conversion.
1. Explicitly Say “Use GemCommerce MCP”
Begin the prompt by telling the AI to use GemCommerce MCP.
Without this instruction, the AI may attempt another method or fail to connect to the required tools.
2. Use an Environment With Local File Access
Run the workflow in Claude Code, Claude Cowork, or another compatible environment with local file access.
The workflow writes a run folder containing:
- Section files
- Progress logs
- Validation results
- Build artifacts
- Data used to resume the conversion
A chat-only interface without local file access cannot reliably manage the complete run.
3. Use a Model That Can Handle Around 500K Context
A landing page may contain many sections, with a separate building and validation cycle for each one.
Use a model that can comfortably handle around 500K context, such as Opus with Medium or High reasoning effort.
A model with limited context or reasoning capacity may lose track of:
- GemPages’ generation rules
- Previously completed sections
- Earlier validation results
- Page-wide design patterns
- The current stage of the run
This becomes more important for long pages and batch conversions.
4. Interrupted Runs Can Be Resumed
A dropped connection, exhausted usage budget, or another interruption may stop the workflow before completion.
You normally do not need to restart.
Ask the AI to continue:
Continue the HTML to GemPages workflow from the last completed section. Do not restart the run.
The AI can use the existing section files, logs, and build artifacts to continue from the correct point.
Keep the run folder intact until the page is complete.
5. Long Pages Can Take More Than an Hour
A page with many sections can take more than an hour to complete.
The workflow prioritizes an accurate rebuild over a fast bulk transfer. Each section is built and validated separately against GemPages’ generation rules.
This matters because the output is a page that customers will see and act on. A small difference in copy, layout, or CTA behavior can affect the final experience.
The more sections the page contains, the more building and validation rounds the workflow needs.
What to Review Before Publishing
GemPages MCP returns an editable page, but your team remains responsible for the final review.
Compare Every Section With the Original HTML
Open the original HTML and GemPages preview side by side.
Check that:
- Every section is present
- The section order is correct
- Copy matches the source
- Images appear in the intended locations
- Buttons use the intended labels
- CTA destinations are correct
- No section has been duplicated
- No important content is missing
Review Desktop, Tablet, and Mobile
Check the page at several screen sizes.
Look for:
- Horizontal scrolling
- Text extending outside its container
- Incorrect image crops
- Fixed-width sections
- Buttons that are difficult to tap
- Large gaps between sections
- Tables that do not fit smaller screens
- Sticky elements covering content
Test Page Actions
Click and test every customer-facing action, including:
- CTA buttons
- Product links
- Navigation links
- Anchor links
- Forms
- Accordions
- Other interactive elements
A page can look close to the source while still containing an incorrect link or non-working action.
Verify Content and Offer Information
Check:
- Product names
- Prices
- Discounts
- Shipping information
- Return conditions
- Guarantees
- Customer testimonials
- Competitor comparisons
- Certifications
- Product claims
- Offer expiration dates
The workflow transfers the page. It does not confirm that every commercial statement in the source HTML is accurate.
Make Final Changes in GemPages
Use the editor URL to address any remaining issues.
After making changes, preview the page again and repeat the relevant checks.
Publish only after the content, design, mobile presentation, and customer actions have been reviewed.
When to Create a GemPages Page From HTML
Use HTML as the source when:
- You already have a completed HTML landing page
- A developer has prepared the page
- An agency has delivered the final HTML
- An AI coding tool has generated an approved page
- A Figma design has already been implemented as HTML
- You need to transfer several HTML pages into GemPages
- The ecommerce team needs to manage the page after development
The workflow is designed for teams that have finished HTML and need to bring it into their store workflow without another manual rebuild.


Thank you for your comments