


GemPages MCP connects compatible AI agents with Shopify and GemPages, giving ecommerce teams access to specialized workflows for content research and production.
The setup process differs slightly depending on whether you use a personal Claude account or an account managed by an organization.
1. Connect With a Claude Personal Account
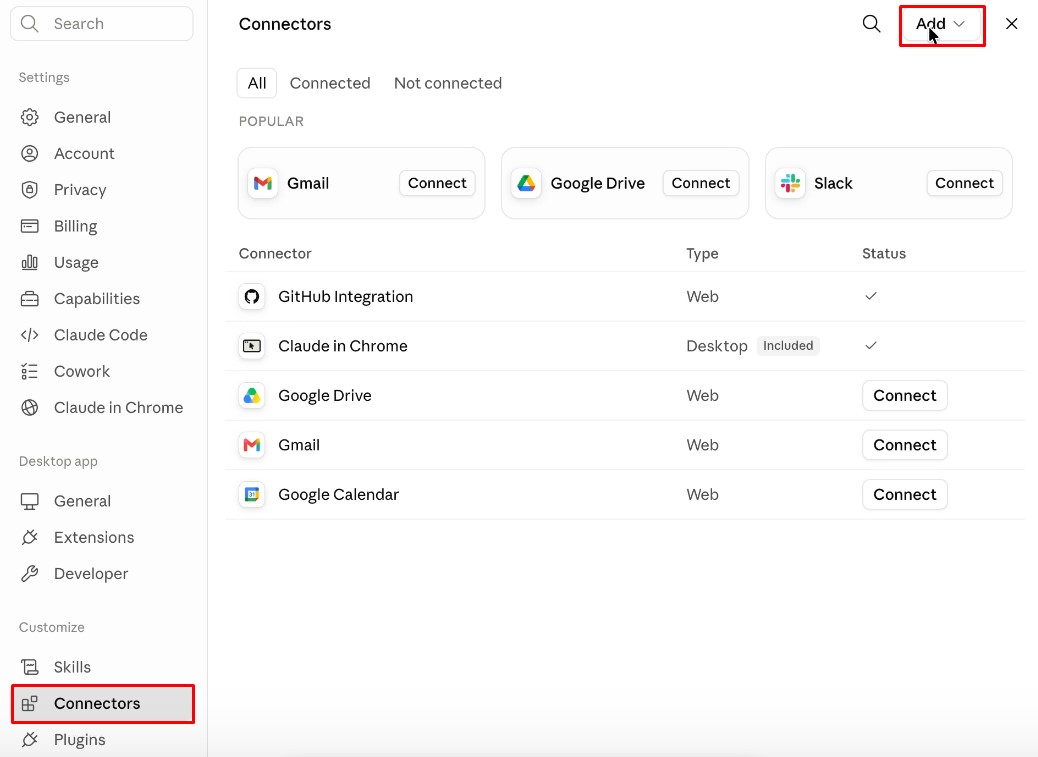
Step 1: Add a Custom Connector
Open Claude and go to: Settings → Connectors
Select Add custom connector.
Step 2: Enter the GemCommerce MCP Details
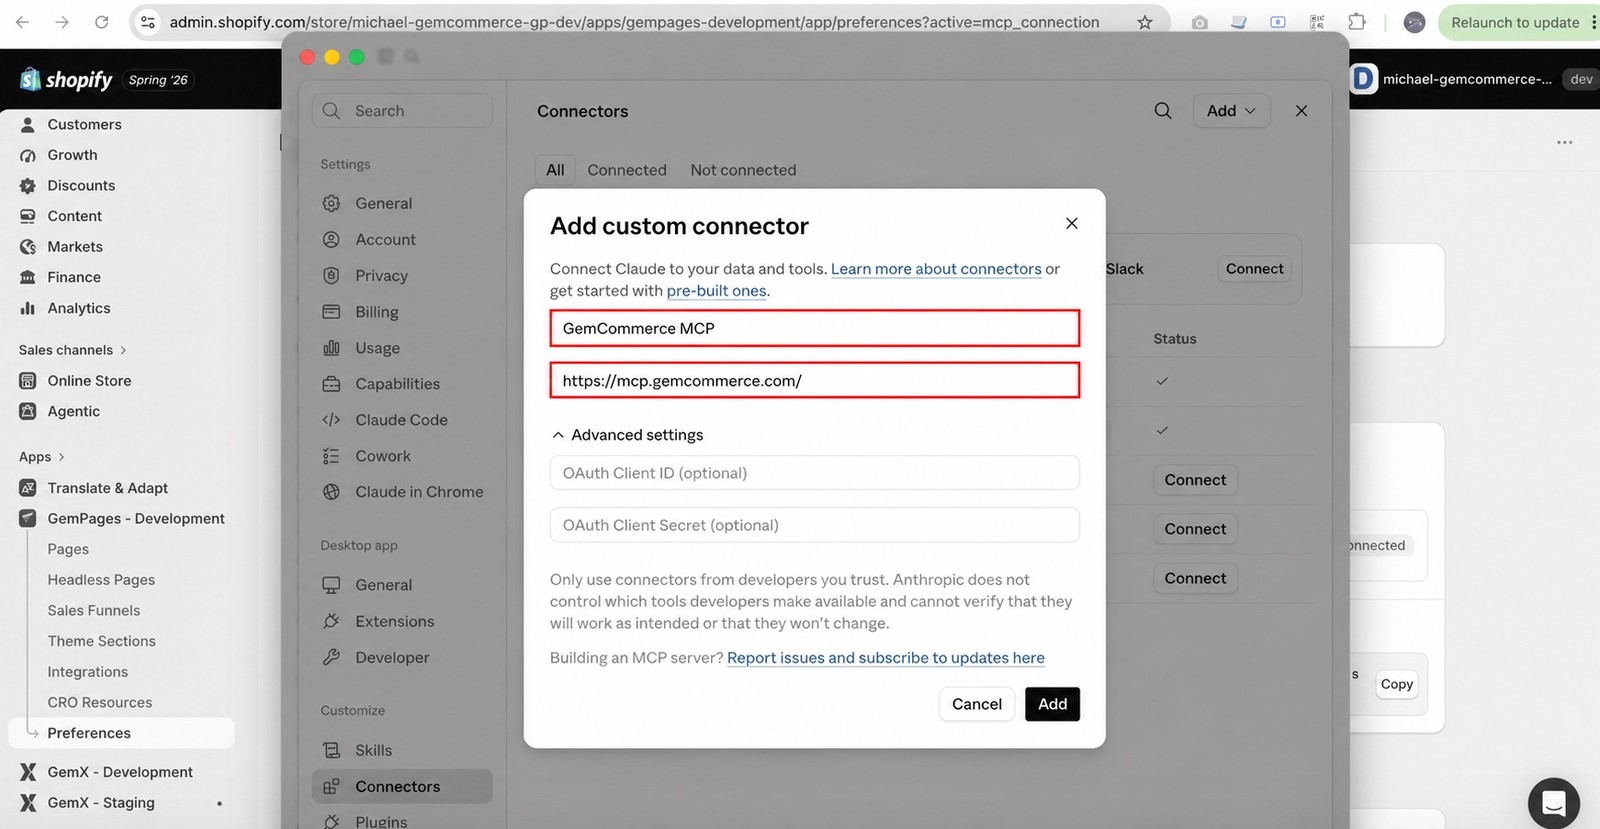
Complete the connector fields with the following information:
- Name: GemCommerce MCP
- Remote MCP URL: https://mcp.gemcommerce.com/
Click Add, then select Connect.
Step 3: Open GemPages Preferences
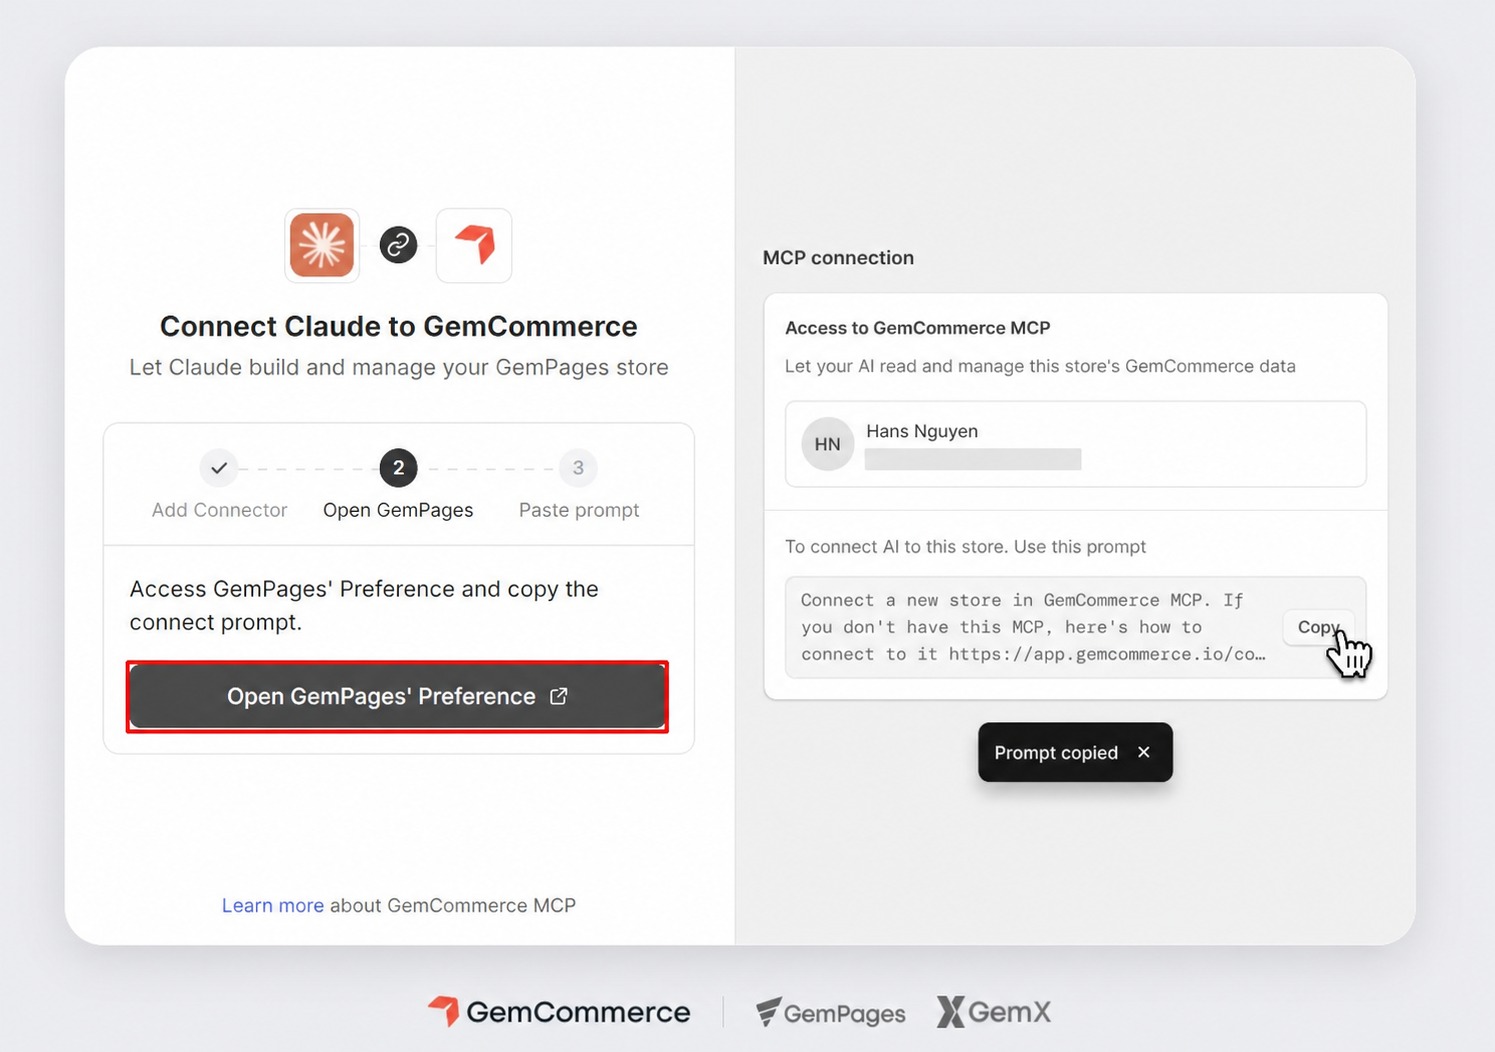
Claude will redirect you to the GemCommerce connection page.
Select Open GemPages Preferences to continue.
Step 4: Select Your Shopify Store
Choose the Shopify store you want to connect to GemPages MCP.
Check the store name and domain before continuing, especially when your account has access to several stores.
Step 5: Copy the Connection Prompt
Find the MCP Connection section in GemPages Preferences.
Copy the prompt provided in this section.
The prompt contains the information Claude needs to complete the connection with your selected store.
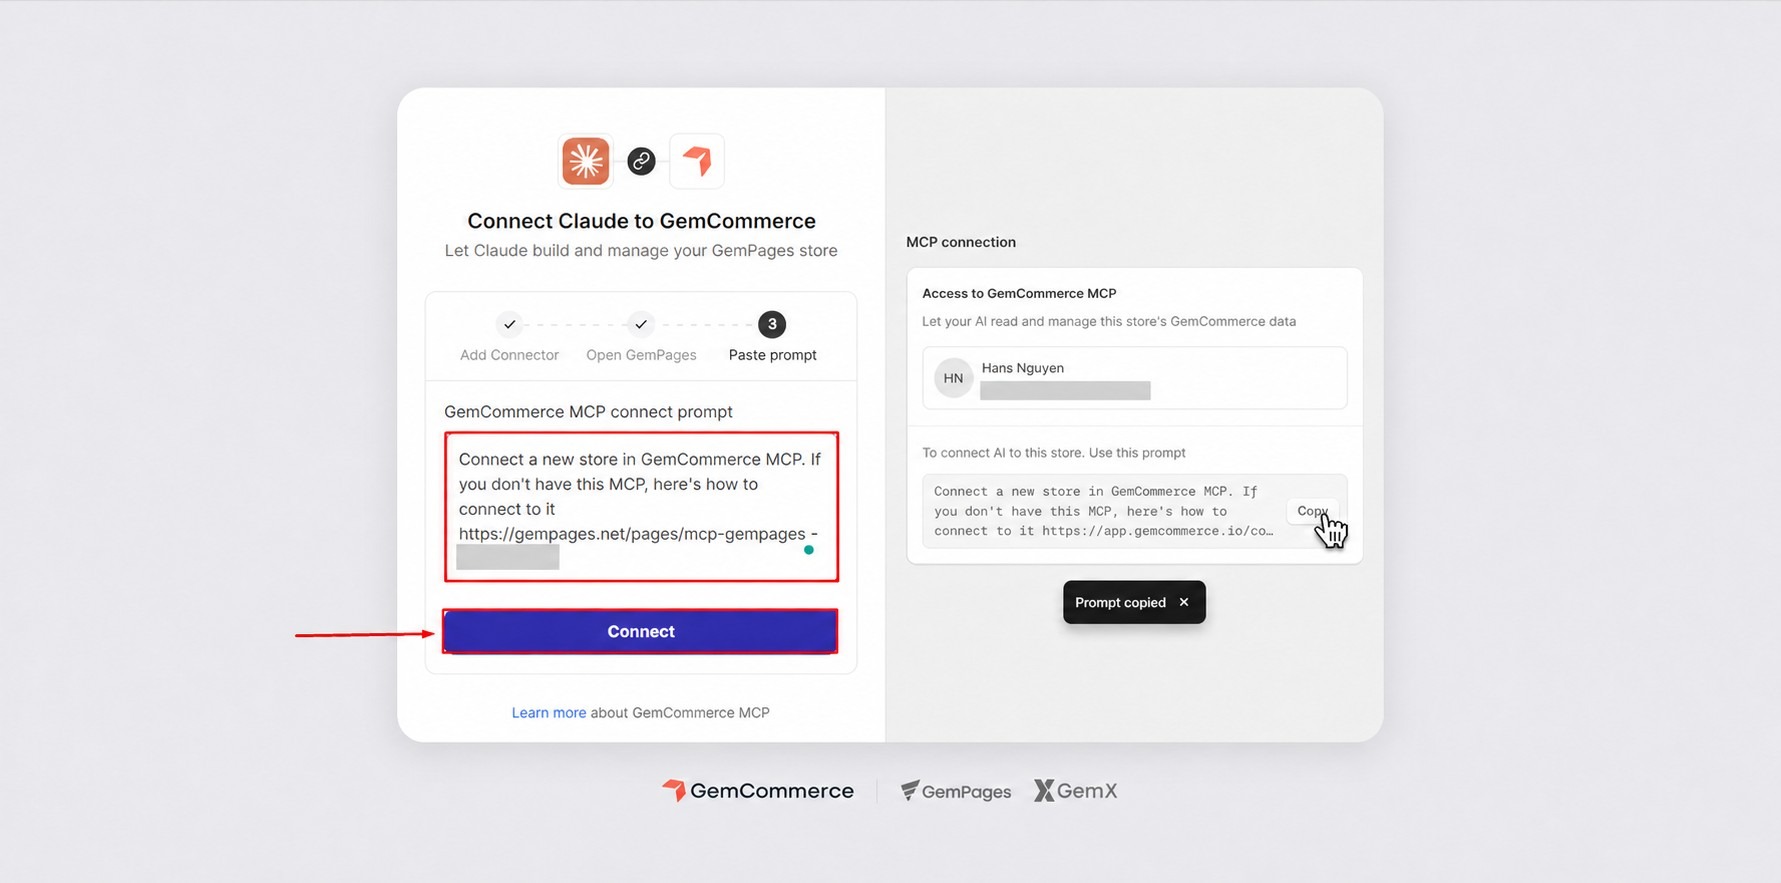
Step 6: Paste the Prompt into GemCommerce connection page
Return to GemCommerce connection page and paste the copied prompt into the Paste prompt here field.
Click Connect.
Your selected Shopify store should now be connected to GemCommerce MCP in Claude.
Step 7: Allow GemCommerce MCP Tool Calls
Claude requests permission before using an MCP tool by default. Since GemCommerce MCP workflows can involve many tool calls, Claude may repeatedly pause and ask for approval.
To prevent these interruptions:
- Open the GemCommerce MCP connector settings.
- Go to Tool permissions.
- Change all required permissions to Always allow.
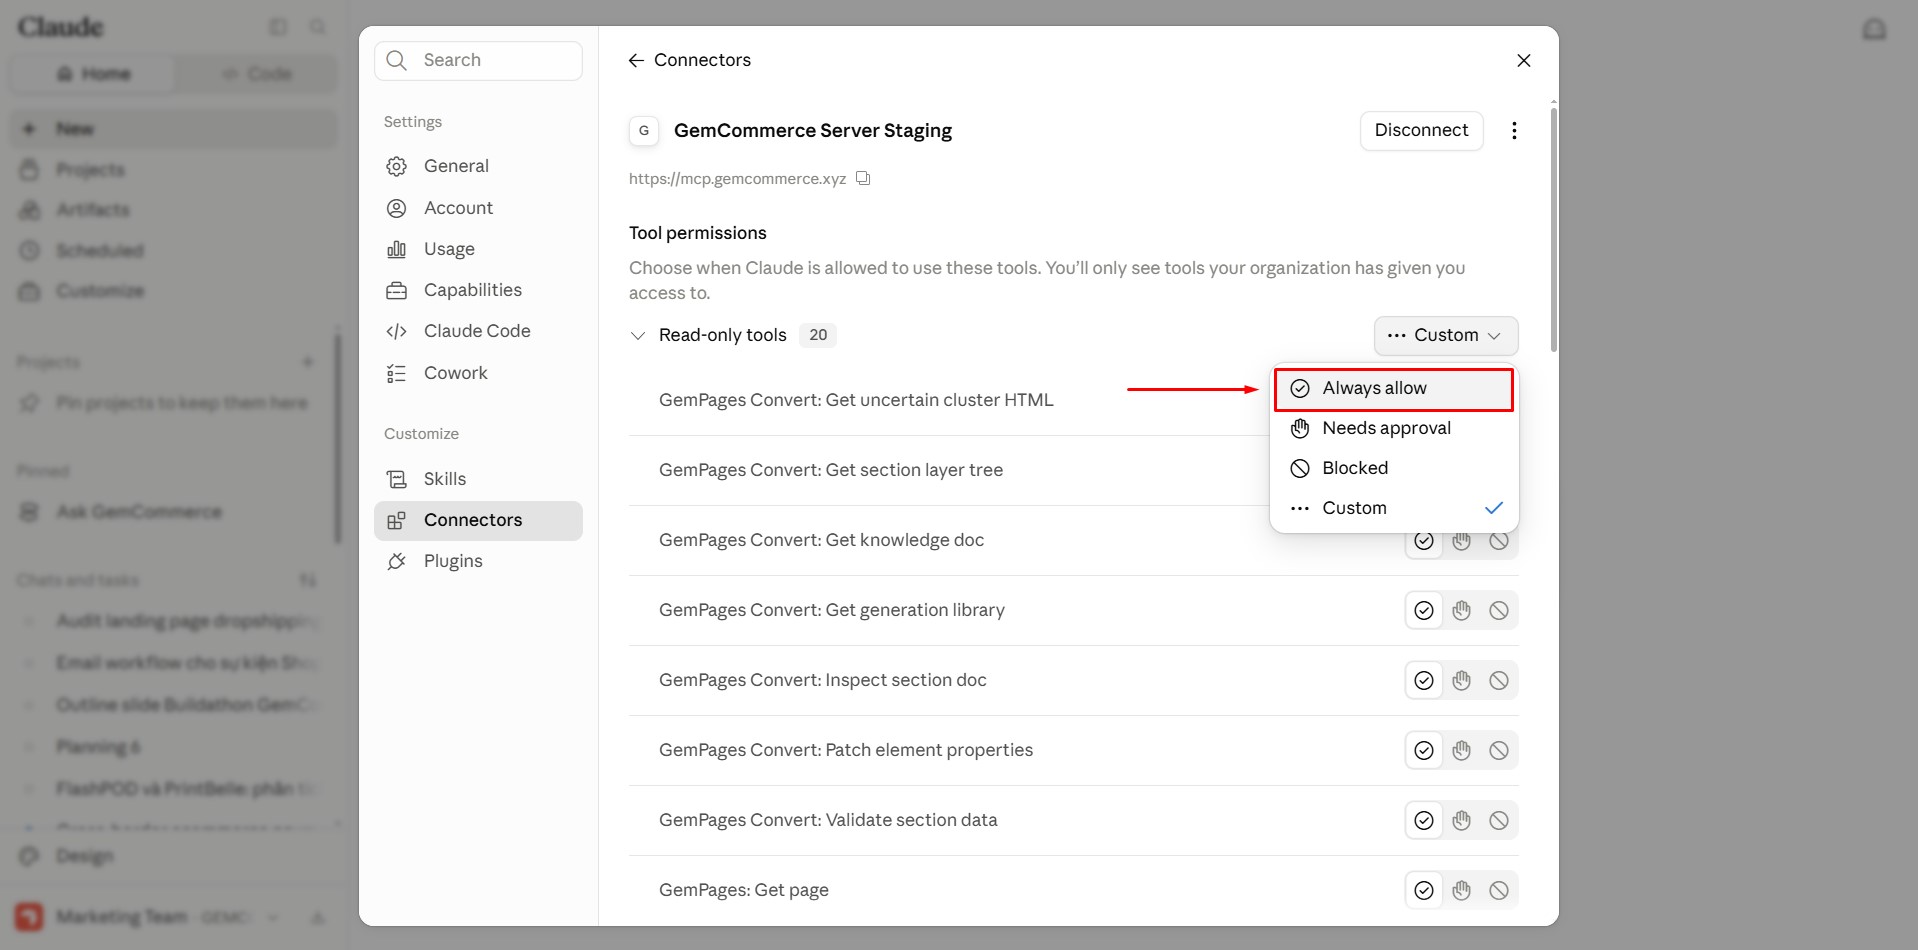
For the complete connection process, watch the video guide below:
2. Connect With a Claude Organization Account
First, check whether GemCommerce MCP already appears in your organization’s available connectors.
If the connector is unavailable, ask your Claude administrator to add it with the following URL:
https://mcp.gemcommerce.com/
Your administrator may need to approve the connector before organization members can access it.
Once the connector is available, follow the same setup process used for a personal account.
3. Connect GemPages MCP to Codex
Step 1: Turn On Developer Mode
Open the following page: ChatGPT Security Settings
Turn on Developer mode.
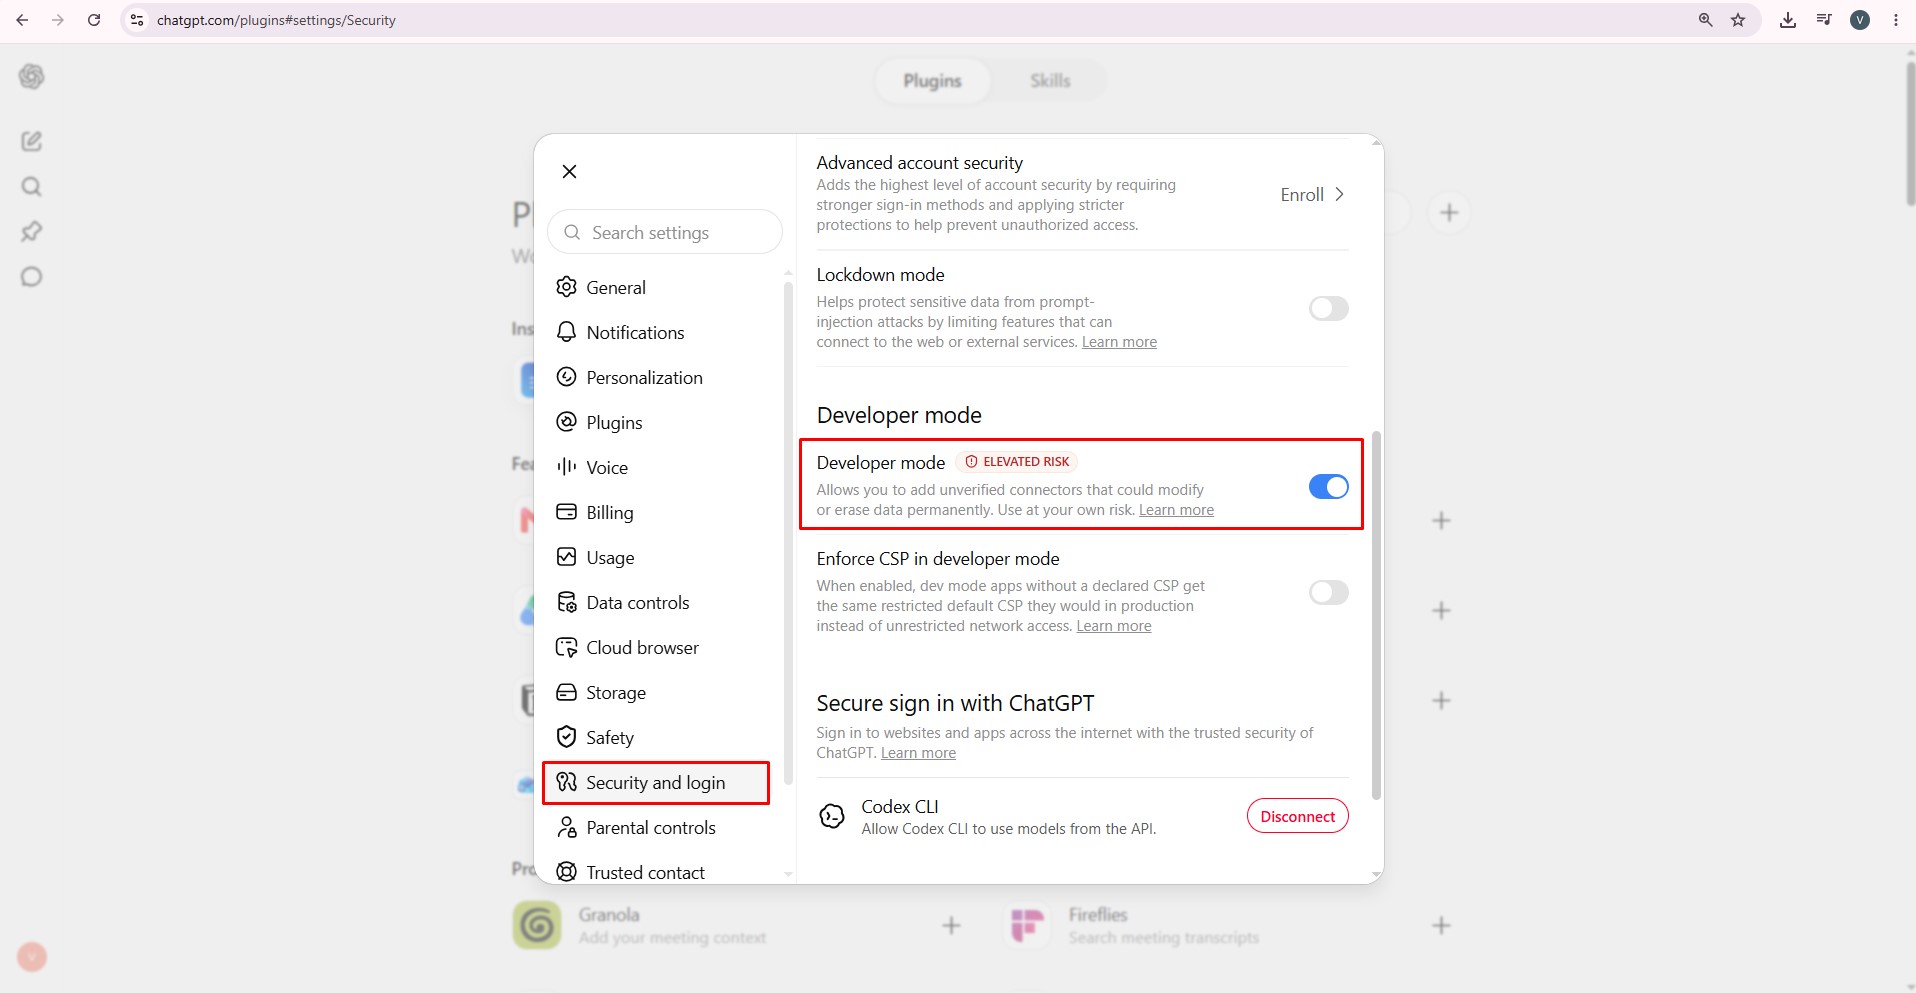
Developer mode allows you to add a custom plugin through an MCP connection.
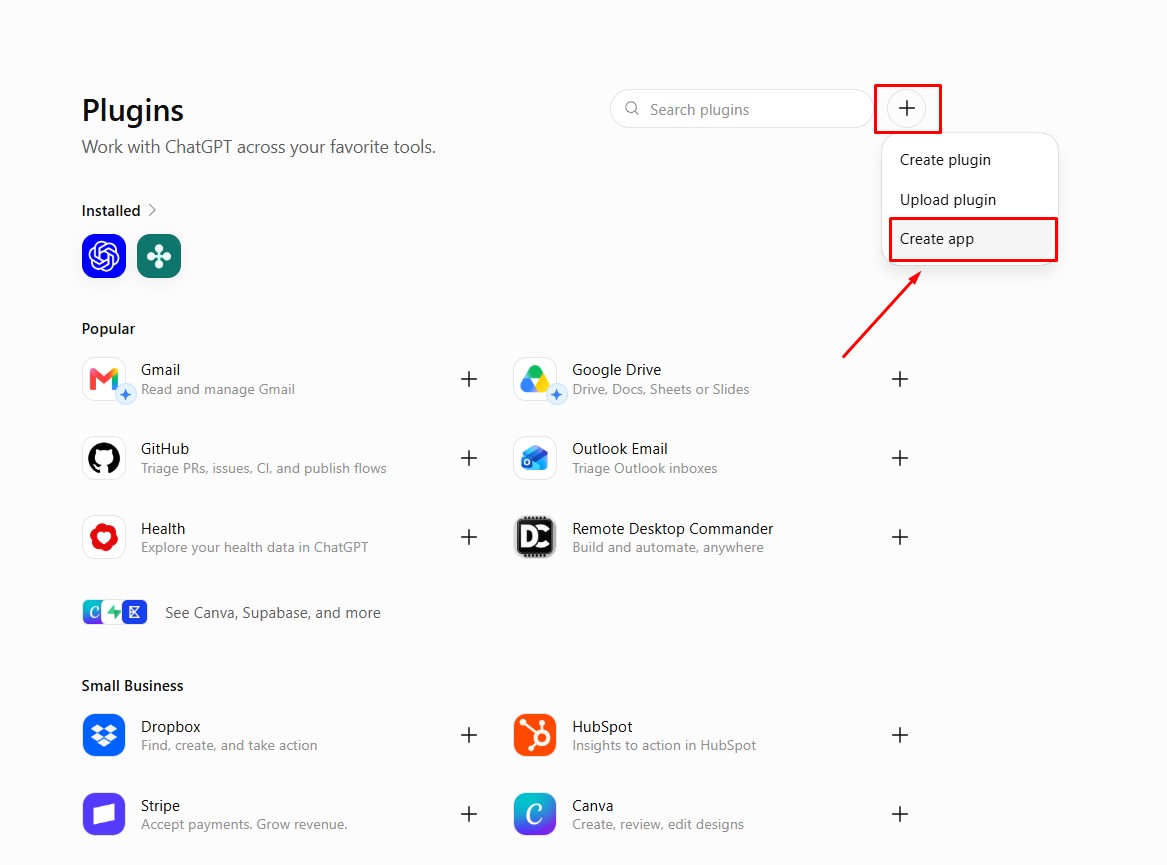
Step 2: Add a New Plugin
Open Plugins and click the plus icon (+). Choose Create app.
Click on Create MCP app.
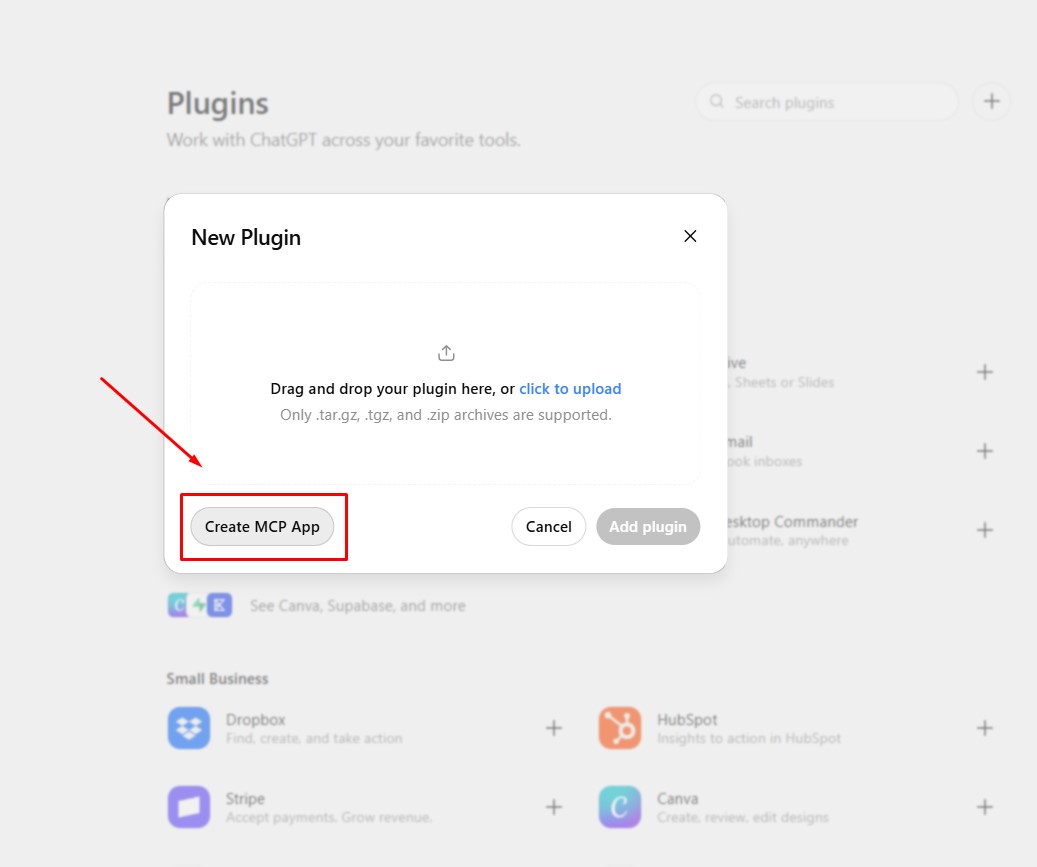
Step 3: Enter the GemCommerce MCP Details
Complete the plugin fields with the following information:
- Name: GemCommerce MCP
- Connection: https://mcp.gemcommerce.com/
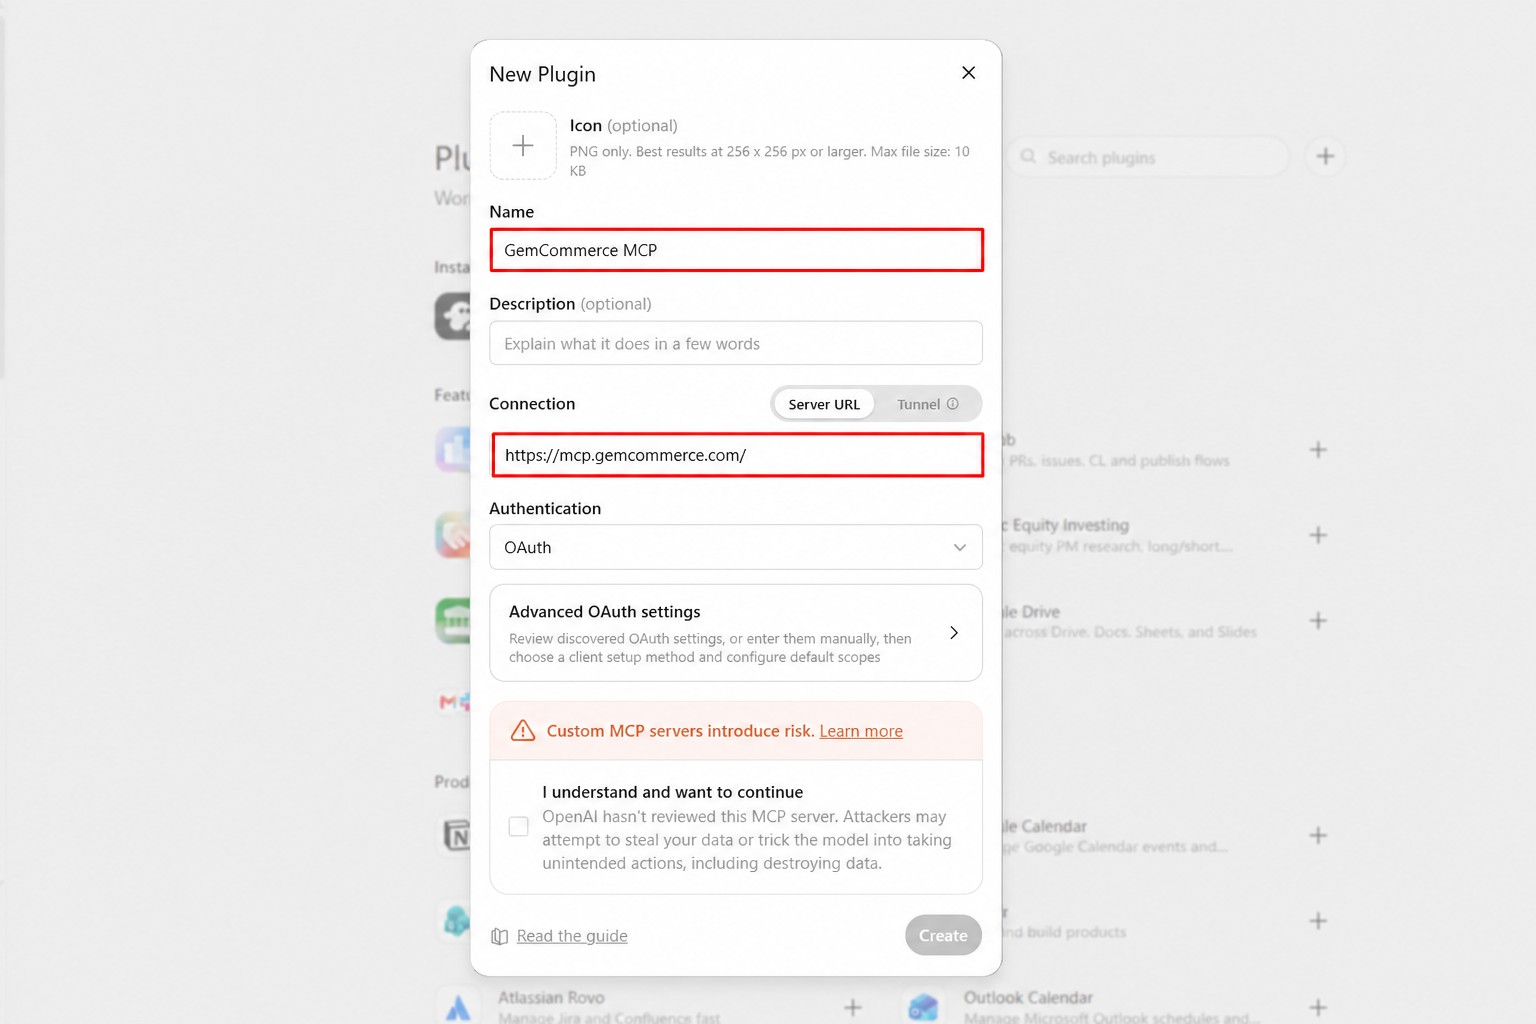
Step 4: Confirm the Custom Plugin Connection
Select: I understand and want to continue
Then click Create.
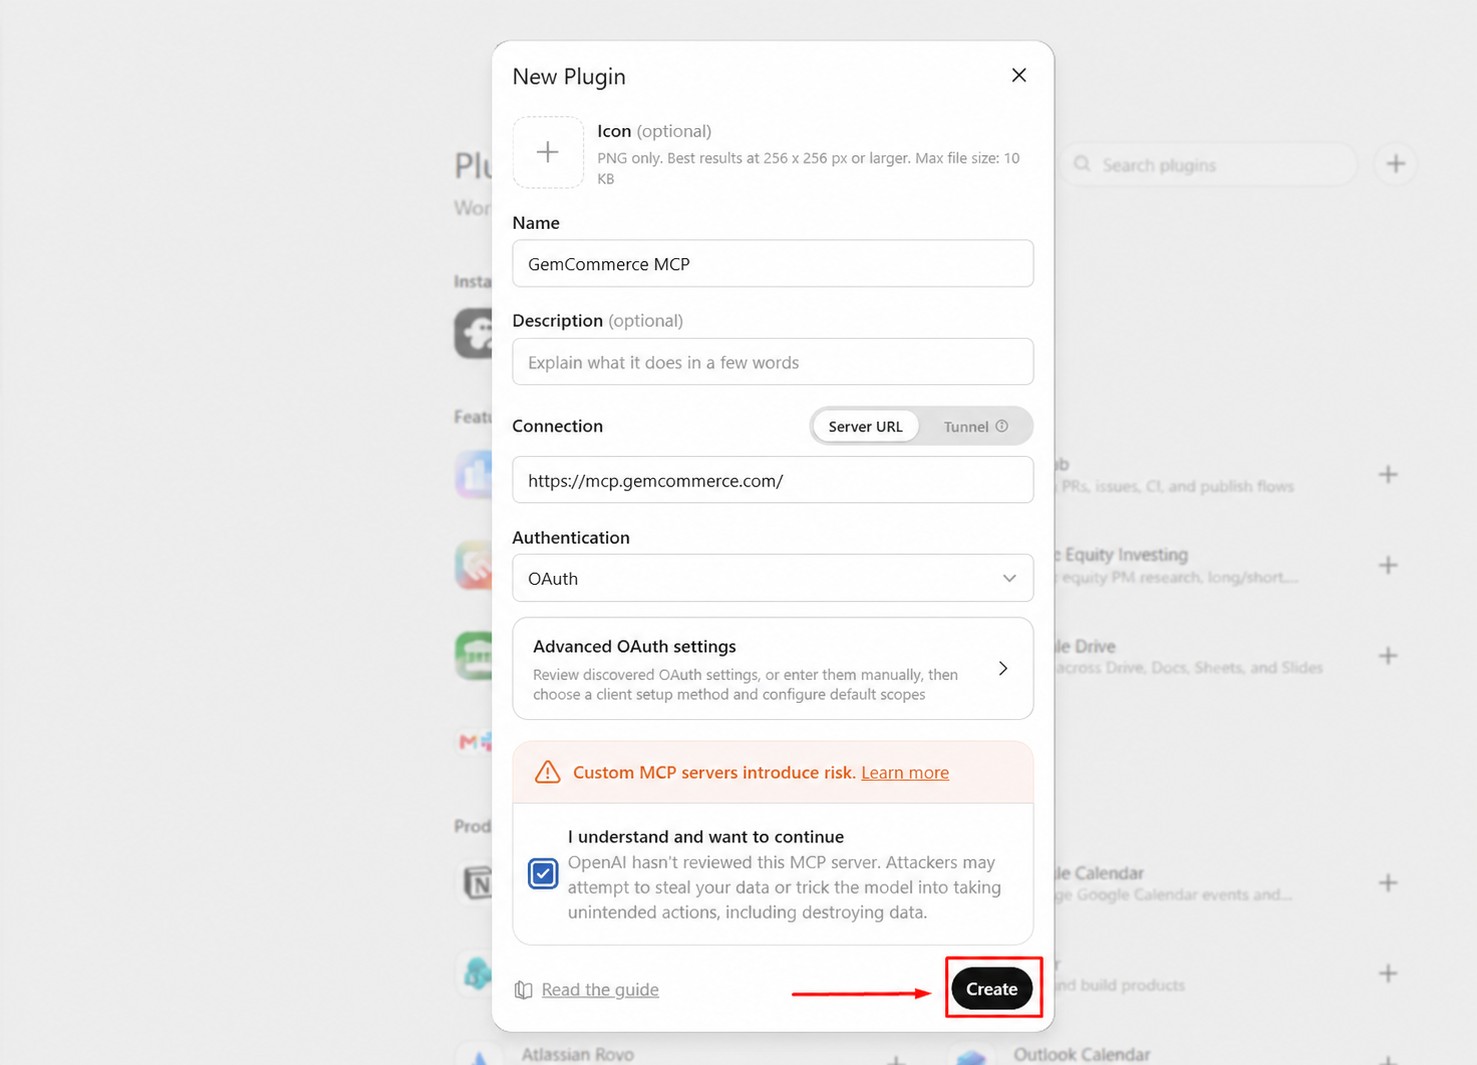
Step 5: Sign In With GemCommerce MCP
Choose Sign in with GemCommerce MCP. You will be redirected to GemCommerce connection page.
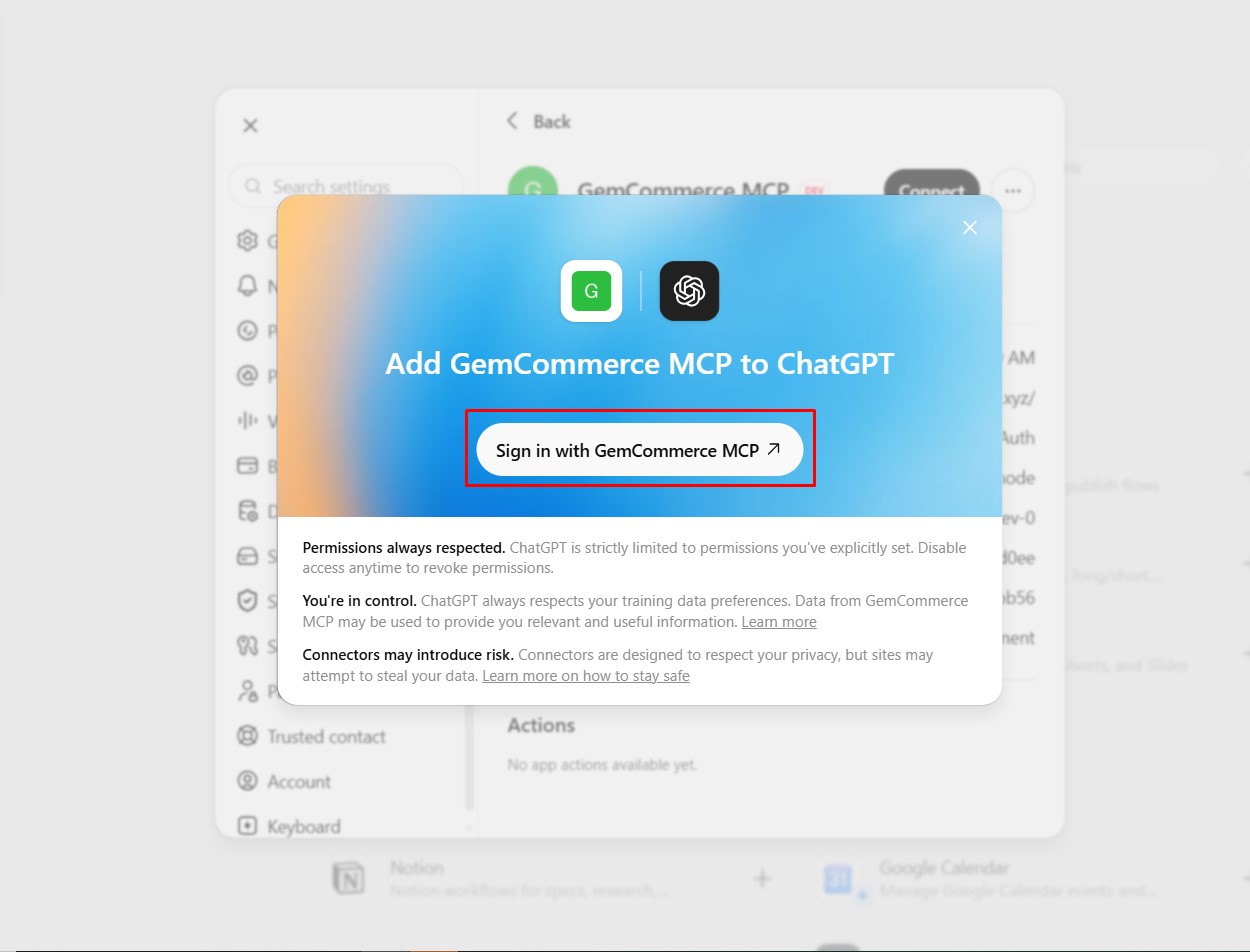
Step 6: Open GemPages Preferences
Select Open GemPages Preferences.
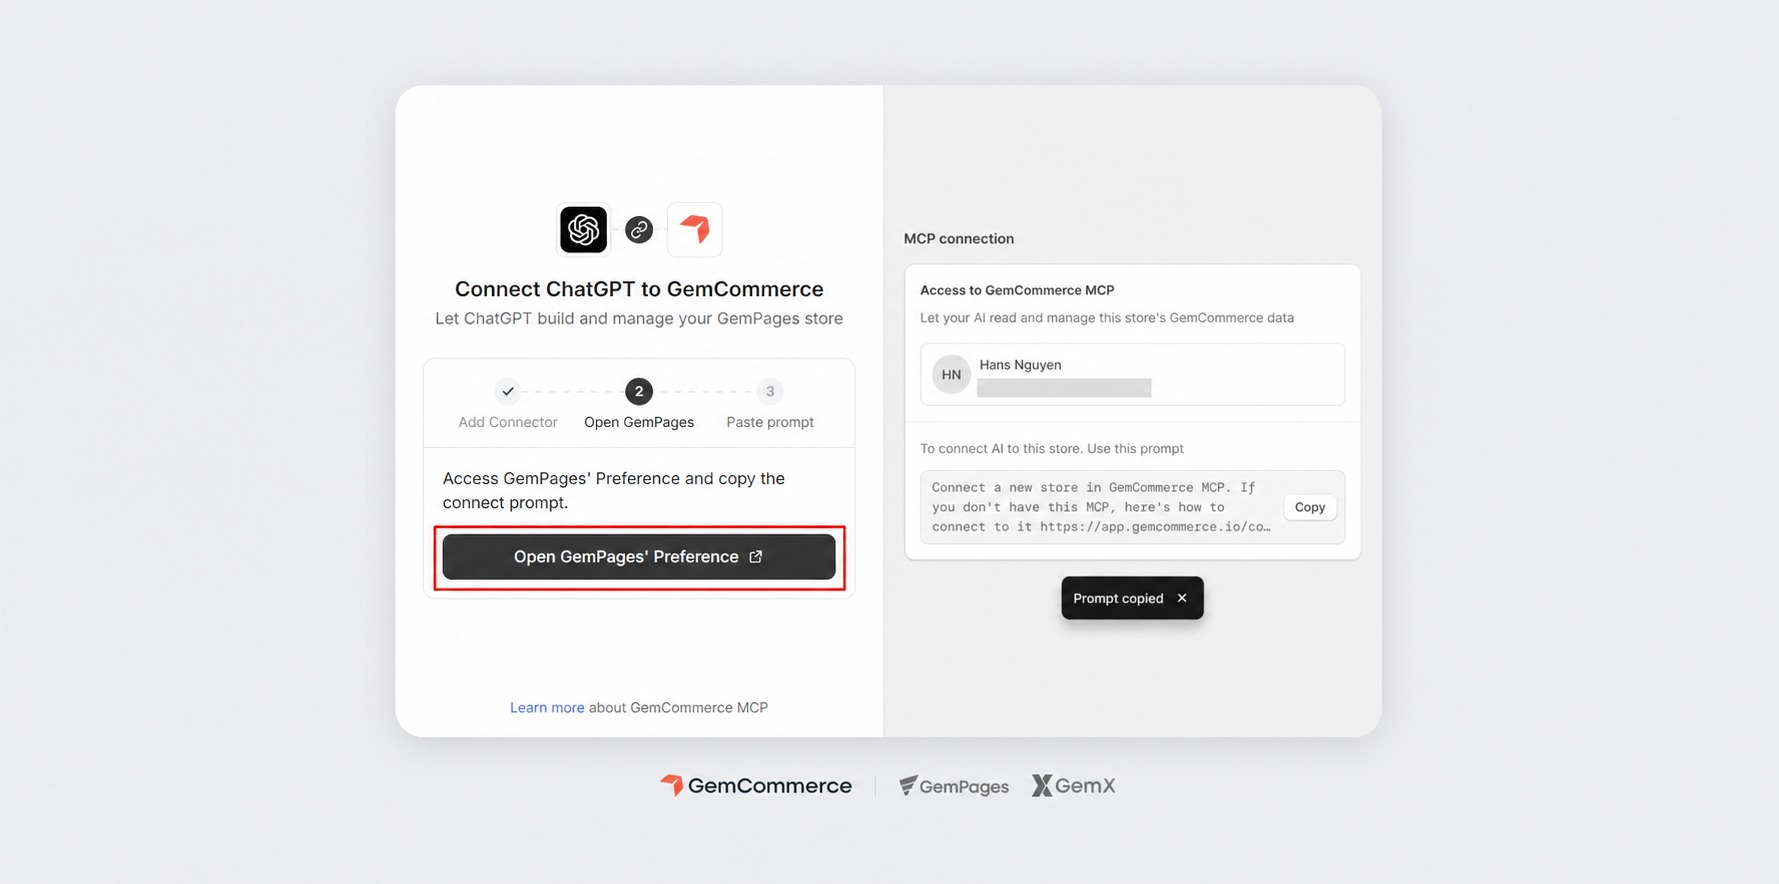
Step 7: Select Your Shopify Store
Choose the Shopify store you want to connect.
When your account has access to several stores, confirm that you select the correct store before copying the connection prompt.
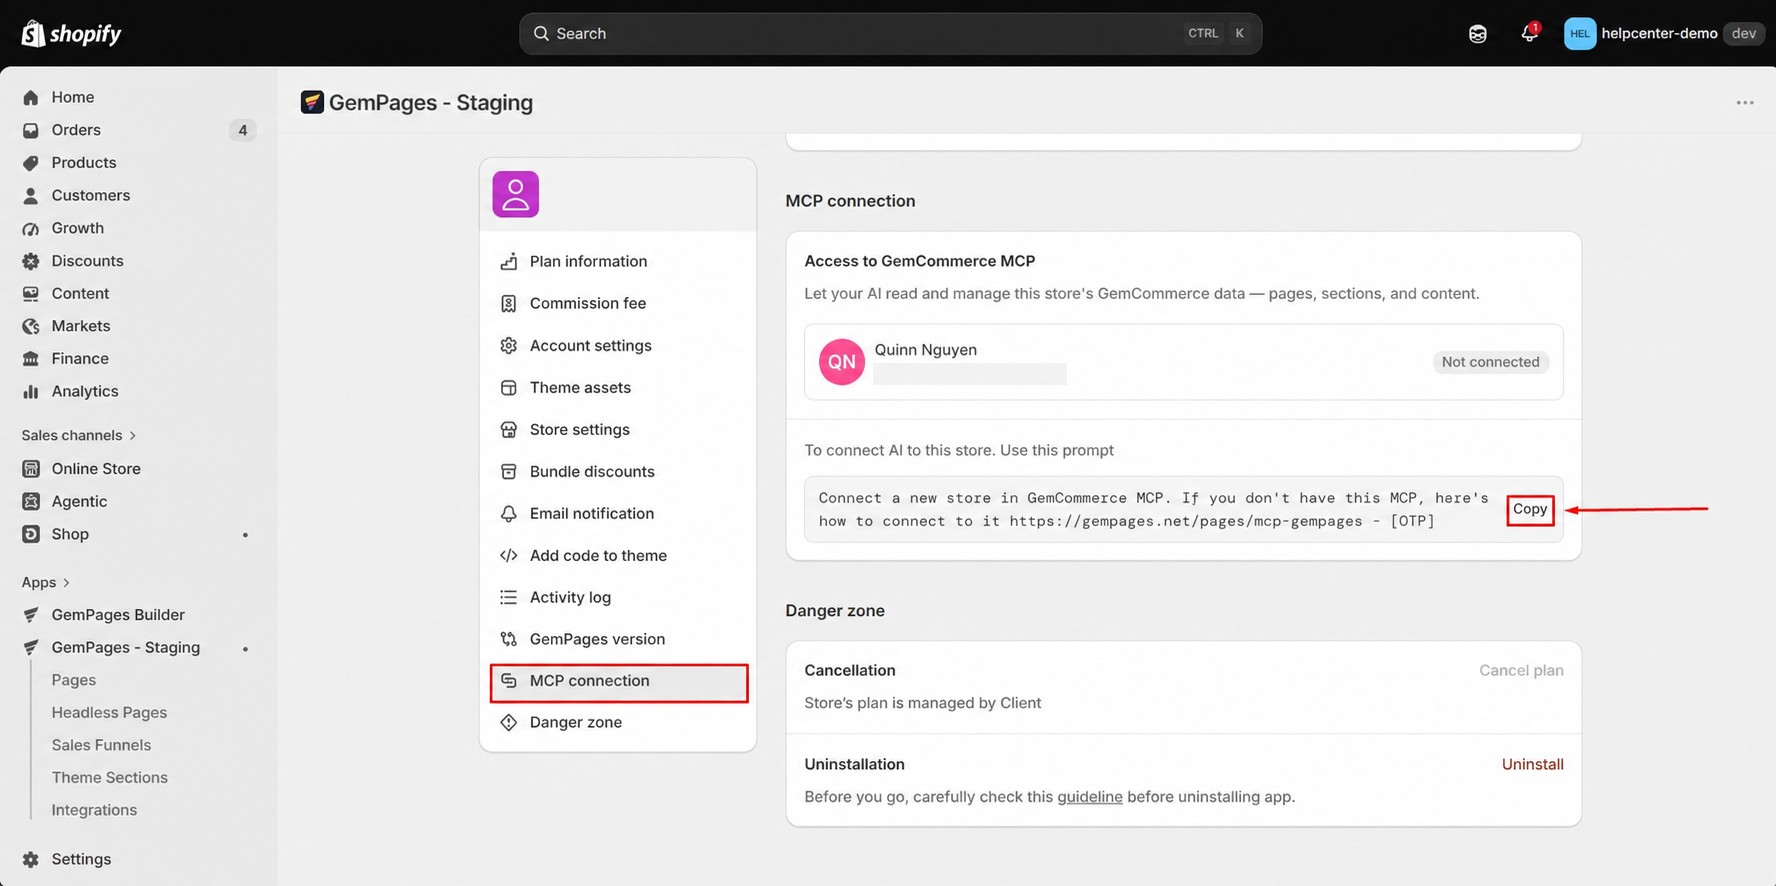
Step 8: Copy the MCP Connection Prompt
In GemPages Preferences, find the MCP Connection section.
Copy the prompt shown in this section.
Step 9: Paste the Prompt Into GemCommerce connection page
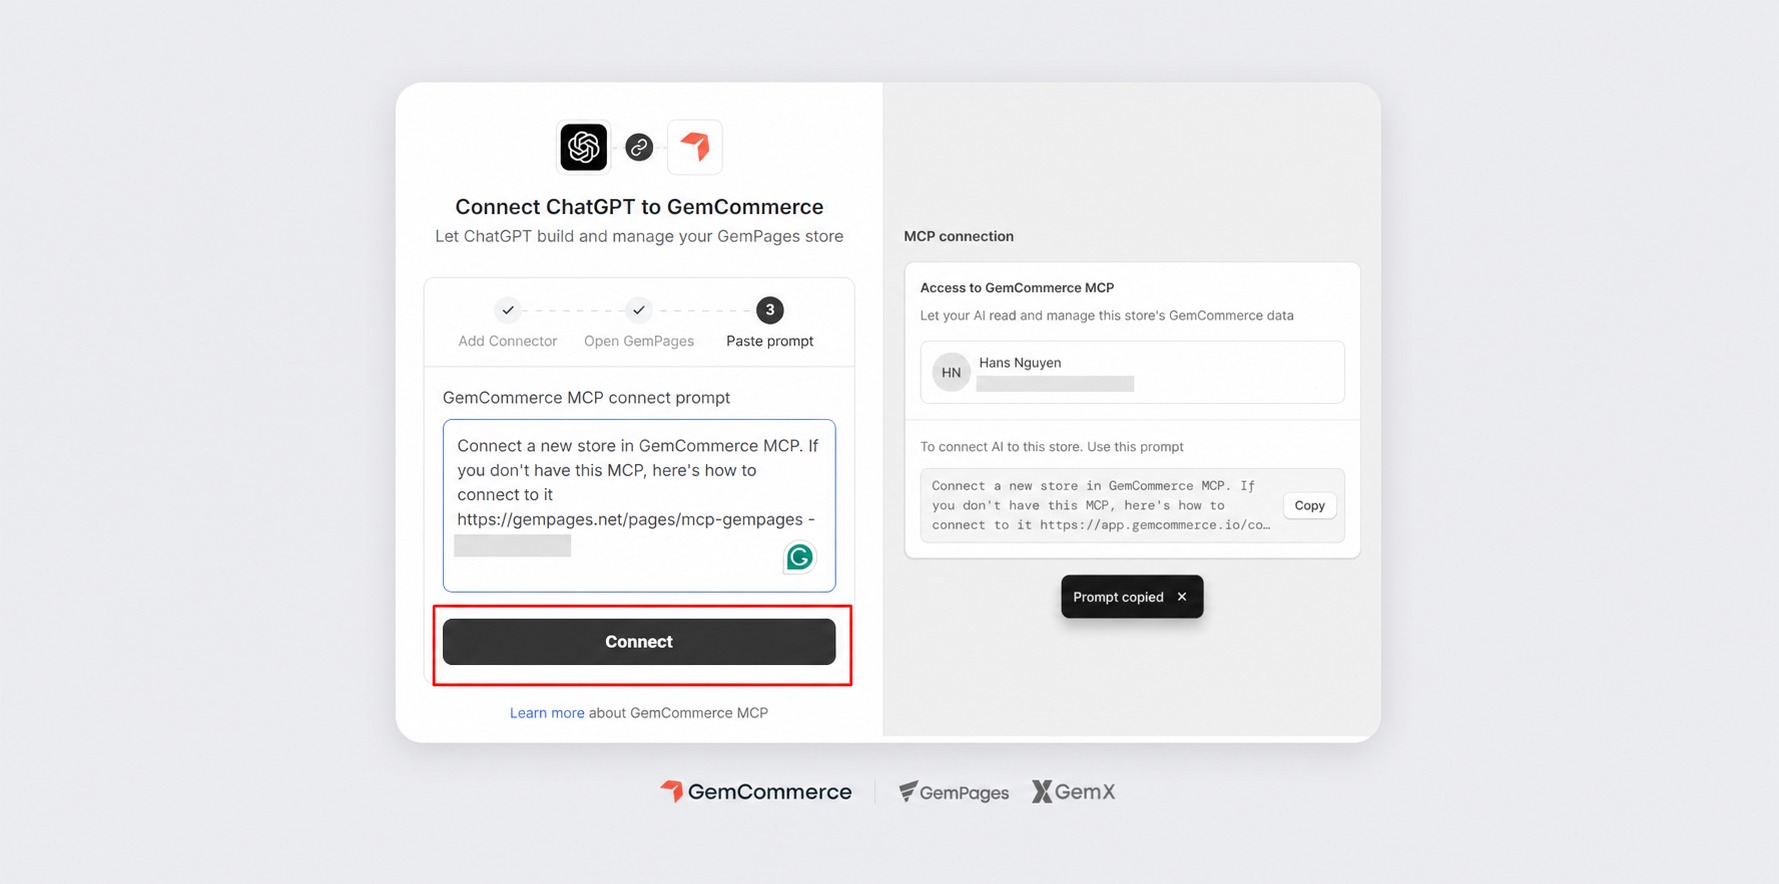
Return to GemCommerce connection page and paste the complete connection prompt into the conversation.
Click Connect to complete the connection.
For the complete connection process, watch the video guide below:
FAQs About Connecting to GemPages MCP
1. Why can’t I connect to the GemPages MCP after pasting the prompt?
This problem occurs when you have installed the GemPages MCP in your AI client but haven’t connected it to your store yet. The connection prompt only works on the GemCommerce connection page.
To connect the GemPages MCP to your store, follow these steps:
- In Claude:
Go to Settings > Customize > Connectors > GemCommerce MCP. Click Connect to open the GemCommerce connection page, then paste the connection prompt there.
- In ChatGPT/Codex:
Go to Plugins > Personal > GemCommerce MCP. Press Connect to open the GemCommerce connection page, then paste the connection prompt there.
2. What ChatGPT Configuration Is Recommended for GemCommerce MCP?
For better results, use ChatGPT version 5.5 or later and set Reasoning effort to High.
Go to Settings → General and turn on Full access.
When Full access is disabled, ChatGPT may not be able to process an attached file directly. In that case, paste the required content into the conversation instead.
3. What Is Required to Run a GemPages MCP Workflow in ChatGPT?
Two conditions must be met:
- The instruction must use the correct prompt syntax.
- GemCommerce MCP must be attached to the current session.
Both conditions are required. The workflow will not run when the MCP is not attached, even when the prompt is written correctly.
Before submitting the prompt, confirm that GemCommerce MCP appears among the tools or plugins available in the current session.
4. Which Claude Configuration Should I Use for GemCommerce MCP Tasks?
The recommended configuration depends on the task:
- Content Research: Claude Opus 5.0 or later
- Content to HTML: A model that can comfortably handle approximately 200k tokens of context, such as Claude Opus 5.0 with Reasoning effort set to Medium or High
- HTML to GemPages: Claude Opus 5.0 with Reasoning effort set to High
HTML conversion involves multiple section-building and validation steps, so it requires a model that can maintain the page structure and workflow state throughout the run.
5. Can I Connect GemCommerce MCP to a Free Claude or ChatGPT Account?
A free account may be able to connect to GemCommerce MCP.
However, GemCommerce MCP workflows involve multiple tool calls, research steps, and file-processing tasks. These tasks may exceed the processing capacity or usage limits available on a free account.
As a result, free-tier users may experience:
- Incomplete workflow runs
- Inconsistent output
- Earlier usage-limit interruptions
- Difficulty processing long pages or large files
For more consistent results, use the model and configuration recommended for the selected workflow.
6. Does GemPages MCP Have Separate Usage Limits From the GemPages App?
No. Actions performed through GemPages MCP follow the limits of the connected GemPages plan.
Using MCP does not create a separate publishing allowance outside the GemPages app.
7. What Does This Mean for a Store on the GemPages Free Plan?
A store on the GemPages Free plan can publish one page.
This limit applies across the account, regardless of whether the page is created through GemPages MCP or directly through the GemPages interface.
Creating or publishing a page through MCP does not bypass the plan limit.
8. Why Does the Workflow Not Start After I Paste the Prompt?
Check the following:
- GemCommerce MCP is attached to the current session.
- The prompt was copied completely.
- You selected the correct Shopify store.
- The MCP connection is still active.
- The AI tool has permission to call the required tools.
- Your account has not reached its usage limit.
- Your GemPages plan allows the requested action.
In Claude, repeated permission requests may also make the workflow appear to stop. Open Tool permissions and set the required GemCommerce MCP actions to Always allow.
9. Can I Connect More Than One Shopify Store?
You must choose the target Shopify store during the connection process.
When your account has access to several stores, check the selected store before copying and running the MCP connection prompt. This helps prevent the AI from researching or creating a page for the wrong store.


Thank you for your comments