


Before you start
1. Plan required
Schedule Publish is available on the Optimize plan or higher. If you’re on Free or Build, you’ll need to upgrade before you can create a schedule.
2. What you can schedule
- Page templates: Homepage, Product page, Collection page, Article page, Landing page
- Theme sections (sections that appear across multiple pages)
How to Schedule Publish a Page
Step 1: Open the page template
Open the page template you want to schedule inside the Web Builder editor.
You can schedule homepage templates, product pages, collection pages, article pages, and landing pages.
Step 2: Open Schedule Publish
In the top-right corner of the editor, click the Settings icon and select Schedule Publish.
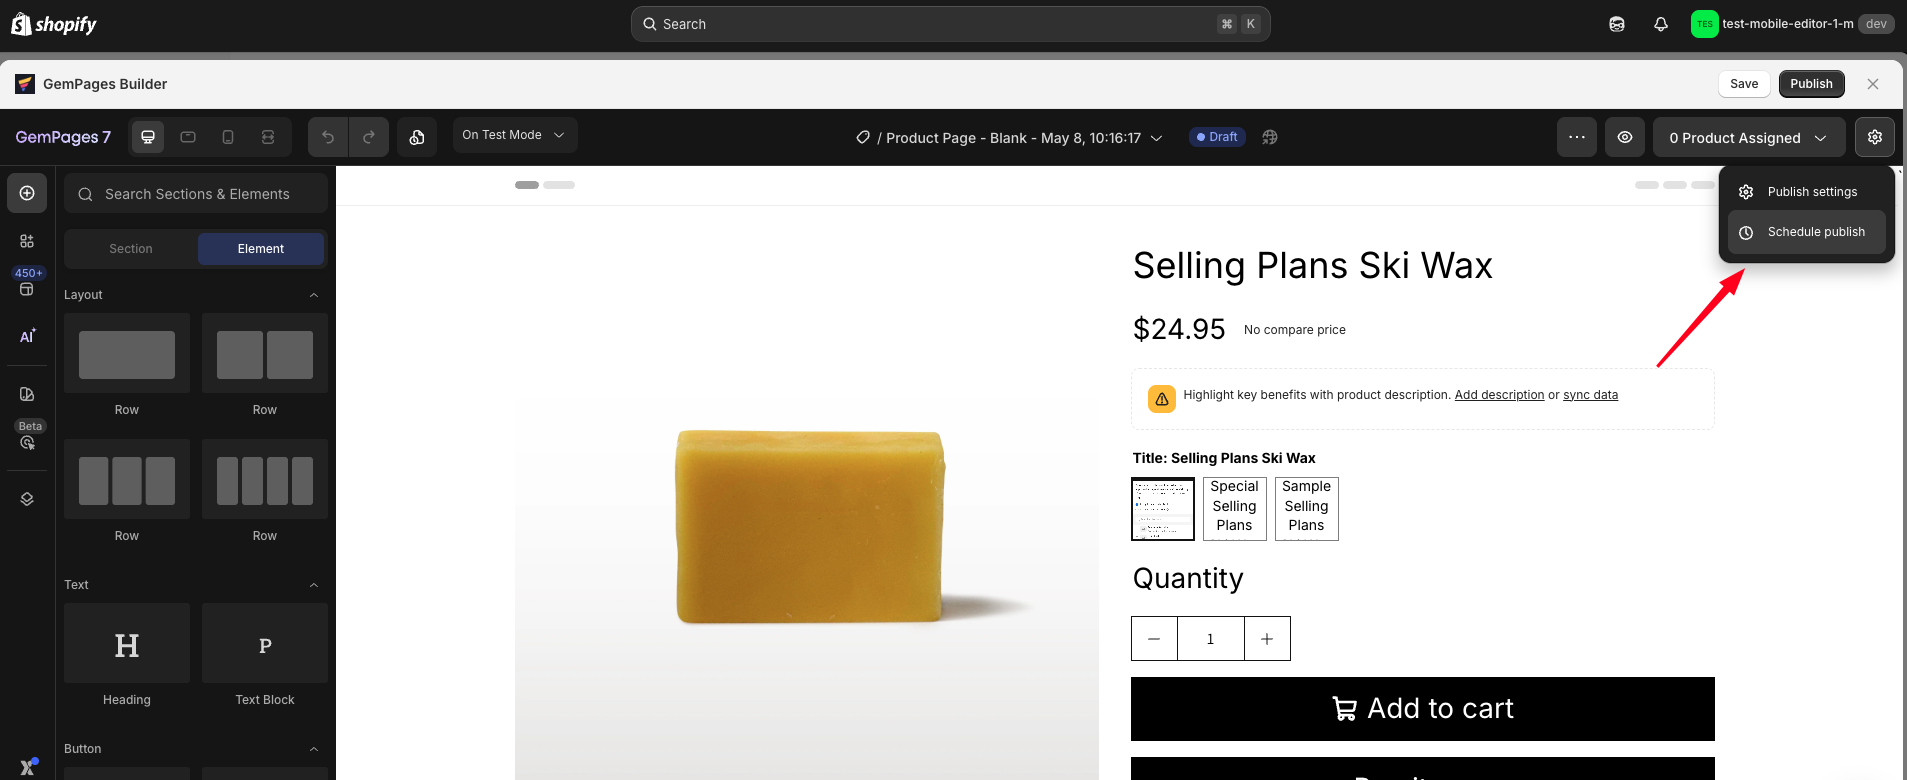
Step 3: Select the publish time
Choose the date, time, and timezone for the scheduled publish.
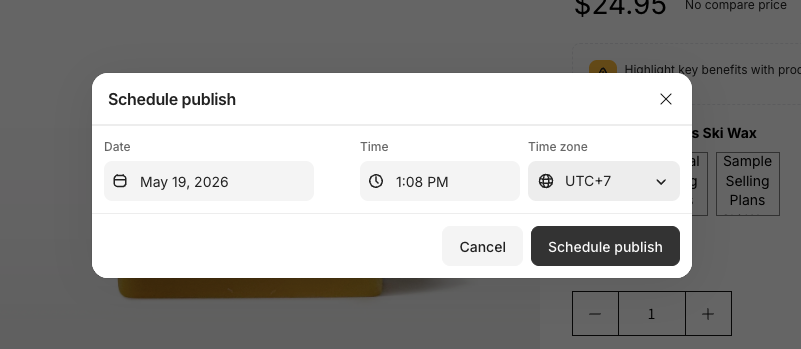
Please note that the selected time must always be in the future.
Step 4: Confirm the schedule
Confirm to create the schedule.
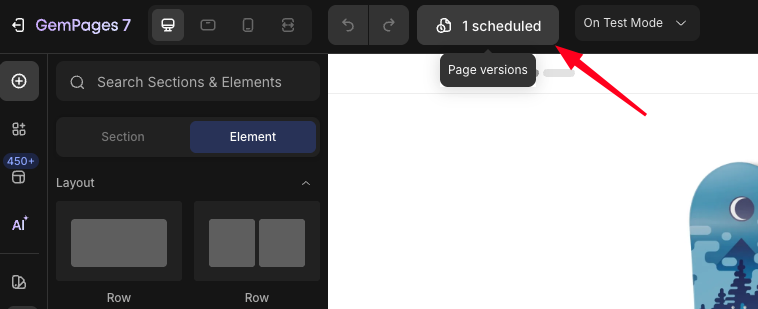
After the schedule is created:
- A scheduled version is automatically generated
- The schedule status becomes Scheduled
- You can preview the scheduled version before it goes live
Note on page-type specific behavior:
- Homepage template: When you create the schedule, you’ll see a notice that this template will be set as the default homepage when it publishes. There’s no separate setting to configure, it happens automatically at publish time.
- Product page / Collection page template: You don’t need to assign products or collections when creating the schedule. At the moment of publishing, the scheduled version automatically takes over whatever assignment your current page has (default template, or specific products/collections it’s assigned to).
- Article page / Landing page: Standard scheduling, no extra configuration needed.
How to Schedule a Theme Section
Theme Sections are reusable sections that can appear across multiple pages in your storefront.
When a scheduled theme section update goes live, every page using that section is updated automatically.
Step 1: Open the theme section
Open the theme section inside the Web Builder editor.
Step 2: Click Schedule Update
Click the Schedule Update button.
Step 3: Choose the publish time
Select the date, time, and timezone for the scheduled update.
Please note that the selected time must be in the future.
Step 4: Confirm the schedule
Confirm to create the schedule.
Once the scheduled time arrives, the updated section automatically appears across all pages using that theme section.
Important notes about scheduling:
- The schedule time must be in the future.
- You can’t create two schedules for the same page at the exact same time.
- You can’t create a schedule if another action (publish, unpublish, or another schedule) is currently being processed on the same page. Wait a moment and try again.
- You can create multiple schedules for the same page, as long as their times don’t conflict.
- You’ll receive an email notification confirming whether the publish succeeded or failed.
How to Manage Scheduled Publishes
You can manage scheduled publishes from several locations inside GemPages.
Method 1: Manage schedules from the Page Listing
Pages with scheduled publishes display a status tag such as Scheduled or Failed.
To view all schedules related to a page:
Step 1: Open the Page Listing dashboard. Go to your page dashboard inside GemPages.
Step 2: Find the scheduled page. Pages with schedules display a status tag.
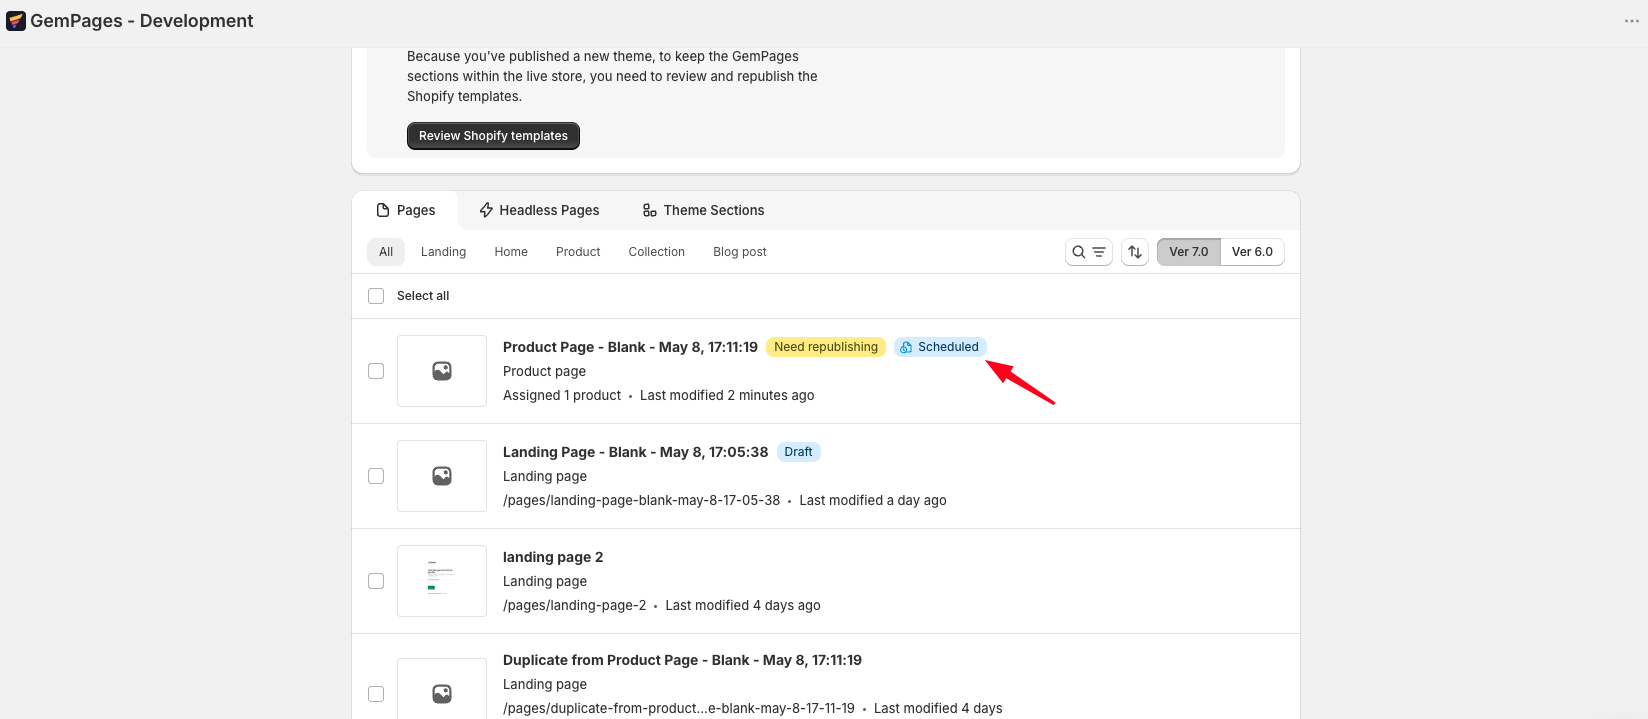
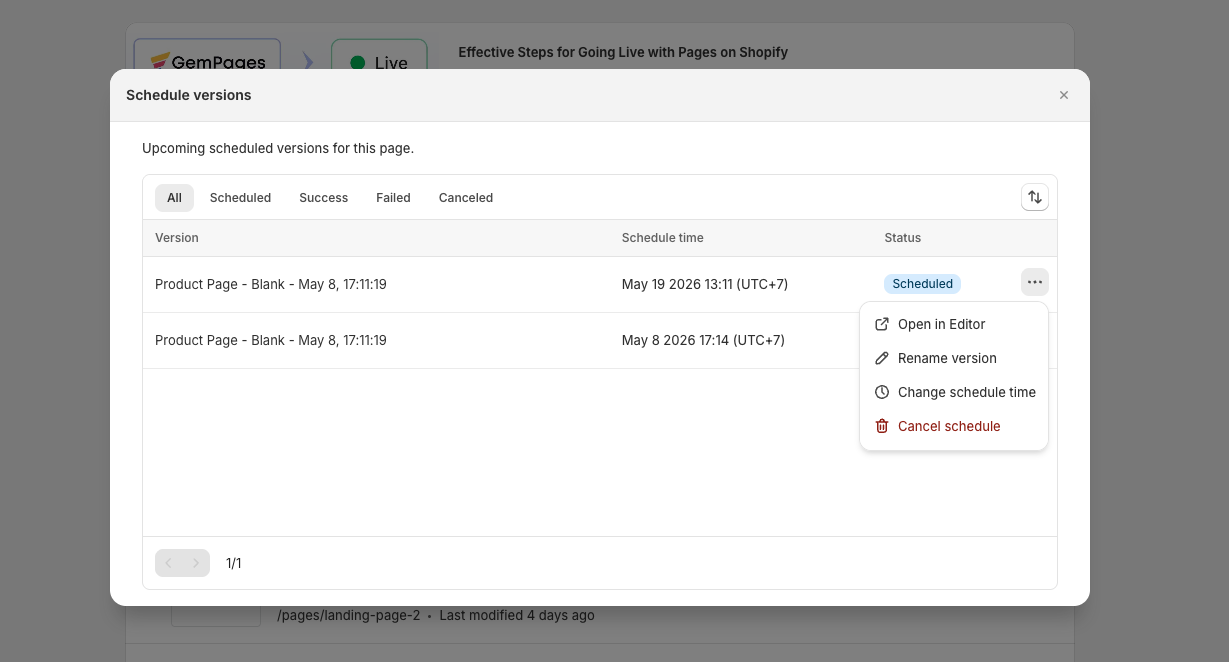
Step 3: Click Schedule Versions to see all scheduled versions related to that page.
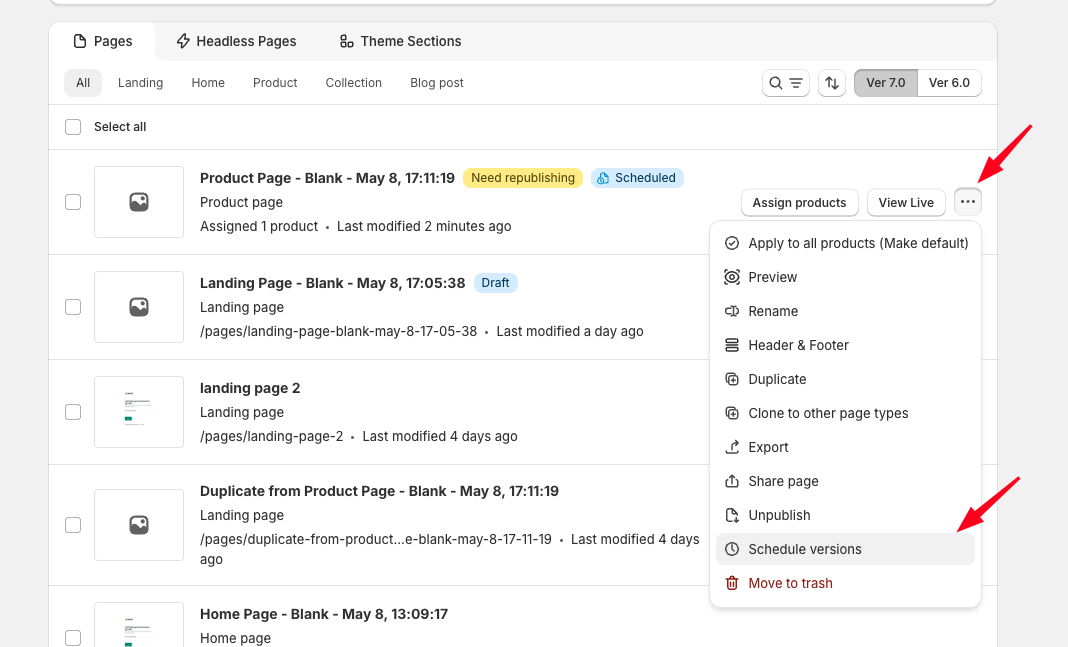
- Version name (which you can rename)
- Scheduled date and time, shown in the timezone you selected when creating it
- Status (Scheduled / Success / Failed / Cancelled)
- View in Editor
Method 2: Manage schedules from inside the editor
You can also manage schedules directly while editing a page.
Step 1: Open the page template inside the editor.
Step 2: Click Schedule Versions to view all scheduled versions for that page.
Method 3: Manage schedules from the Schedule Management page
The Schedule Management page provides a centralized view of all scheduled publishes across your store.
Step 1: Go to: Preferences → Schedule Publish
Step 2: View and manage schedules
From this page, you can:
- Filter schedules by status
- Filter schedules by date range
- View schedule details
- Rename scheduled versions
- Change scheduled publish times
- Cancel schedules
- Open preview links
This is especially useful when managing multiple campaigns or coordinated storefront updates.
What Happens If a Schedule Fails?
GemPages automatically performs several checks to reduce the chance of publish failures.
This includes verifying page compatibility with Shopify when the schedule is created and retrying publish attempts if temporary issues occur.
However, schedules can still fail in rare situations, including:
- Paused Shopify stores
- Temporary Shopify connection issues
- Corrupted theme files
- Shopify theme size limits
- Duplicate page handles already being used
If a schedule fails:
- Its status changes to Failed
- You’ll receive an email notification
- The scheduled version remains available inside your Schedule Version List
How to Handle Failed Schedules
If a scheduled publish fails, you can either cancel the schedule or restore the failed version into a new editable version.
Option 1: Cancel the failed schedule
Cancel the schedule if you no longer need it.
Option 2: Restore the scheduled version
Step 1: Open the failed version from the Schedule Version List or Schedule Management page.
Step 2: Restore the failed version into a new editable version.
Step 3: Fix and publish
After restoring, you can:
- Fix any issues
- Publish immediately
- Create a new schedule for another time
Please note that failed schedules do not retry automatically later, even if the original issue has been resolved.
Frequently Asked Questions
1. Can I create multiple schedules for the same page?
Yes. You can create multiple schedules for the same page as long as no two schedules use the exact same publish time.
2. Can I edit the content of a scheduled version after creating it?
You can directly rename a scheduled version or change its scheduled publish time.
To edit the actual content:
- Restore the scheduled version
- Edit the restored version
- Publish it immediately or create a new schedule
The original scheduled version remains active unless manually cancelled.
3. Which timezone is used for scheduled publishes?
The timezone selected during schedule creation is used throughout the scheduling flow and displayed alongside the scheduled publish time inside the app.
4. Do scheduled versions count toward the protected version limit?
No. Scheduled versions are stored separately and do not count toward your protected version limit.
5. Can I preview a scheduled version before it goes live?
Yes. Every scheduled version includes a preview link accessible from both the Schedule Version List and the Schedule Management page.
6. Can I schedule a page update and a theme section update to go live together?
Yes. You can schedule both for the same date and time.
Please note that pages always display the latest published version of any theme section they contain. If you want a specific theme section version to appear together with a scheduled page version, the section must also be published or scheduled for that same time.


Thank you for your comments